Clicking on the Wi-Fi icon on the taskbar in Windows 10 should show you the list of available Wi-Fi networks that you can connect to. If you’re sure that there are networks available, but Windows isn’t showing you any, it means that there is an issue. Try out the methods listed below one by one, to fix your issue in a matter of seconds.
Method 1: Re-Enable Network Adapter Driver From Device Manager
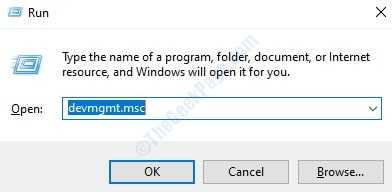
1. Open the Run Window by pressing the keys WIN+R together. When it opens up, type in devmgmt.msc and then press Enter key.
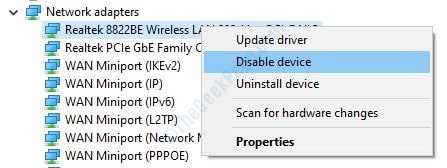
2. When the Device Manager window opens up, scroll down and find the section named Network adapters. Find your Wi-Fi adapter from the list and then right click on it to view its right click context menu. Now click on Disable device option.
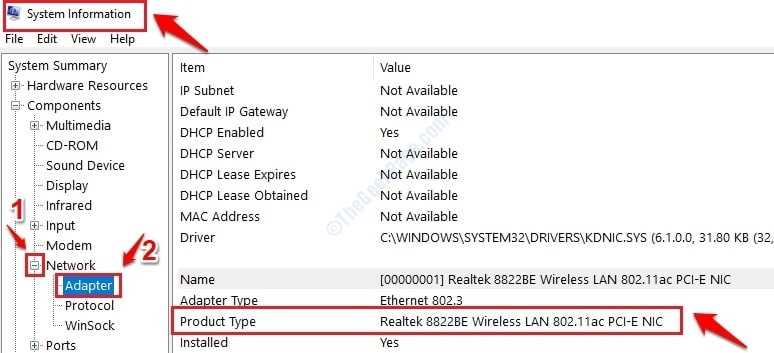
If you’re not sure which one is your Network adapter, please type in System Information in your Windows Start Menu Search bar and then choose System Information App from the results. When it opens up, in the left window pane, under Components section, expand the section named Network. Under Network, click on Adapter option as shown below. Now in the right Window pane, you will be able to see the network adapter that your PC is using. This is the one that you need to disable and enable.
3. After you click on the Disable device option, you will now get a disable confirmation window like the one shown below. Click on Yes button.
4. The Wi-Fi icon on the Taskbar will now be disabled and you might get a notification that says Not connected – No connections available.
5. Now let’s re-enable the network adapter. For that, right click on the same network adapter that you disabled before and then click on Enable device option.
6. That’s it. Your Wi-Fi adapter should now be up and running and you should be able to see the list of available networks now, if the issue was with your network adapter. You can also try clicking on the Update driver option if re-enabling the driver method didn’t work for you. Please try out the other methods listed if this method did not work for you.
Method 2: Turn on Network Discovery From Windows Settings
1. First of all, we need to open the Windows Settings window. For that, press WIN+I keys together. Once the Settings window opens up, click on the tab Network & Internet.
2. Under Network & Internet, click on the option Wi-Fi. Now in the right window pane, scroll down and find the section named Related settings. Under Related settings, click on the link that says Change advanced sharing options.
3. In the Advanced sharing settings window, expand the section Private and then click on the radio button Turn on network discovery.
4. Likewise, expand the section Public, and click on the radio button Turn on network discovery here as well. Once you are all done, hit the Save changes button.
Method 3: Turn on Network Discovery From Elevated Command Prompt
In the previous method, we turned on network discovery for Public and Private profiles through Windows Settings. In this method, we are going to do this through elevated command prompt for all the network profiles present in your system.
1. Type in cmd on Windows Start Menu Search bar and from the results, right click on Command Prompt and then click on Run as administrator to open the command prompt in elevated mode.
2. Copy paste the following command and hit Enter key. Once you are done, close the command prompt and check if your problem is gone.
netsh advfirewall firewall set rule group="Network Discovery" new enable=Yes
Method 4: Delete Outdated VPN Entries
Sometimes, outdated Virtual Private Network(VPN) entries present in your Windows Registry could block the available networks discovery in Windows. Deleting these outdated entries might solve your problem. But before proceeding with editing Windows Registry entries, make sure you take a backup of the Registry, as a corrupted Registry can break your system.
1. Open Command Prompt in administrator mode. For that, type cmd in Windows Start Menu Search bar and then from the results, right click on Command Prompt and then click on Run as administrator.
2. When cmd opens up in admin mode, key in the command netcfg -s n and then press the Enter key.
netcfg -s n
This command will list all the Network Adapters, Network Protocols, Network Services and Network Clients present in your system. Look for the entry DNI_DNE in this list, as it belongs to an outdated Cisco VPN client and has to be deleted if present.
3. If DNI_DNE entry is present in the list, then copy paste the below command into your cmd next and hit Enter key. This is the command that deletes the value from Windows Registry. If there is no DNI_DNE in the Registry, you will be notified of that as well.
reg delete HKCR\CLSID\{988248f3-a1ad-49bf-9170-676cbbc36ba3} /va /f
4. Finally, run the following command to uninstall DNI_DNE if it is already installed.
netcfg -v -u dni_dne
If an outdated VPN entry was present in your Windows Registry, then it would be deleted by now and your network issue should now be fixed. Try restarting your PC and check if the issue is still present.
Method 5: Configure Services Correctly
1. Open Run window by pressing WIN+R keys together and then type in services.msc. Hit OK button.
2. From the list of services, scroll down and find the service named Network Location Awareness. Double click on it to open its properties.
When the properties window opens up, make sure the Startup type: is set to Automatic. If not, click on the drop down menu and then choose Automatic. Also, make sure that the Service status: is in Running state. If it is not in Running state, click on the Start button as shown below. Once done, hit Apply and Ok buttons.
3. As next, from the list of services, locate and double click on the service named Network List Service. Make sure its Startup type: is set to Manual. Also, make sure that the Service Status: is Running.
4. Likewise, check the below services are Running and their Startup types are correctly set just like in the above 2 services:
Windows Event Log – Automatic
Windows Update – Manual
WLAN AutoConfig – Automatic
5. Once you are done verifying all the 5 service configurations listed in steps 2, 3 and 4, you can close the Services console and then try checking if your issue is resolved or not.
Method 6: Unblock Blocked SSIDs Using Netsh Command from CMD
Sometimes, in the past, you might have blocked certain SSIDs using the netsh command. If that is the case, those network names will not appear when you click on your Wi-Fi icon. This might be the reason why you’re unable to view the available Wi-Fi networks now. If that is the case, please follow the below steps to unblock the blocked SSIDs.
1. Open cmd in admin mode. For that, type in cmd in windows Start Menu Search bar and hit Enter. Right click on Command Prompt and then click on Run as administrator option.
2. When cmd opens in admin mode, copy-paste the following command and hit Enter key to view all the SSIDs that are blocked in your system.
netsh wlan show filters
3. Now let’s unblock the SSIDs that are in the blocked list. For that, type in the following command on cmd and hit Enter key.
netsh wlan delete filter permission=block ssid="NAME OF SSID THAT IS IN BLOCK LIST" networktype=infrastructure
If you execute the netsh wlan show filters command again, you can see that the SSID that was blocked earlier is now removed from the block list. If there are more SSIDs that are blocked, you can unblock them all using the netsh delete filter command.
Method 7: Manually Connect to a Wi-Fi Network
If none of the above methods are working for you and if you know the name(SSID) of the Wi-Fi network that you want to connect to, but is not appearing in the list, then you can try to manually add this network, enter the password and connect to it. You can find the steps to do that here.
Hope you found fix a for your problem from this article.


