Are you seeing a ‘DRIVER VERIFIER IOMANAGER VIOLATION’ error code while your machine dives into BSOD? If you are facing this issue on your computer repeatedly, then follow these easy fixes on your computer. This problem occurs due to the display driver on your computer.
Requirements-
a. At first shut down your device.
b. Then, simply press the power button to boot up your system.
c. As soon as your system boots up, as soon as you have seen the manufacturer’s logo, press and hold the power button until your system shuts down again.
d. Carry on these steps 2-3 more times and it will automatically reach the startup repair screen.
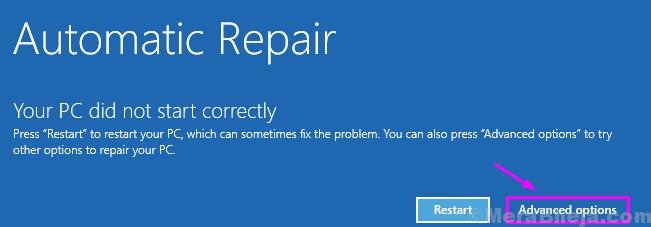
Next time once your computer boots up, you will be in Automatic Repair mode.

Fix 1 – Update graphics driver
This problem is caused by a faulty graphics driver. Installing the latest update may solve this issue.
1. Acess the Automatic Repair mode.
2. After that you need to click on the “Advanced options“.

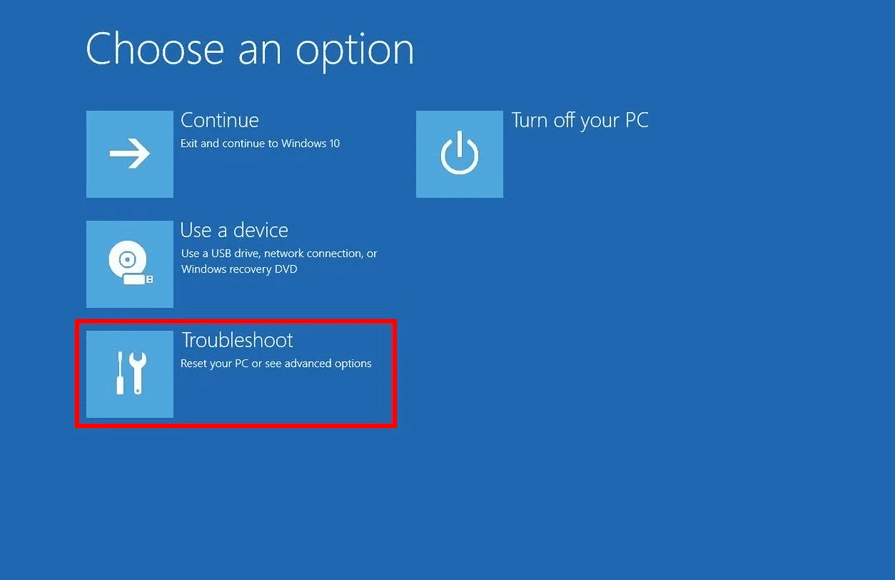
3. On the next screen you need to click on “Troubleshoot“.

4. When the Troubleshoot window prevails, simply need to click on “Advanced options“.

5. Next, click on the “Startup Settings“.

6. Simply, click on “Restart” on the bottom-left corner of the corner.

7. You need to press the ‘F5‘ key to “Enable Safe mode with Networking“.
As soon as you press that key, your system will boot into safe mode.

[Safe mode should have a black desktop with ‘Safe Mode’ written at four corners of the desktop.]
8. When your computer boots into Safe mode, right-click on the Windows icon.
9. Then, you have to click on the “Device Manager“.

10. Click on the drop-down list of the “Display adapters“.
11. Then click on “Update driver“.

12. To let Windows search the driver itself, click on “Search automatically for updated driver“.

Now just wait for Windows to download and install the latest graphics driver.
This should fix your problem.
Fix 2 – Update BIOS firmware
1. Simply shutdown your computer.
2. Again boot it up. When your computer is starting up, you need to press the “Delete“* key from your keyboard to open the bios setup on your computer.
* NOTE-The particular key may vary from manufacturer to manufacturer. These are the variety of keys-
Esc, F1, F2, F10, F11, F12 or Delete

3. When the BIOS setup opens up, go to the “Advanced” settings.
4. Change the BIOS settings on your computer. Try to set the SATA controller to AHCI.

5. Again, press the key that is associated with to save the settings.
[It is the “F10” key for this computer.]

6. Click on “Yes” to save the settings.

Check if this one works for you.
Fix 3 – Unplug additional adapters
Sometimes optional attachments (such as USB devices, external HDD)that are attached to your computers may cause this issue on your machine.
1. Simply Unplug any unnecessary USB devices, external HDDs, Wireless/ Bluetooth adapter from the system.
2. Reboot your system and check if this works.
Fix 4 – Use DDU for a clean install
Display Driver Uninstaller is an amazing tool that removes the existing graphics driver completely. We have explained how to use it-
Level 1 – Download DDU and SWITCH oFF THE automatic update
1. At first, download DDU.zip on your computer and after downloading it, unzip the contents in a location of your choice.
Remember the location where you have extracted this zip file.

2. Now, press Windows Key+R to launch Run, and
3. Then write “control printers“. After that, click on “OK“.

Device and Printers window will be opened.
4. Simply right-click on your computer name and click on “Device installation settings“.

5. Then, click on the radio box “No (your device might not work as“ expected)” option.
6. Click on “Save Changes“.

7. Search “Nvidia drivers” from your browser and click on “Download Drivers|NVIDIA“.

8. Input appropriate information in the appropriate sections (like ‘Product type’, your ‘Operating System’, etc).
9. Then, click on the “Search” to search for the latest driver.

10. After that, click on “Download” to download the driver on your system.
Do remember where you are saving the installer on your computer.

Close the browser window after downloading the driver.
Level 2 – Boot into Safe Mode and uninstall the graphics driver
1. At first, press the Windows Icon+I keys and click on “Update and Security“.

2. After that, click on “Recovery“,
3. Then, under ‘Advanced Startup’, click on “Restart Now“.

4. Once your computer restarts into Windows Recovery Environment, simply click on “Advanced options“.

5. Then you have to click on the “Startup Settings“.

6. Now, click on “Restart“.

7. You have to press F4 to “Enable Safe Mode“.

Now, you will boot into the safe mode.
8. Then, navigate to the file location where you have extracted the DDU.zip.
9. After that, double click on “DDU v18.1.0.9” to extract the main files.
10. You have to go to the extracted folder, and then double click on the “Display Driver Installer“.

11. Now, in the Display Driver Uninstaller window, on the left-hand side, click on the drop-down beside “Select device type” and click “GPU”
12. Here you have to finally click on “Clean and Restart“.

NVIDIA drivers will be uninstalled from your system and the system will be booted to normal mode again.
Level 3 – Install the graphics driver manually
Once your computer restarts, follow these easy instructions to solve the problem.
1. Go to the location where the driver is on your computer.
2. You have to double click on the offline installer to launch it.
![]()
3. When the NVIDIA Graphics Driver window appears, click on “NVIDIA Graphics Driver and GeForce Experience”
4. After that, Click on “Agree and continue“.

5. Click on the radio button beside the “Custom installation“.
6. Click on “Next” to proceed further to the installation process.

7. At last, check the “Perform a clean installation” box
8. A click on “Next” and the installation process will start.

9. Once the installation is done, click on “Close” to close the NVIDIA Graphics Driver Installer window.

Restart your computer to let the installation process complete.
LEVEL 4 – ENABLE AUTOMATIC UPDATES
You have to enable the automatic update you disabled earlier.
1. Once you have rebooted your device, right-click on the Windows icon and click on “Run“.
2. Type this code and click on “OK”.
control printers

3. In the Devices and Printers window, right-click on your computer and click on “Device installation settings“.

4. This time you need to choose “Yes (recommended)” and then click on “Save Changes“.

This should have fixed your issue with the graphics driver.
Fix 5 – Use System Restore
You can put your computer to the latest restore point on your computer.
1. In the Automatic Repair settings window, click on “Advanced options“.

2. Your computer will be booted into Windows RE mode. In the Choose an option‘ window, you have to click on “Troubleshoot“.

3. In the Troubleshooting window, click on “Advanced options“.

4. In the Advanced options window, click on “System Restore” to start the system restore process on your computer.

Now, system restore will put your computer in a correct form.
5. In the System Restore screen, click on “Next“.

6. Choose the restore point from the list of the restore points and then click on “Next“.

7. Click on “Finish” to finish the process.
This will restore your computer back to the state when it was working perfectly.
Wait patiently as this process will take some time.