Many users prefer making changes to their Windows OS using the Registry editor that allows you to view, create, and change the registry keys and values in it. The Registry Editor is basically a tool to make numerous tweaks to the Windows registry to customize Windows settings as per your needs.
While you can make changes to the Windows registry using the Registry Editor, it’s not suggested to do so as any incorrect modifications can end up damaging your system. It’s recommended to make changes only when urgent, however, even then, you must ensure to create a backup of your registry first. Doing this will ensure that even if you end up losing any data, you can restore it immediately.
Let’s see how to backup your registry and restore data in your Windows 10 and Windows 11 PC.
How to Create a Backup of your Registry
Step 1: Go to the File tab on the upper left and select Export from the context menu.

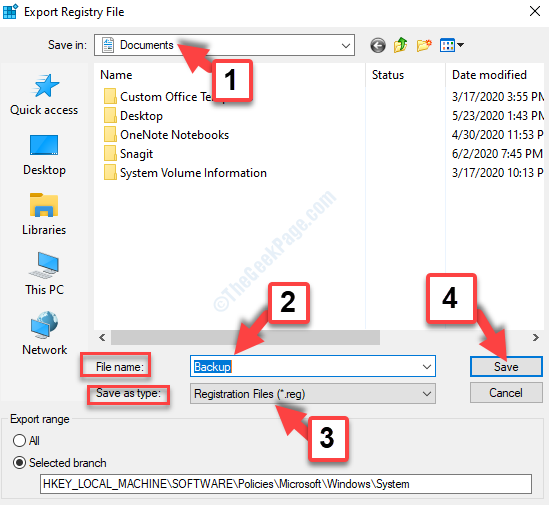
Step 2: Now, in the Export Registry File window, select the location where you want to create the Backup file. For instance, we selected the Documents location. You can select any location of your choice.
Now, go to the File Name field and name it anything as per your requirement. We named it as Backup.
Select the Save as type field as Registration Files (*.reg). Click on Save.

You have successfully created a backup file for your Windows registry. If in any case you have lost any data, you can restore the registry data using the method as shown below.
How to Restore the Registry Data Backup
Step 1: Go to the File tab on the upper left of the Registry Editor window, and click on Import in the context menu.

Step 2: In the Import Registry File window that opens, select the Backup file and click on Open at the bottom.

Step 3: Now, click on Yes in the prompt to continue with the registry data backup import process.

That’s about it. You have successfully restored any lost data for the registry.