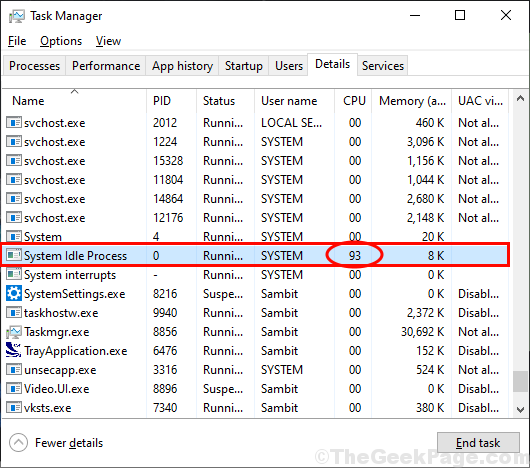
Is your computer keep stalling or freezing because of 99% CPU usage? It may be happening because of some particular application is consuming a huge chuck of the processing power in the background. After receiving recent updates, many users are accusing System Idle Process as the main culprit for this problem. System Idle Process runs on your CPU thread when no other task is running. It usually has a lower priority and should consume a lot less amount of CPU power of your system. But due to some bugs it is behaving abnormally. Attempt these fixes on your computer and the problem should be fixed in no time. But, before going ahead for the main solutions we suggest to go for this workarounds at first to try out some simpler solution for your problem.

NOTE-
System Idle Process mainly runs when no other heavy task is going on your computer, i.e. your computer is in idle state. The consumption of 80-90% of the processing power by System Idle Process usually means that system is at rest and 80-90% of the free processing power is available. But when you are trying to run an application, System Idle Process usually stalls and the application consumes the high amount of processing power. This is just a regular process. But, if you are seeing that the System Idle Process is consuming unnecessary processing power and stalling your computer, go for these solutions.
Create a System Restore point on your system. In case anything goes wrong, you can restore the files and settings of your computer very easily.
Initial Workarounds–
1. If this problem is happening for the first time on your computer, a simple reboot may solve your problem.
2. Check if your Windows is updated or not. If this problem is triggered due to a bug or some corrupted system files, Windows Update delivers the bug fix for your system. After updating your Windows, check if the problem still persists or not.
If any of these workarounds didn’t work out for you, go for these fixes-
Fix-1 Clean Boot your computer-
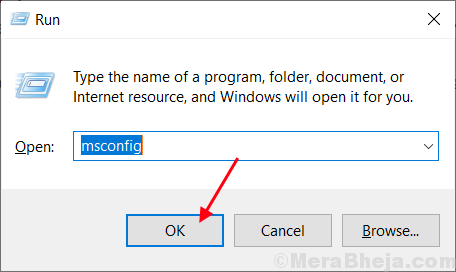
1. Press Windows Key+R to launch Run. Now, type “msconfig” and then click on “OK“. System Configuration window will be opened.

2. Now, in System Configuration window, click on “General” tab and then uncheck the box beside the “Load startup items“. After that, make sure the “Load system services” option is checked.

3.Now, click on the “Services” tab. After that, check the “Hide all Microsoft services” and then click on”Disable all” on System Configuration window. Now, click on “Apply” and “OK” to save the changes on your computer.

4. Reboot your computer.
Upon clean booting, your computer will booted with only necessary drivers for your device. So, after rebooting check if the System Idle Process is still having a high CPU usage or not.
Fix- 2 Disable Startup processes-
Disabling startup of unnecessary applications on your computer can solve this problem.
1. Press Ctrl+Shift+Enter to open the Task Manager window. In Task Manager, go to the “Startup” tab.

2. Now, repeat the same step for any unnecessary application you will notice in the same window. Close Task Manager window.
Reboot your computer and after rebooting check if System Idle Process is still having a high CPU usage or not.
Fix- 3 Run .bat file
1 -Open Notepad
2 – Copy and paste the code given below in notepad
PowerCfg /SETACVALUEINDEX SCHEME_CURRENT SUB_PROCESSOR IDLEDISABLE 000

PowerCfg /SETACTIVE SCHEME_CURRENT

PowerCfg /SETDCVALUEINDEX SCHEME_CURRENT SUB_PROCESSOR IDLEDISABLE 000

PowerCfg /SETACTIVE SCHEME_CURRENT
3 – Now, save this file as scheme.bat
Choose All files in Save as type
4 -Click save.

5 – Right click on scheme.bat file and run as admin.
Fix-4 Clean the disk with Disk Cleanup-
Running Disk Cleanup will empty temporary files and corrupted files from your system. This may solve your problem-
1. Press Windows+R to launch Run. Now, copy-paste this command “cleanmgr /lowdisk” in Run and hit Enter. Disk Cleanup window will be opened.

2. In Disk Cleanup: Drive Selection window, from the option “Drives:“, select the drive where you have installed Windows.

3. Now, in the “Files to delete:” option, check every options in the list. Then, click on “OK” to start the cleanup process on your computer.

Disk Cleanup process will take a few minutes to clean up the junk file from your system.
After the cleanup process is completed, reboot your computer. After rebooting, check if System Idle Process is still consuming huge amount of the processing power or not.
If you want to have a deep look into the disk cleanup methods, you can go through this article.
Fix-5 Run Disk Fragmentation-
1. Press Windows key+E to open File Explorer window. Now, on the left pane you should notice the list of drives on your computer. Right click on the drive where Windows 10 is installed, and then click on “Properties“.

2. In Local disk C: Properties window, go to the “Tools” tab and then in ‘Optimize and defragment drive’ option, click on “Optimize” to optimize the drive.

3. In Optimize Drive window, select the drive where Windows is installed, and then click on “Analyze” to run an analysis over the drive. Click on “Optimize” to the drive on your computer.

After defragmenting the drive, close the Optimize Drives window on your computer.
NOTE–
Depending upon the disk size, defragmentation process may take a while.
Reboot your computer to save the changes. After restarting your computer check if System Idle Process is still consuming high CPU power or not.
If you want to know more about the processes of disk defragmentation, you can read Windows 10 defragmentation step-by-step process.
Fix-6 Update USB drivers on your computer-
Updating the USB drivers on your computer may fix your problem. Follow these steps to update the driver on your computer-
1. Press Windows key+R to launch Run. Now, type “devmgmt.msc” and hit Enter. Device Manager window will be opened.

2. In Device Manager window, expand “Universal Serial Bus controllers” and then right click on the first usb driver and click on “Update driver“.

3. Now, click on “Search automatically for updated driver software“.

Wait for a while, as Windows will find the latest driver for your computer and install it.
4. If you see a prompt saying the “Best driver for your device are already installed” click on “Search for updated drivers on Windows Update“.

The latest driver of the device is going to be installed along with the Windows Update.
5. Repeat this step-2 to step-4 again for the other drivers of “Universal Serial Bus controllers“.

After the upgradation process is complete, reboot your computer. After rebooting check if System Idle Process is still consuming a huge amount of processing power or not.
Fix-7 Run Driver Verifier on your computer-
If this problem is happening due to any driver, Driver Verifier is able to identify and fix the driver problem on your computer.
Before moving ahead, you need to enable the minidump (DMP) files. Follow these steps to create minidump files.
1. Press Windows key+R to launch Run, and then type “sysdm.cpl” and hit Enter.System Properties window will be opened.

2. In System Properties window, go to the “Advanced” tab. Under, Startup and Recovery option, click on “Settings“.

3. In Startup and Recovery window, uncheck the “Automatically restart” option and then under ‘Write debugging information‘ section, click on drop-down “Small memory dump (256 KB)” option.
Now, copy and paste “%SystemRoot%\Minidump” in ‘Small dump directory:‘ section. Now, click on “OK” to save the changes.

4. Restart your computer.
After rebooting your computer, Run Driver Verifier on your computer and your problem should be the solved.