With the release of Window 10 there came an endless problem associated with it. Whenever the user on Window 10 is struck with any problems they are always suggested to update the driver. The user without any further delay tries to update it without knowing the fact whether it is actually causing an issue. In such cases, finding the main reason behind the issue can help the user to fix it to a certain extent. The main reason writing for writing this post is to help the user to identify if a driver causing issue in Window 10
The utility Driver Verifier monitors Window kernel mode and Graphic driver. It is included in every version of window since 2000.It is used to detect and troubleshoot many driver issues that are known to cause system failure, corruption or any other unpredictable behavior.
With the help of the driver Verifier the user can check and identify whether the driver is causing issue in the window 10 system.
NOTE: The user should backup all the important data and files. He should only Run Driver verifier on test computer or on the computer that he is testing and debugging.
The following are the steps to follow:
How to Identify if a Driver is Causing Issues in Windows 10
STEP 1: Click on the start button and type “verifier” in the search panel and press enter.
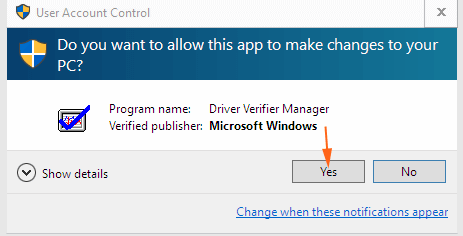
STEP 2: A confirmation message will appear on the screen!
“Do you want to allow this app to make change to your PC”?
Press yes!

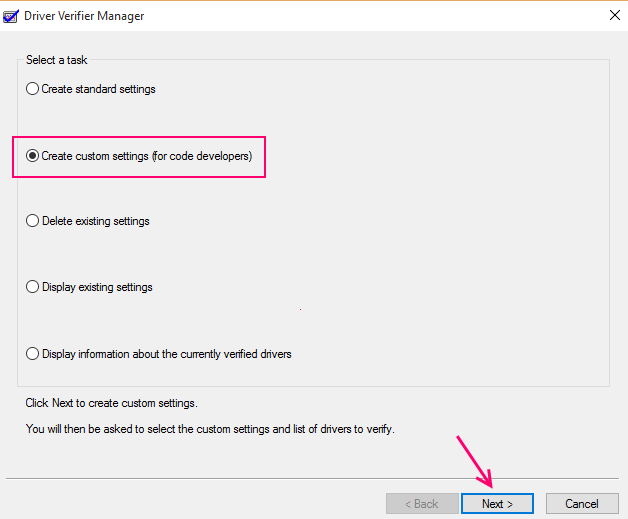
STEP 3: A Driver Verifier manager window will appear on the screen. Click on the box which show the statement
“Create custom setting for code developer”
Click next!

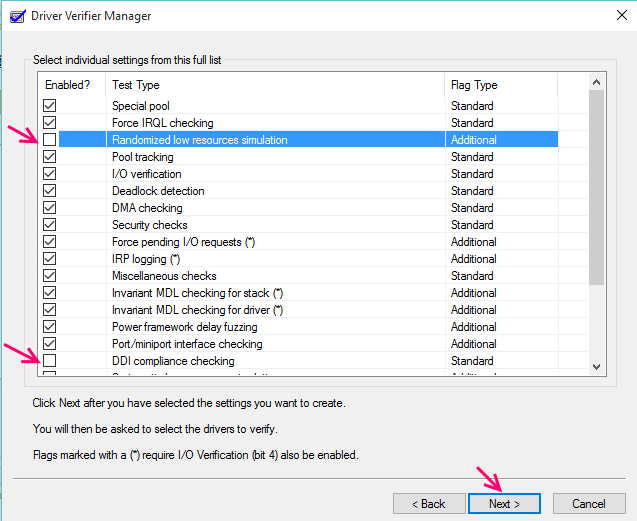
STEP 4: A new dialog box will appear on the screen. It will consist of various individual setting . Check all the options leaving only two options named as Randomized low resource simulation and DDI Compliance which are shown in the list and proceed to next!

STEP 5: Click the radio box on the Driver verifier window stating,” Select driver name from a list”
Press next!

STEP 6: It will take some time to scan all the details. A dialog box will appear on the screen which consist of large list of drivers name.
Tick on all the boxes where Microsoft corporation is not written that means choose all those drivers which are not provided by the Microsoft and hit the finish button.

STEP 7: A new dialog box will appear on the screen asking the user to restart the computer!
The message says, “You must restart this computer for the changes to take effect”
Press yes!
STEP 8:The window 10 system restarts and a blue screen appears, Click continue to start the computer with the normal mode
If the trouble shoot interface comes up then press “continue” and if it continues to comes up again and again then press “reset” and refresh the computer so that the files remain safe
STEP 9: When the desktop screen appears on the screen click the start button and write the command in elevated command prompt.
“verifie/querysetting “
Press enter!
STEP 10: The Driver checking has started and It will take around 36 hours to check all the drivers which the user has selected is working correctly or not and therefore it will help the user to identify if a driver is causing problems in the window 10 system. There might be chances that the system crashes, here the user should need to press continue!
STEP 11: If the system crashes very frequently then boot the computer in safe mode and enter the command to stop verifier.
“verifier/reset”