Is your computer lagging or showing signs “Not responding” while you are running any Microsoft Office apps? “Microsoft Office Click to Run” can be the reason as sometimes, faulty process threads can consume a lot of hardware resources on your computer. Microsoft Office Click to Run or OfficeC2Rclient.exe is a native background process that maintains the Office applications. But, it normally takes a miniscule amount of the processing power while working in the background. So, if the OfficeC2RClient is showing 70-80% usage of RAM/CPU in the Task Manager.
Fix 1 – Delete Office files and re-enable OfficeC2R Client
You have to put a stop on the running Office Click to Run services and clear the Office File cache folder and re-enable the service.
STEP 1
Step 1 – At first, you need to open a Run panel. Just use the Windows and R keys together.
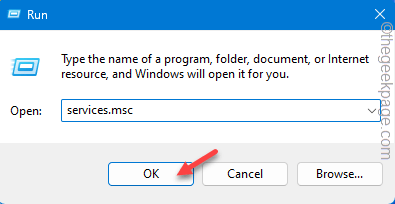
Step 2 – You have to open the Services. To do that, type “services.msc” and click “OK“.
Step 3 – After loading up the Services, scroll down to find “Microsoft Office Click-to-Run Service“. You can access that just by double-tapping it once.
Step 4 – If you see the ClickToRunSvc is already running, use the “Stop” service to halt it.
Step 5 – Just set the “Startup type:” to “Disabled” so that Windows doesn’t auto start the service.
Step 6 – After this, once click “Apply” and then tap the “OK” option.
Quit the Services window and restart your PC/laptop. Restarting the device is a must.
STEP 2
Now, you can delete all these locally stored files from your system.
Step 1 – Open the Run box, using the Win+R keys at once.
Step 2 – Then, paste this and hit the Enter key.
control folders
Step 3 – Switch to the “View” tab.
Step 4 – Make sure to set the “Show hidden files, folders, or drives“.
Step 5 – Use the “Apply” and “OK” so that you can view the hidden folders.
Step 6 – First of all, open the File Explorer, follow this path –
C:\Users\Username\AppData\Local\Microsoft\Office\Spw
Step 7 – Select all the contents of the folder and delete those.
Step 8 – Then, go to this point –
C:\Users\Username\AppData\Local\Microsoft\Office\16.0\OfficeFileCache
[NOTE – The “16.0” in the address line denotes the MS Office version installed on your computer. ]
Step 9 – After cleaning up both these folders, search for “services“.
Step 10 – Then, click “Services” to access that.
Step 11 – Go to the “Microsoft Office Click-to-Run Service“. Just right-click the service and tap “Properties“.
Step 12 – You have to set the “Startup type:” to “Automatic” mode.
Step 13 – Save these new changes using the “Apply” and “OK” buttons.
Quit Services.
Finally, close all the windows that you have opened on your screen and reboot the machine.
When the machine does restart, the ClickToRunSVC component will function properly.
Fix 2 – Repair the Office package
Try repairing the Office package.
Step 1 – Quickly right-tap the Start icon and tap “Run“.
Step 2 – To open the Programs & Features window, paste this and click “OK“.
appwiz.cpl
Step 3 – Locate the Microsoft Office app.
Step 4 – Next, right-click that and choose the “Change” option.
Step 5 – There are two options there. Choose the “Quick repair” option.
Step 6 – Then, choose the “Repair” option to start the repairing operation.
Repairing the Microsoft Office may restrict the over usage of the Office Click-to-Run program on your system.
Fix 3 – Disable the Office Click To Run service
If clearing out the Office cache folder following the previous solution doesn’t work, disable the ClicktoRunSvc component completely.
Step 1 – You have to search for “services“.
Step 2 – Quickly, click the “Services” in the search results to open that up.
Step 3 – Scroll through the entire list of services to find the “Microsoft Office Click-to-Run Service” service. To access that, you have to double click that.
Step 4 – You have to ensure this service doesn’t start up automatically. So, fix the ‘Startup type:’ to “Disabled” mode.
Step 5 – Check the ‘Service Status’ once. If it shows “Running“, use the Stop function to pause it.
Step 6 – Finally, by tapping the “Apply” and the “OK” buttons consecutively, ensure these changes are saved.
Step 7 – Lastly, restart the computer.
When the system reboots again, the OfficeC2Client won’t slow down your system.
Fix 4 – Run a system-wide WD check
This can be happening due to a infected file/malware as well. So, we recommend you start a full system scan to quarantine the threat, if there are any.
NOTE – We recommend doing this at night, just before you go to bed.
Step 1 – Search “Windows Security” from the search box.
Step 2 – Next, tap the “Windows Security” to open that.
Step 3 – There are multiple security options present in here. Open the “Virus & threat protection” settings to explore that.
Step 4 – It will take you to the Quick Scan page. But, you have to tap the “Scan options” option to view all the possible scan options.
Step 5 – Now, choose the “Full scan” feature in there.
Step 6 – Finally, tap “Scan now” to commence the scanning operation.
The Full Scan feature works as the name suggests, means, it will scan each and every file and component stored on your computer. So, it should take 1-2 hours or more to complete, depending upon the storage type and situation.
Just leave it working behind in the background.
Office Click-To-Run won’t put any unnecessary load on the system resources again.
Hope these fixes have helped you resolve the issue!

