Have you come across this “Reset to device, DeviceRaidPort0, was issued” error on your Windows 10 PC? Then you are not alone as this is a common error on Windows PC and Windows servers, causing the system to freeze. This error usually arises due to different reasons like the power settings configuration, SATA controllers, etc.
Fortunately, the “Reset to device, DeviceRaidPort0, was issued” error can be fixed. Let’s see how.
Method 1: By Running SFC /Scannow
Corrupted system files are often the reason behind many errors in a Windows 10 computer and hence, the best way to detect and repair them is by running the System File Checker command. Just Open command prompt as admin and run the command given below.
sfc /scannow
Once the process is complete, restart your PC and the error should be gone. But, if the Windows screen is still stuck, you may try running a disk scan as shown below.
Method 2: By Running a Disk Scan
A disk scan helps to detect any corrupted sectors in the hard drive and even repair them. Her’s how to run it:
Step 1: Open Command Prompt with Admin rights and run the below command. Hit Enter:
chkdsk /r

The process takes a while to complete, so wait till it’s over. Once done, restart your PC and check if the error is gone. If the error still appears, then you may have to adjust the power settings.
Method 3: By Adjusting the Power Settings Using Registry Editor
Before you make any changes to the registry editor, make sure that you create a backup of your registry data.
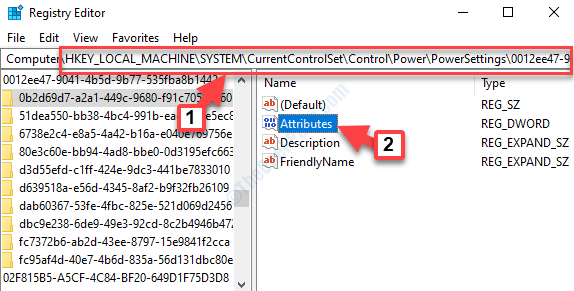
Step 1: Open Registry Editor and navigate to the below path:
HKEY_LOCAL_MACHINE\SYSTEM\CurrentControlSet\Control\Power\PowerSettings2ee47-9041-4b5d-9b77-535fba8b1442HKEY_LOCAL_MACHINE\SYSTEM\CurrentControlSet\Control\Power\PowerSettings\012ee47-9041-4b5d-9b77-535fba8b1442\0b2d69d7-a2a1-449c-9680-f91c70521c60b2d69d7-a2a1-449c-9680-f91c70521c60
Double-click on Attributes on the right side of the pane.

Step 2: It will open the Edit DWORD (32-bit) Value dialogue box. Change the Value Data to 2.
Press OK to save the changes and exit.

Step 3: Now, go to the below path in the registry editor:
HKEY_LOCAL_MACHINE\SYSTEM\CurrentControlSet\Control\Power\PowerSettings2ee47-9041-4b5d-9b77-535fba8b1442\dab60367-53fe-4fbc-825e-521d069d2456.
On the right side of the screen, double-click on Attributes.

Step 4: It will open the Edit DWORD (32-bit) Value dialogue box. Change the Value Data to 2.
Press OK to save the changes and exit.

Step 5: Right-click on Start and select Run.

Step 6: In the Run command, type powercfg.cpl and press OK to open the Power Options window.

Step 7: In the Power Options window, go to the right side and next to your Selected plan, click on Change plan settings.

Step 8: Next, click on Change advanced power settings.

Step 9: It opens the Power Options dialogue box. Under Advanced settings, expand Hard disk and then expand AHCI Link Power Management – HIPM/DIPM.
Under it, you will see two options – On battery and Plugged in. Set both the options to Active.
Step 10: Now, expand AHCI Link Power Management – Adaptive.
Set both the options – On battery and Plugged in under it to 0.
Step 11: Then, expand Turn off hard disk after and set the On battery option under it to Never.
Press Apply and then OK to save the changes and exit.
Once done, restart your PC and the error should be gone now. But, if you are still seeing the error, you may then need to changing the power plan settings as below.
Method 4: By Changing the Power Plan Settings
Step 1: Open the Power Options dialogue box as shown in the above method and select High Performance power plan from the drop-down.
This will change the PCI Express status to Off.
Press Apply and then OK to confirm changes.

Restart your PC and you should not see the Reset to device, \Device\RaidPort0 was issued error anymore.
If the error still comes up, you can try updating the AHCI driver.
Method 5: By Updating the AHCI Driver
Step 1: Press Win + X hotkey on your keyboard and select Device Manager from the menu.

Step 2: In the Device manager window, expand the IDE ATA/ATAPI controllers section.
Now, right-click on the AHCI controller below it and select Update driver.

Step 3: Next, click on Search automatically for update driver software.

Now, follow the on-screen instructions to complete checking for any available latest drivers. If found, Windows will automatically update it. Once done, reboot your PC and the problem should be solved.
If you are still facing the problem, you would need to disable fast startup. Let’s see how.
Method 6: By Disabling Fast Startup
Step 1: Right-click on Start and select Run.

Step 2: In the Run command, type powercfg.cpl and press OK to open the Power Options window.

Step 3: In the Power Options window, go to the left side and click on Choose what the power button do.

Step 4: In the next window, click on Change settings that are currently available.

Step 5: In the System Settings window, under the Shut-down settings section, uncheck the box next to Turn on fast start-up (recommended).
Press the Save changes button to confirm the changes.

Now, restart your PC and the “Reset to device, DeviceRaidPort0, was issued” error will be no more there.