Stage 4. Verifying free space. Ten percent. It’s been ten percent for two hours.
The drive light isn’t blinking. Nothing is moving. And every guide online says don’t interrupt CHKDSK or you’ll destroy your data, so you sit there.
Why This Happens
First, the good news, because it saves most people an entire evening: CHKDSK is often not stuck at all. Its progress counter just stops updating.
The console window buffers its output. If you clicked inside that window at any point, Windows put it into a selection mode that freezes everything printing to the screen. CHKDSK keeps working underneath. You just can’t see it.
Press Enter. Seriously, that’s it. As one exasperated forum poster put it after losing hours to this — nowhere in the CHKDSK output, and on no page he could find, does it say “hit Enter if this appears to be stuck.” So the progress jumps forward and you feel slightly cheated.
Now the genuinely slow case. Stage 4 checks every sector that the file system says is free. On a QLC SSD — the cheap high-capacity kind that packs four bits into each memory cell — reading those sectors is brutally slow, because the controller has to work out the voltage level for each one. And the drive is simultaneously juggling its own internal housekeeping.
So Stage 4 on a 2TB QLC drive can genuinely run for six hours or more. It’s not frozen. It’s just miserable.
Fix 1 – Press Enter
Try this before anything else. Click once on the CHKDSK window, then press the Enter key.
If the percentage jumps, it was never stuck — you had accidentally selected text in the window, and that pauses the display. Let it finish. Don’t click inside the window again.
This solves it far more often than it has any right to.
Fix 2 – Check Whether It’s Really Frozen
Before you kill anything, find out if the drive is still doing work. A stuck CHKDSK and a slow CHKDSK look identical on screen. They don’t look identical in Task Manager.
This only works if CHKDSK is running inside Windows. A boot-time scan gives you no way to check — there, watch the drive activity light on the case instead.
1 – Press Ctrl + Shift + Esc to open Task Manager.
2 – Click the Performance tab on the left.
3 – Click your drive in the left column.
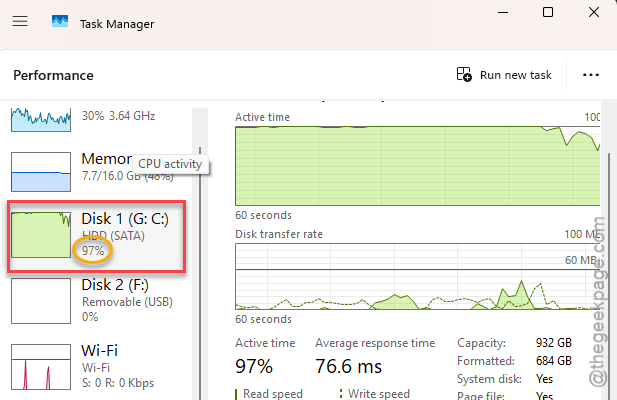
4 – Watch the Active time graph for a full minute.
Anything above zero means CHKDSK is working. Leave it alone and go do something else. A flat line at zero for several minutes means it’s genuinely hung, and the fixes below apply.
Fix 3 – Cancel a Boot Scan Before It Runs Again
Stuck in a loop where CHKDSK fires every time you boot, hangs, and you force a restart? Stop it from scheduling itself. You’ll need to get into Windows first — force a reboot and let the countdown run out, or press a key during the 10-second skip prompt.
1 – Press the Windows key, type cmd, then right-click Command Prompt and choose Run as administrator.
2 – Type this and press Enter:
chkntfs /x C:
3 – Swap C: for whichever drive is being scanned, if it isn’t the main one.
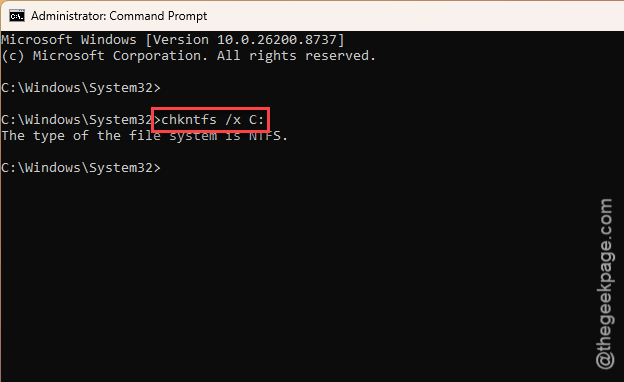
4 – Restart. The boot scan is skipped and you get to your desktop.
This doesn’t repair anything. It buys you a working PC so you can run the safer scan in Fix 6.
Fix 4 – Force the SSD to Clean Itself Up
Stage 4 is exactly the stage that reads free space. And on an SSD, “free” blocks that were never properly released are the slowest thing on the drive to read. A manual TRIM tells the drive which blocks are genuinely empty, so it stops reading them the hard way.
1 – Right-click the Start button and choose Terminal (Admin) or Windows PowerShell (Admin).
2 – Type this and press Enter:
Optimize-Volume -DriveLetter C -ReTrim -Verbose
3 – Text scrolls past as it works. On a large drive this takes a few minutes.
4 – Wait for it to return to the prompt.
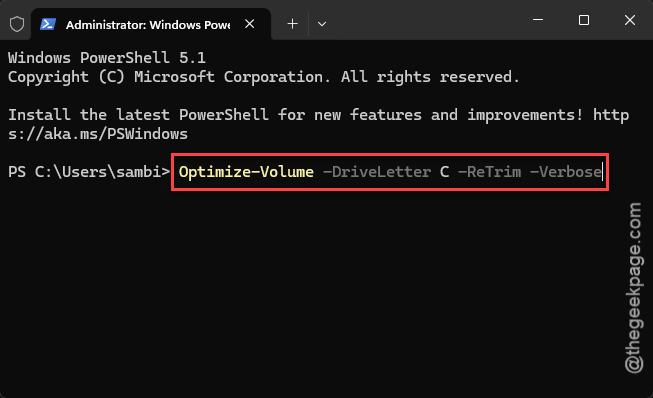
Run your CHKDSK again after this. Stage 4 is frequently much faster, sometimes dramatically so.
Fix 5 – Stop Windows Powering Down the SSD Mid-Scan
Windows saves power by putting NVMe drives into low-power states between requests. During a long scan with quiet stretches, the drive naps, the scan waits for it, and the whole thing crawls. Occasionally it stops dead.
1 – Press Windows + R, type control powercfg.cpl, and press Enter.
2 – Click Change plan settings next to your active power plan.
3 – Click Change advanced power settings.
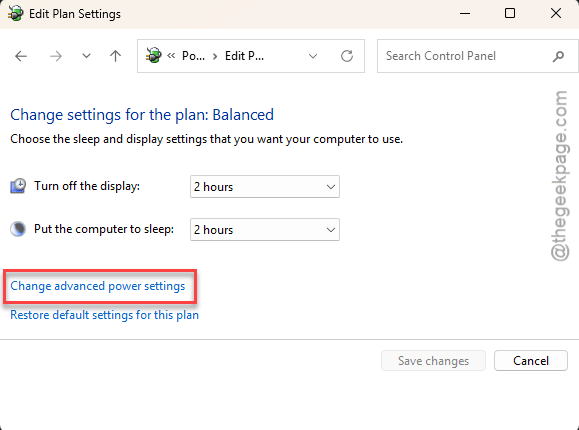
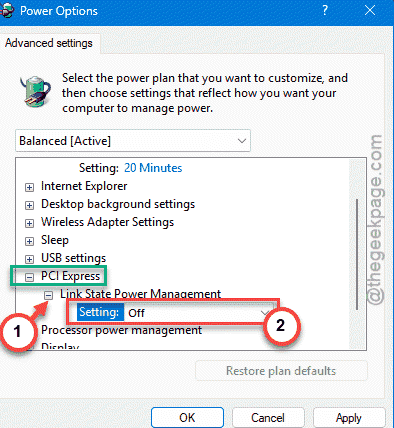
4 – Scroll down and click the + next to PCI Express.
5 – Expand Link State Power Management.
6 – Set both On battery and Plugged in to Off.
7 – Click Apply, then OK.
On a laptop this costs you a little battery life. Set it back afterwards if that bothers you.
Fix 6 – Run the Scan That Doesn’t Hang
If you’ve been running chkdsk /r, stop. That’s your problem.
The /r switch tells CHKDSK to read every physical sector on the drive looking for bad ones. That made sense on spinning hard drives. On QLC flash it exhausts the drive’s controller buffers, takes days, and can hang outright. Your SSD already tracks its own bad blocks — it does not need Windows checking them.
Use the logical-only scan instead. It fixes the file system, which is what was actually broken.
1 – Open Command Prompt as administrator.
2 – Run this:
chkdsk C: /f /x /scan
3 – The /scan part runs it online, so you keep using the PC while it works.
4 – Let it finish. It reports what it found and what it fixed.
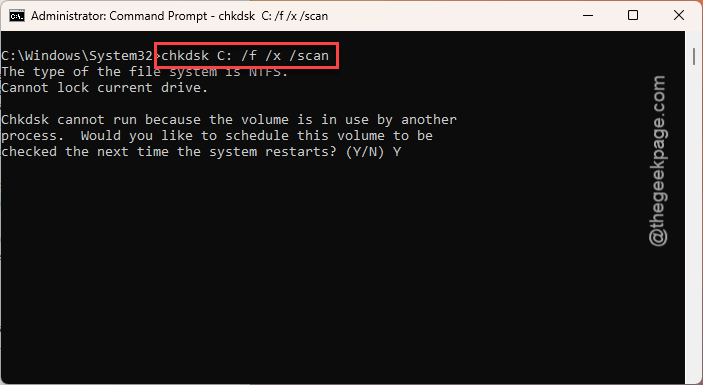
Minutes, not hours. And no Stage 4 crawl, because it never touches the free space sectors.
How to Prevent This
– Never use /r on an SSD. Use /f /x /scan. Sector scanning is for mechanical drives and always has been.
– Don’t click inside the CHKDSK window while it runs. One stray click and it looks frozen for the rest of the day.
– Keep 15-20% of an SSD free. QLC drives get very slow when they fill up, and everything above gets worse with them.
– Run Optimize-Volume with -ReTrim every couple of months. Windows does it weekly on its own, but a manual pass doesn’t hurt.
– Shut down properly. The unexpected-shutdown flag is what schedules these boot scans in the first place.
People Also Ask
Why does CHKDSK stage 4 take so long?
Stage 4 reads every sector marked as free, and on a QLC SSD that’s punishingly slow — the controller has to measure a voltage level for every single cell. Add the /r switch and you’re scanning the whole drive twice. On a 2TB drive, six hours is normal, not broken.
How to stop CHKDSK in stage 4?
Press Enter first — it’s usually just paused output, not a hang. If it’s a boot scan and genuinely frozen, hold the power button, boot back into Windows, and run chkntfs /x C: as administrator to stop it rescheduling. Interrupting Stage 4 is safe, since it only reads free space.
Is it safe to interrupt CHKDSK?
During Stage 4, yes — it’s reading empty space, not writing anything. Stages 1 through 3 are riskier because CHKDSK may be rewriting file records, and cutting power there can lose files. Let those finish if you possibly can. Stage 4 you can walk away from.