It’s your own laptop. Nobody manages it. But the Start menu insists that “Some settings are managed by your organization,” and half the options are greyed out.
You can’t rearrange your pinned apps. Can’t change the layout. And there is no organization.
Why This Happens
Windows has a set of controls built for company IT departments — lock the Start menu, force a layout, hide things. Those controls live in the registry, in a section called Policies.
Home PCs are supposed to leave that section empty. Yours isn’t.
So how does a personal machine end up with a policy? A few ways. You ran a debloat or “privacy” script from GitHub, and it wrote one. Or a registry tweak you found in a forum three years ago. Some software installers set them too. And a Windows update can leave a half-applied policy behind after a failed install.
Windows doesn’t care where it came from. It sees a policy, it obeys it, and it tells you an organization is in charge. There is no organization. There’s just a leftover value nobody cleaned up.
The good news? You don’t need to reset Windows. You need to delete a few registry entries.
Fix 1 – Back Up the Registry First
You’re about to delete things.
1 – Press Windows + R, type regedit, and press Enter. Click Yes.
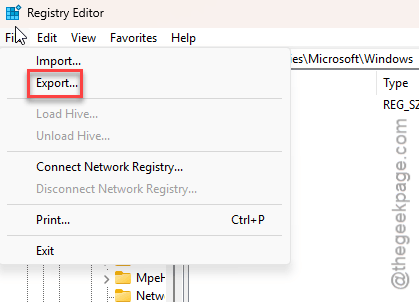
2 – Click File in the menu bar, then click Export.
3 – Under Export range at the bottom, select All.
4 – Now, save the file to your Desktop and name it something you’ll recognize later.
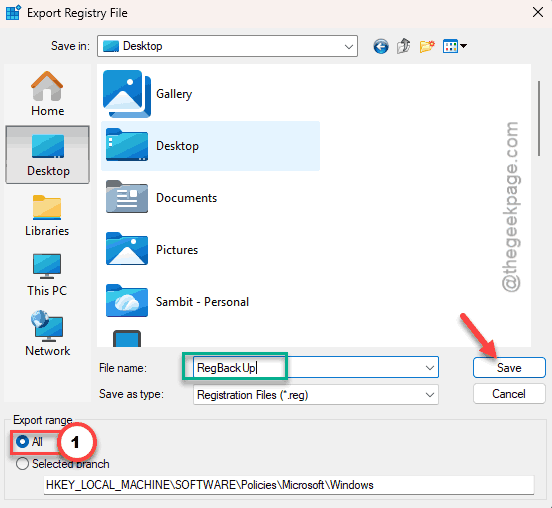
5 – Wait for it to finish. It takes about thirty seconds and makes a large file. That’s normal.
If anything goes sideways, double-click that file to put everything back exactly as it was.
Fix 2 – Delete the Start Layout Locks
These two values are what freeze your Start menu.
1 – In Registry Editor, paste this into the address bar at the top and press Enter:
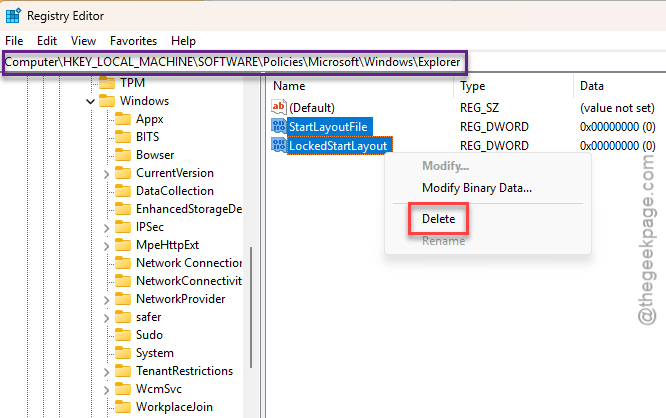
HKEY_LOCAL_MACHINE\SOFTWARE\Policies\Microsoft\Windows\Explorer
2 – Look in the right pane for LockedStartLayout and StartLayoutFile.
3 – Right-click each one you find and choose Delete. Confirm.
4 – Now paste this second path into the address bar and press Enter:
HKEY_CURRENT_USER\SOFTWARE\Policies\Microsoft\Windows\Explorer
5 – Delete the same two values here if they exist.
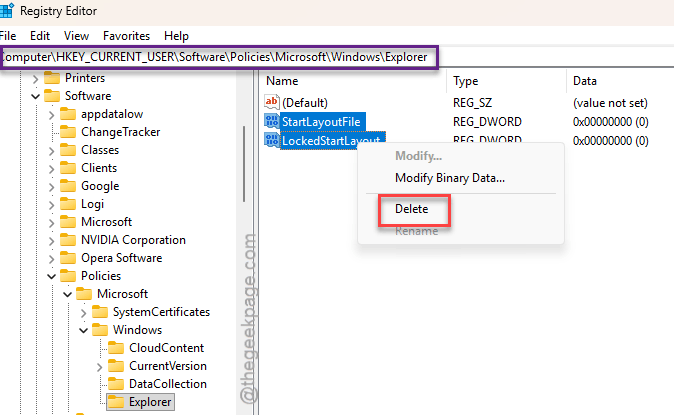
6 – While you’re in each location, look for anything named StartPins or HideCategoryView. Delete those too.
If the Explorer key doesn’t exist in one of those paths, nothing was set there. Move on.
Fix 3 – Restart File Explorer
Try restarting the File Explorer to solve the issue.
1 – At first, press Ctrl + Shift + Esc keys together.
2 – Next, scroll down the Processes tab to find the Windows Explorer.
3 – Then, right-click it, and choose Restart.
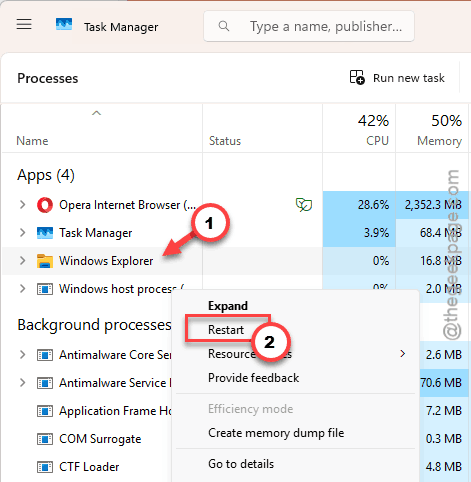
See if this works.
Fix 4 – Reset the Group Policy Files
If the registry fix has no effect, you should try the group policy approach.
1 – At first, hit the Windows key.
2 – Then, type cmd. Finally, right-click the Command Prompt and choose Run as administrator.
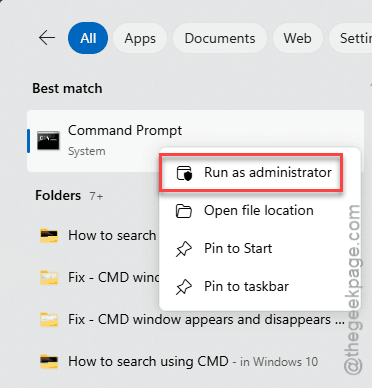
2 – Write down this line and press Enter:
RD /S /Q "%WinDir%\System32\GroupPolicyUsers"
3 – Then this one:
RD /S /Q "%WinDir%\System32\GroupPolicy"
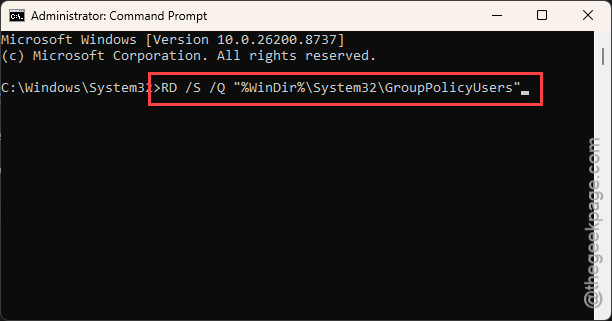
4 – One of those may say “The system cannot find the file specified.” That’s fine — it means the folder was never there.
5 – Now rebuild the policies with:
gpupdate /force
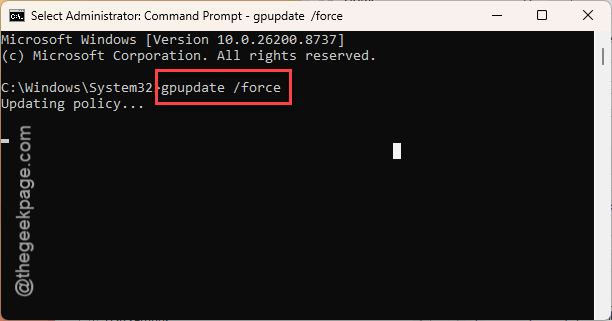
6 – Wait for “Computer Policy update has completed successfully.” It takes about ten seconds.
7 – Restart your PC.
Fix 5 – Re-Register the Start Menu
Policies gone but the Start menu still acts locked? The Start menu is its own little app, and its installation can be damaged.
1 – Press Ctrl + Shift + Esc to open Task Manager, right-click Windows Explorer, and choose End task. Your desktop goes blank. Don’t panic.
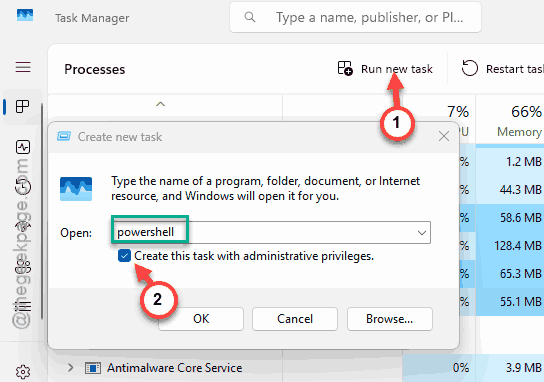
2 – In Task Manager, click Run new task at the top.
3 – Type powershell, tick Create this task with administrative privileges, and click OK.
4 – Paste this command in and press Enter:
Get-AppxPackage Microsoft.Windows.StartMenuExperienceHost | Foreach {Add-AppxPackage -DisableDevelopmentMode -Register "$($_.InstallLocation)\AppXManifest.xml"}
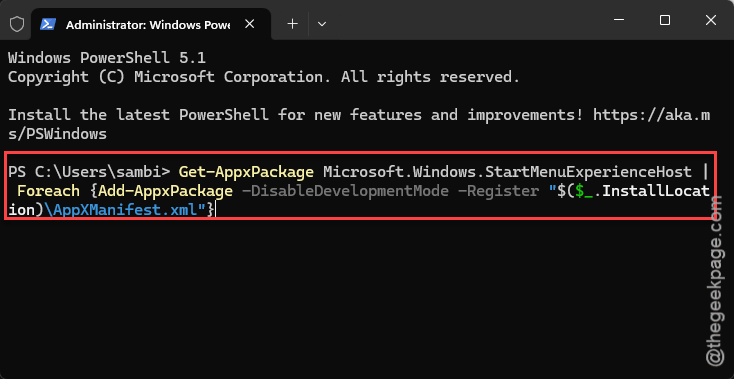
5 – Red text may scroll past. As long as it finishes, ignore it.
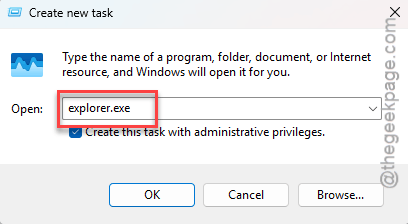
6 – In Task Manager, tap the Run new task again.
7 – Then, type explorer, and click OK.
7 – Restart your PC.
This should have resolved your issue.
Fix 6 – Make Sure You Aren’t Actually Managed
Worth ruling out before you keep digging. If you ever signed into this PC with a work or school account, Windows may genuinely be managed — and every fix above will get undone.
1 –Press Windows + I and go to Accounts.
2 – Then, tap the Access work or school.
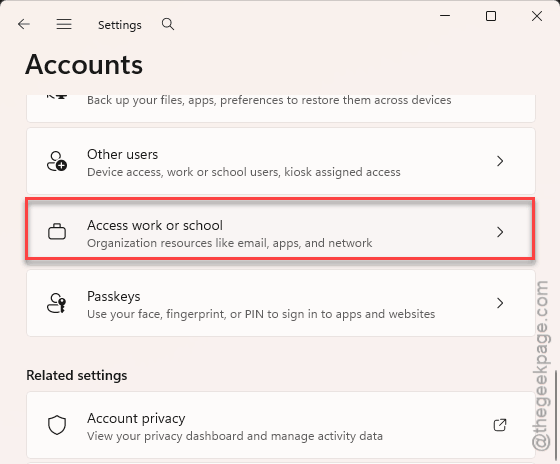
3 –If there’s an account listed there and you don’t need it, click it and choose Disconnect.
Empty list? Then it’s a leftover policy, and Fixes 2 through 5 are your answer.
How to Prevent This
– Read debloat scripts before you run them. Most of the ones that cause this are writing Start menu policies you never asked for.
– Export the registry before any tweak. Takes thirty seconds and it has saved a lot of weekends.
– Skip “one-click optimizer” tools. They set policies to make changes stick, then never remove them.
– Don’t sign in with a work account on a personal PC unless you mean it. That connection brings real policies with it.
People Also Ask
How to manage start menu?
You can easily pin, remove app icons in your start menu. On the other hand, you can uninstall the apps directly from the Start menu page.
Why does Windows say my personal PC is managed by an organization?
Because something wrote a group policy into your registry. A debloat script, a forum tweak, an installer, or a failed update. Windows sees the policy and assumes an IT department put it there. Delete the leftover values and the message goes away — no reset needed.