While connecting your phone to the PC/Laptop, you might encounter this error message “Please update your device’s settings to accept media transfers” in the Photos app. Though connecting and transferring media files via USB cable gets you the maximum speed and efficiency, this problem can get in your way. You won’t be able to transfer files or pictures unless you take care of the problem, first.
Fix 1 – Restart the devices and reconnect
This can be just a bug on either the phone OS or your computer.
Step 1 – Unplug your phone from the USB cable which is connected to the computer.
Step 2 – After severing the connection between the devices, restart the phone.
Step 3 – Restart your computer, as well.
Step 4 – Wait until the phone boots up normally. Wait for 5-10 seconds for everything to settle down.
Step 5 – Do the same thing for the computer as well.
Now, connect the computer and the phone using that same USB cable.
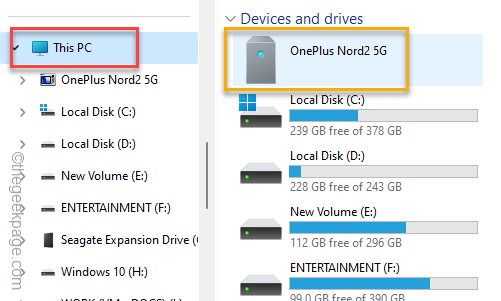
Step 6 – Now, open the File Explorer and go to the “This PC“.
Here, you can view all the images and videos stored on your phone.
Check if this works!
Fix 2 – Change the default USB configuration
Sometimes for more advanced operations on your phone via the system, USB debugging needs to be turned on.
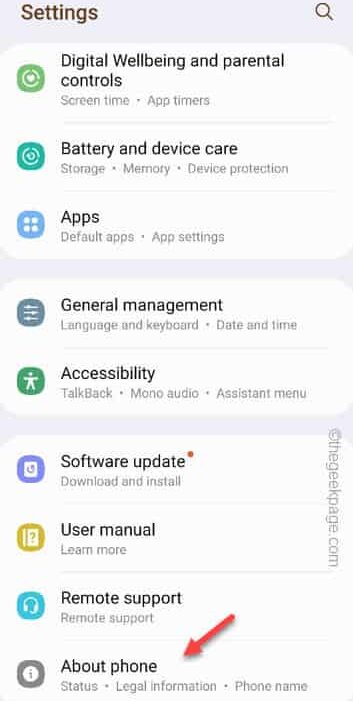
Step 1 – To do this, open your phone Settings (⚙️).
Step 2 – Later, open the “About phone” setting.
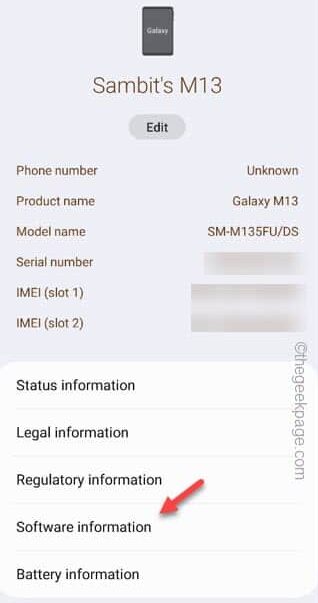
Step 3 – Next, you have to open the “Software Information“.
Step 4 – Tap the “Build number” 5-6 numbers to open that up.
This way, you can enable the Developer Options on your phone.
Step 5 – Go to your phone Settings and open the “Developer Options“.
Step 6 – Toggle the “USB Debugging” to “On” mode.
Step 7 – Your phone will throw up a standard warning message. Tap “OK“.
Step 8 – On the same page, tap the “Default USB configuration” to change that settings.
Step 9 – Now, set the ‘Default USB Configuration’ to “Transferring files” mode.
This way, whenever you connect the phone to another device using a USB cable, it will be automatically used for file transfer.
So, plug the phone into your computer and test. If you are still seeing the same message, go for the next solution.
Fix 3 – Enable file transfer on your phone
There are multiple modes available when you connect your phone to the computer.
Step 1 – Just disconnect the USB cable.
Step 2 – Reconnect the USB cable to the computer.
Step 3 – Allow the computer to access the data stored on your phone.
Step 4 – As soon as you plug in, there will be a prompt on your phone screen. Swipe down to go to the Notification Center.
Step 5 – Tap “Transferring media files via USB” setting.
Step 6 – Now, select the “Transferring files/Android Auto” mode in there.
Exit the Settings on your phone.
Now, you can use the phone to transfer files from your phone to a computer or vice-versa.
Fix 4 – Update the MTP USB device
Consider upgrading the phone device driver using the suitable driver package available on the device.
Step 1 – Plug the mobile phone into your computer.
Step 2 – Next, load up the Device Manager. Just, right-tap the Windows icon and click “Device Manager“.
Step 3 – Tap the “Portable devices” section and find your phone device driver.
Step 4 – Later, right-tap the phone driver and click “Update driver“.
Step 5 – After this, tap the “Browse my computer for drivers” option.
Step 6 – On the following screen, click the “Let me pick from a list of available drivers on my computer” option.
Step 7 – Check the “Show compatible hardware” check box.
Step 8 – This will enlist the list of devices in there. After this, select the MTP device in there.
Step 9 – Tap “Next“.
Follow the on-screen steps and complete the installation steps. After this, check whether you can view or transfer the files or not.
Fix 5 – Update the Photos app
Check whether you can update the Photos application from the Store.
Step 1 – Open the Microsoft Store.
Step 2 – Go to the “Library” from the left pane.
Step 3 – Then, look for the “Photos” app and check whether any updates are pending for them or not.
Step 4 – If the updates are pending, tap “Update” to update the app.
After updating the app, try to import/export files from your phone.
Fix 6 – Update the USB drives
The USB drivers need to be updated to the latest version.
Step 1 – Just hit the Start button and type “device“.
Step 2 – Next, open the “Device Manager” to open that up.
Step 3 – Next, hit the “Universal Serial Bus controllers” device drivers.
Step 4 – Later, right-click the first device driver and tap “Update driver“.
Step 5 – Next, choose “Search automatically for drivers” to download and update the driver.
Step 6 – Next, repeat the same steps for all the rest of the BUS controller drivers there, as well.
Once you have finished updating the USB drivers, you must exit the Device Manager.
After this, reboot the computer.
Later, plug your phone into the device and test if this works!
Fix 7 – Use Nearby Share (Quick Share)
If you still can’t transfer your files via USB cable, you should use the Nearby Share (or, Quick Share) feature to transfer the files wirelessly.
Step 1 – Download the Quick Share for Windows. Tap “Get started” to get the package.
Step 2 – Now, run this downloaded “BetterTogether” setup and install this on your computer.
Step 3 – After this, open the Gallery on your phone and select the images or videos that you want to share.
Step 4 – Tap the Share icon and choose the “Nearby share” from there.
Step 5 – You have to turn on the Bluetooth, Location services on your phone to use this feature.
Step 6 – Later, return to your computer and search for “Quick share” in the search box.
Step 7 – Open the “Quick Share from Google” app.
Step 8 – Tap “Sign in” on the Quick Share page.
Step 9 – Now, choose the Google account to sign in using that.
Step 10 – Return to the Quick Share page. Click the drop-down button and select the “Recieve from everyone” mode.
After this, you can transfer the files from your computer to your phone.
Step 11 – Choose the computer to share the files.
You can transfer any documents, files, or any other shareable items as well.
This is a good alternative to troubleshooting this problem.


