Windows Update errors like “Only one instance of wusa.exe is allowed to run” are quite common with all versions, but it’s specially prevalent with the Windows 7 OS. This is because, carrying out updates on the older versions of Windows was always more challenging than it’s with the latest versions. The “Only one instance of wusa.exe is allowed to run” error on Windows 10 can occur while updating the Internet Explorer browser, manual installation of an update, etc. While disabling the 3rd party antivirus, specially the McAfee, can help fix the error sometimes, most of the times it won’t. Here we have a few workarounds that may help you fix the error. Let’s see how.
Method 1: End “wusa.exe” Process in Task Manager
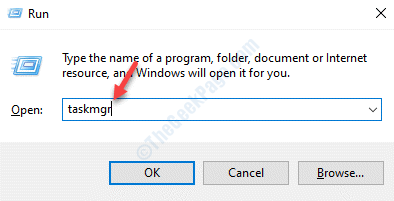
Step 1: Press Win + R hotkey on your keyboard to open the Run command.
Step 2: In the Run command search box, type taskmgr and press Enter.

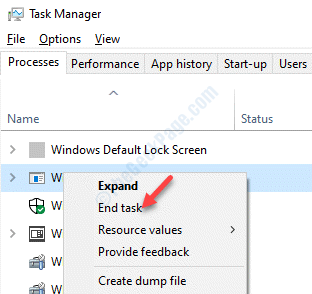
Step 3: In the Task Manager window, under the Processes tab, find the wusa.exe process.
Right-click on it and click on End task.
*Note – If you find multiple entries of the process, make sure that you right-click on each of the entries and select End task.

Step 4: In the warning prompt that appears, click Yes to confirm.
Now, restart your PC and you should be able to complete the Windows update.
Method 2: Check If Windows Installer Service is Running
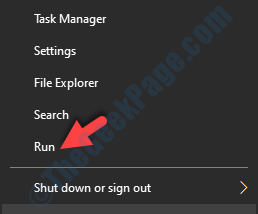
Step 1: Right-click on Start menu and select Run to open Run command.

Step 2: Type services.msc in the Run command search field and press OK to open the Service manager window.

Step 3: In the Services window, go to the right side of the pane and under the Name column, locate Windows Installer.
Now, double-click on it to open its Properties window.

Step 4: In the Properties window, under the General tab, go to the Startup type section and set it to Automatic.
Then go to the Service status section and press the Start button below to start the service.
*Note – Change the Startup type section Automatic only if it’s not grayed out.

You should now be able to complete the Windows update process without any issue.
However, if you see this error message when you click on Start, “Windows could not start the Windows Installed Service on Local Computer. Error 1079: The account specified for this service differs from the account specified for other services running in the same process”, you would need to follow the below steps.
Step 1: Press the Win + R keys together on your keyboard to open the Run command.
Step 2: In the Run command search box, type services.msc and hit OK.

Step 3: In the Services window that opens, navigate to the right side and under the Name column, look for Windows Installer.
Now, right-click on it and select Properties.

Step 4: Now, in the Properties dialogue box, go to the Log On tab.
Select the radio button next to This account and press the Browse button.
Step 5: Go to the “Enter the object name to select” field and write your PC’s name.
Next, click on the Check Names option and now wait till the name gets validated.
Step 6: Once you are done, press OK.
You will see a prompt asking for the administrator password, so enter the password in the Password field.
Once you are done, you can now try to continue with the Windows update process and it should go through.
Method 3: Re-register Windows Installer Service
Step 1: Go to the Start menu and then copy and paste the below command in the Windows search bar:
%windir%\system32\msiexec /unregserver

Step 2: Now, left-click on the result to run the command and unregister the Windows Installer.

Step 3: Now, copy and paste the below command in the Windows search bar like the previous one above:
%windir%\system32\msiexec /regserver

Step 4: Left-click on the result to run the command re-register the Windows Installer.

*Note – If you see any prompt asking to grant administrator permissions, click Yes/OK to confirm.
You can now try updating your Windows PC and you should not see the wusa.exe error anymore.
Method 4: Check the Event Log
Step 1: Press the Win + X keys together on your keyboard and select Run to open the Run command.

Step 2: In the Run command window, type eventvwr.msc in the search box and hit Enter.

Step 3: It will open the Event Viewer window.
On the left side of the pane, under the Event Viewer (local) section, expand Windows Logs.
Then, click on Setup.

Step 4: Now, go to the extreme right side of the pane, and under the Actions section, click on Filter Current Log.

Step 5: In the Filter Current Log dialogue box, under the Filter tab, go to the Event sources field.
Look for WUSA and check the box next to it.
Click OK to save changes and exit.

It will now help you to find the cause of the wusa problem.
Method 5: Check if InProgress Key Exists in Registry Editor
Before you make any changes to the Registry Editor, make sure that you create a backup of the registry data, so that, in case you lose any data in the process, you can recover it back.
Step 1: Press the Win + R keys together on your keyboard to open the Run command window.
Step 2: In the Run command window, type regedit and hit Enter to open the Registry Editor window.

Step 3: In the Registry Editor window, navigate to the below path:
HKEY_LOCAL_MACHINE\SOFTWARE\Microsoft\Windows\CurrentVersion\Installer\InProgress
If you see the InProgress key, then right-click on it and select Copy Key Name.

Step 4: Now, copy the InProgress key to your system desktop.
To copy the key, right-click on InProgress key and select Export.

Step 5: In the Export Registry File window, select Desktop as the location on the left.
Now, go to the File name field and name it accordingly.
Click on the Save button to finish.

Step 6: Now, delete the InProgress key from the Registry Editor.
Method 6 – Reset Windows Update
1 – Search cmd in search box of windows computer and then right click on it and choose run as administrator

2 – Now, run the commands given below one by one
Net Stop wuauserv
Ren %systemroot%\SoftwareDistribution SoftwareDistribution.back
Net Start wuauserv
3 – Try to update your PC again
Now, go back and try completing the Windows update and you should not experience the wusa.exe error anymore.
Alternatively, you can reinstall the Windows Installer in Safe Mode. For this, you would need to boot your PC in Safe Mode using the Advanced Startup options. However, if none of the options work, then you can try installing the update manually , if the automatic process does not work for you. To update Windows 10 manually, you can follow this process. However, if you want to update Windows 7 or Windows 8.1 (both 32-bit and 64-bit) versions, you can follow this link and download the updates in bold.