Safe mode is one of the booting options present in Windows. Safe mode requires only necessary & important system files to run the operating system. Hence, it is faster than normal booting.
Whenever your normal booting shows irregular or unexpected behaviour and it fails to open the “Start Screen”, you can re-boot your PC in Safe mode to check and repair if there is any error caused by running the Disk Utility. Usually, Safe mode is used for diagnosing the problems.
Also read: – How to restart Windows PC in clean Boot Mode
In this article, we’ll follow certain methods on how to Boot into Safe Mode in Windows 10:
Method 1: Using System Configuration
Enabling Safe Mode in System Configuration can be achieved through the following steps:
Step 1:
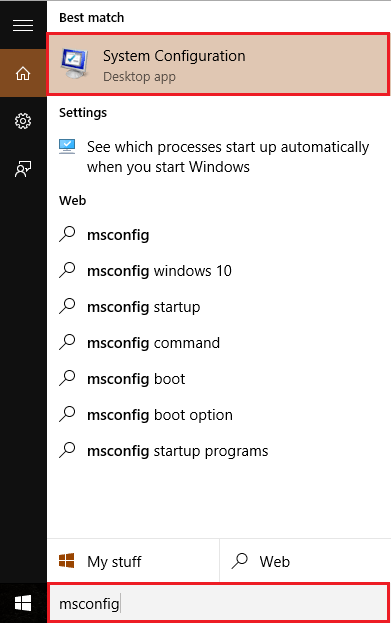
Click on the Windows Search bar located next to the Start icon and type “msconfig”. Click on the first option provided.

Step 2:
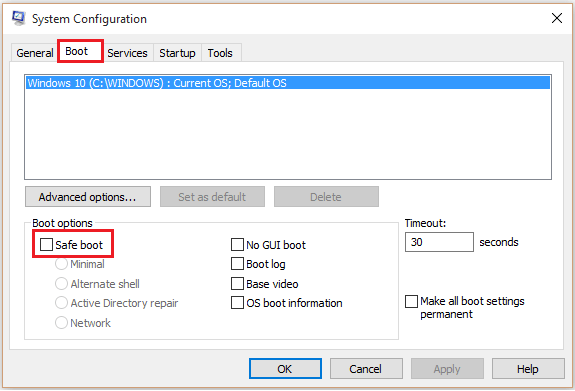
Click on the “boot” tab & under “Boot Options”, Enable the check mark “Safe Boot”.

Step 3:
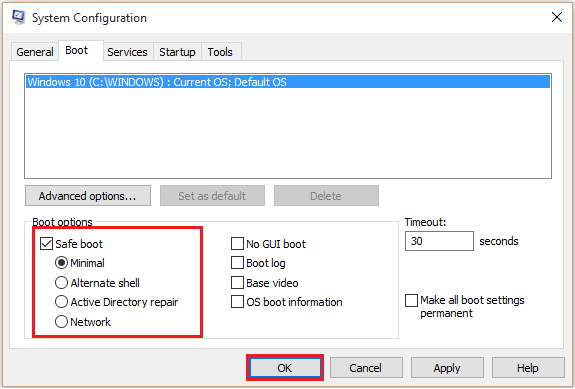
Select any one of the given options in which you are having problems. For instance, select “Minimal” & click on “OK”.

Method 2: Using Advanced Boot Settings
Various modes of logging in the system can be found using the different options after reboot. The advanced boot options can be précised in the following steps:
Step 1:
Click on the Start icon positioned at the bottom left corner of your screen. Click on “Power” and then click on “Restart” while pressing the “Shift” key.

Note: Your computer will reboot and a following screen will display with various options.
Step 2:
In the following screen, click on “Troubleshoot”.

Step 3:
Now, click on “Advanced Options”.

Step 4:
Click on Startup Settings which provides different booting methods.

Step 5:
Click on “Restart” to change Windows options.

Step 6 – Press 4 to enter safe mode or you can press 5 from your keyboard to enter safe mode with networking.

By using power button
Step 1. Automatic Repair Mode can be kick-started by interrupting the booting process of a Windows 10 system three times. So, turn on your computer and while the Windows is loading turn off the computer by pressing and holding the Power button for 4 seconds. Repeat this 2 more times and you will be greeted with Automatic Repair screen.

Step 2. Wait for a few seconds as your computer diagnoses your PC.

Step 3. When you see the Automatic Repair screen, click on Advanced options.

Step 4. Select Troubleshoot in Choose an option screen.

Step 5. Click on Advanced options in Troubleshoot screen.

Step 6. In the Advanced options screen, you need to select Startup Settings.

Step 7. The last step will lead you to the Startup Settings screen. Here, you will see a number of options, which you can change after restarting your computer. The Enable Safe Mode is also mentioned in it. Select Restart here.

Step 8. After your computer restarts, you will see ways to access three types of Safe Mode among other options. Press F4.

Step 9. After selecting Safe Mode in the last step, your computer will restart and boot into the select Safe Mode.