The right-click context menu on the Windows 11/10 desktop is quick way to perform many actions like, opening a file, copy, paste, delete, compress to zip file, create, edit, share and much more. The menu also allows you to send the file to a Bluetooth device, fax, mail recipient and even to a printer. Moreover, if you want to add items to the context menu, and even remove or edit the menu, you can do so by using 3rd party application or by editing the registry editor. In fact, you can also restore the missing “New” option or the missing “Open” option in the context menu.
But, if the printer is not already added to the “send to” desktop context menu or it does not pick it up automatically, you would need to add the printer separately. Let’s see how.
How to Add Printer to ‘Send to’ Desktop Context Menu?
Adding the printer Send to menu on your Windows OS helps you send documents straight for printing, to the printer you have selected, without any need to open the file. Moreover, if you have multiple printers, adding those printers to the Send to menu, on your network, allows you to have a choice of getting your print from any of the printers added.
Let’s see how to add a printer to the Send to menu on your Windows 11/10 PC:
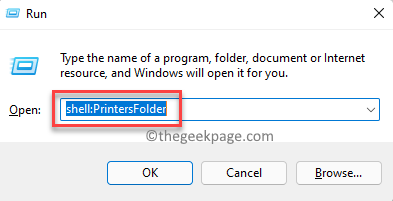
Step 1: Press the Win + R keys simultaneously on your keyboard to open the Run command window.
Step 2: Copy and paste the below path in the Run command search bar and hit Enter to open the Printers Folder in the File Explorer window:
shell:PrintersFolder
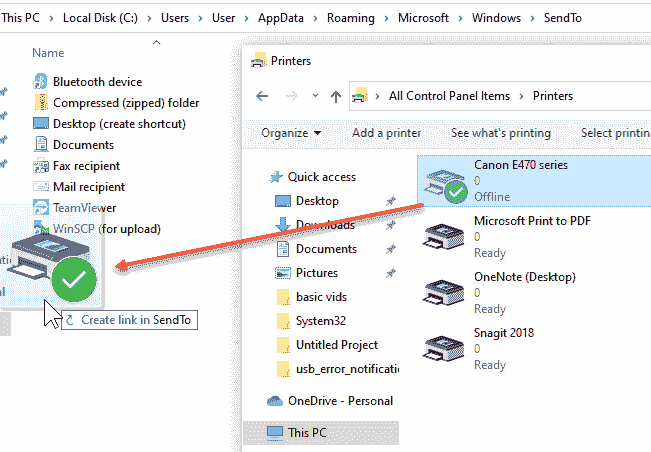
Step 3: Now, Open file explorer and go to shell:sendto from address bar. Leave this window Open.
Now, Drag your printer from shell:PrintersFolder to shell:sendto

Step 4: Rename the Printer here
*Note – To add more printers to the Send to desktop context menu, repeat the Step 1 through 4.
