One of the most annoying change that we, users never wanted was the inclusion of “Show more options” in the right-click context menu. But, you can remove this and get back the classic context menu in Windows 11. No more of multiple clicks and hunting down those ZIP shortcuts in the context menu. Follow this guide get back the full-fledged right-click context menu on your Windows 11.
Fix 1 – Tweaking the CLSID manually
It is the only manual method in our list. You will be tweaking a particular key or value in the Registry Editor to fix the issue.
NOTE – Registry edits like these are very safe and does work as normally as the way it should. So, you should create a registry backup before trying this out on your system.
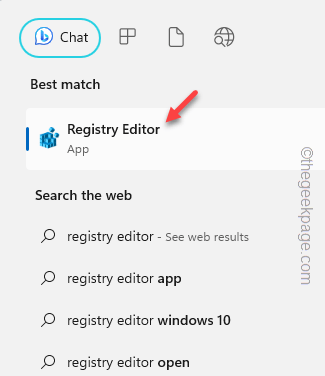
Step 1 – Try searching for the “Registry Editor“.
Step 2 – Click the “Registry Editor” as the best match in the search result.
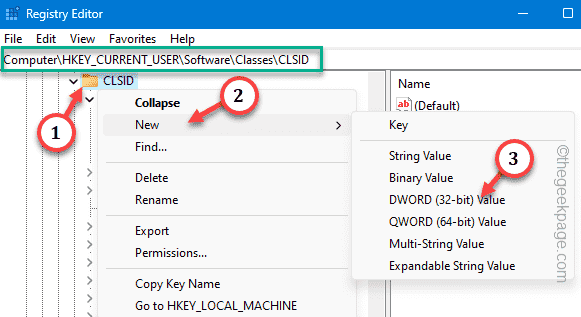
Step 3 – After entering the Registry Editor, tab go to the CLSID tab –
HKEY_CURRENT_USER\SOFTWARE\CLASSES\CLSID
Step 4 – You have to create a new sub-key under CLSID. So, right-click that one and tap “New>” and tap “Key“.
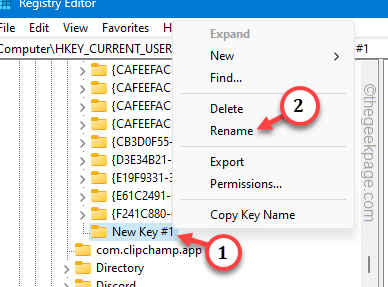
This key will get a generic name “New Key #1“. You have to rename it on your own.
Step 5 – To rename this key, right-click this and tap “Rename“.
Step 6 – Write or copy-paste this name in that key to rename it as such.
{86ca1aa0-34aa-4e8b-a509-50c905bae2a2}
Step 7 – Select the new “{86ca1aa0-34aa-4e8b-a509-50c905bae2a2}” key. Then, right-tap it and click “New>“, “Key” to create a new key.
Step 8 – You have to name this key as “InprocServer32“.
When you creates a new key, a “Default” value is automatically gets assigned to it.
Step 9 – What you have to do is to doublet-tap this “(Default)” value.
Step 10 – Wipe out any data you see in that ‘Value data:’ box. Make sure it is clean.
Step 11 – Now you have to save it using the “OK” option.
Quit the Registry Editor.
Now, don’t go ahead and try to test the results just now! You have to wait.
Restart your computer. When the system does come back, go to your desktop and right-click there.
Check the context menu. You will get back the old, classic Windows context menu without the tedious “Show more options” in there.
But, what if you want to get it back? There is a way.
Step 1 – You have to open the Registry Editor once more.
Step 2 – Then, go to the same Class ID again –
HKEY_CURRENT_USER\SOFTWARE\CLASSES\CLSID
Step 3 – Just, right-click the “{86ca1aa0-34aa-4e8b-a509-50c905bae2a2}” and click “Delete” to remove it from your system.
Step 4 – Tap “Yes” if a confirmation is needed.
Reboot the system after this.
Fix 2 – Run the context changing script
Don’t want to get into the hassle of editing the registry on your own? You can run this batch file just to do that on your system.
Step 1 – Download this Disable_Show_more_options_context_menu zip file on your system.
Step 2 – Extract the zip file. On the inside of the zip file, you will get a registry script.
Step 3 – Just extract the “Disable_Show_more_options_context_menu” zip file.
Step 4 – Just double-click the “Disable_Show_more_options_context_menu” script to run the batch file on your computer.
This script will add the registry key in your system registry (the manual method that we have demonstrated in Fix 1).
After running the batch file, you have to reboot the computer.
There is another script which you can use to revert this change, i.e. get back the Show More Options in the context menu.
Step 1 – Get this Enable_Show_more_optionss.
Step 2 – Extract this zip file. You will find a script inside.
Step 3 – Double-click the “Enable Show more options” registry script to run it.
This will bring back the Show more option in the context menu. Do reboot the computer once and check once.
Fix 3 – Using the terminal
The last option is another way to doing this. Just run the particular command to disable the Show more options or enable it on your system.
Disabling the Show More Options –
These are steps to get the classic context menu on on your system –
Step 1 – You need to open the terminal with administrative rights. So, search for the “command“.
Step 2 – Just right-tap the top search result and use the “Run as administrator“.
Step 3 – Just paste this one line in the black terminal. Then, hit Enter to disable the Show More Options on your system.
reg add "HKCU\Software\Classes\CLSID\{86ca1aa0-34aa-4e8b-a509-50c905bae2a2}\InprocServer32" /f /ve
After quitting the terminal, restart your PC/ laptop.
Enabling the Show More Options –
If you want to revert the Show More Options in the context menu, these are steps you should follow –
Step 1 – Open the CMD terminal as an administrator.
Step 2 – Then, paste this code and hit Enter to enable the Show More Options menu.
This will delete that registry key from the system registry.
reg delete "HKEY_CURRENT_USER\Software\Classes\CLSID\{86ca1aa0-34aa-4e8b-a509-50c905bae2a2}" /f
After executing the code, quit the terminal.
Restarting the system should get you the new context menu once more. Check if this works.


