If you use a particular program too often then you may want to launch the program more easily. You can manage to open the program just in two clicks. In this article, we are going to show how to include any program in your right-click context menu. So that, whenever you may need to use the program you can easily do it by right-clicking on an item in File Explorer and then clicking on the name of the program.
How to add any program to right-click context menu
Follow these steps to add the desirable program to right-click context menu-
1. Click on the Windows icon and type “regedit“.
2.Then, hit “Enter” from your keyboard to access the Registry Editor.

3. Now, simply expand this location-
Computer\HKEY_CLASSES_ROOT\*\shell\
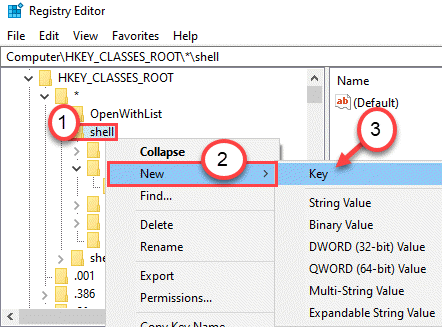
4. Then, right-click on the “shell” key and then click on “New>” and then on “Key“.
5. Name the key as the application name which you want on the right-click context menu (We have named it “PainDotNet” ).

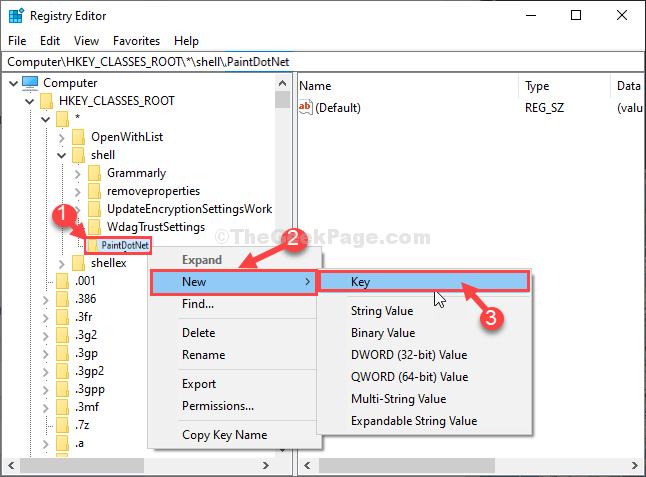
6. Again, right-click on this new key (in our example, it is ‘PaintDotNet‘) and then click on “New>” and then on “Key“.
7. Name the key as “command“.

Minimize the Registry Editor window.
8. Right-click on the desktop icon and click on “Properties“.

9. Navigate to the “Shortcut” tab.
10. After that, copy the path mentioned in the “Target:” box.

Close File Explorer window.
11. In the Registry Editor, click on “PaintDotNet” on the left pane.
12. Further, you have to double click on the “(Default)” string.

13. In the Edit String window, set the ‘Value data:‘ as what term you wish to see in the right-click context menu.
(For us it is – “Paint it with Paint.Net”. Whenever we will right-click on an item, ‘Paint it with Paint.Net‘ will appear. )
14. Click on “OK” to save the changes on your computer.

15. Now, on the left-hand side of the Registry Editor window, click on the key “command“.
16. On the right-hand side, double click on “(Default)” to modify it.

17. Set the ‘Value data:’ to the ” “application location” “%1” “.
For example – the value data will look like this- the location of ‘ Paint.Net “%1” ‘. or in actual words, it will this –
18. Click on “OK” to save the changes.

Close Registry Editor window.
That’s it!
You may need to reboot your computer to witness the changes.
From now on whenever you right-click on an item in the File Explorer window, the application handle will appear in the context menu, just like this-

OPTIONAL STEPS-
After enacting the mentioned steps on your computer, you will be able to access the shortcut option from the right-click context menu. But, it won’t show the icon of the application. Follow the below-mentioned steps to modify the registry to get the .ico file.
1. Open the Registry Editor window.
2. Go to this location, again –
Computer\HKEY_CLASSES_ROOT\*\shell\\
3. Now, on the left-hand side of the Registry Editor window, click on “PainDotNet“.
4. On the right-hand side, right-click on “New>” and then click on “String Value“.
5. Name the new string value as “Icon“.

6. Double click on “Icon“.

7. In the Edit String window, set the ‘Value data:‘ as the path of the application.
8. Click on “OK“.
NOTE– For us, we have copy-pasted this-

Close the Registry Editor and restart your computer once. That should do it.
NOTE–
The process we have explained here will put the desired application shortcut in the right-click context menu of the File Explorer.
But there is a right-click context menu on the desktop where you can add an app shortcut, or you can remove items from the right-click context menu if it looks very clumsy.
Steps to delete unnecessary items from the right-click context menu
1. Open the Registry Editor on your computer.
2. After that, expand to this location –
HKEY_CLASSES_ROOT\*\shellex\ContextMenuHandlers\
3. You will notice there are multiple keys under the ‘ContextMenuHandlers‘ section.
These are the keys of the application shortcuts in the right-click context menu.
4. To disable certain applications in the context menu, you need to select the particular key on the left-hand side window.
(Example – We want to remove “7-Zip” from the right-click context menu. So, we have selected ‘7-Zip’ from the left-hand side. )
5. After that, double click on the “(Default)” key on the right-hand side.

6. Now, all you need to do to disable the particular application shortcut is to put a “–” in front of the value data.
7. Click on “OK“.

Close the Registry Editor and refresh the desktop once. Now, right-click and check if this is working out or not.
NOTE 1 –
If prefixing the value data with a ‘-‘ doesn’t work out, you can consider deleting the key under the context handler header.
1. Launch the Registry Editor once again.
2. Go to this place on the left-hand side –
HKEY_CLASSES_ROOT\*\shellex\ContextMenuHandlers\
3. Right-click on the particular application which you want to get rid of and click on “Delete“.

If there are any warning message, just click on “Yes“.
That should do the trick.
NOTE 2 –
It is quite possible that there are some extra shortcuts in the right-click context menus that are not showing up under the ‘ContextMenuHandlers’ section.
You may find those missing keys in one of these locations –
HKEY_CLASSES_ROOT\*\shell
HKEY_CLASSES_ROOT\AllFileSystemObjects\ShellEx\ContextMenuHandlers
Modify the right-click context menu on desktop
You can also add an application shortcut to the right-click context menu of the desktop.
1. After opening the Registry Editor go to this location –
HKEY_CLASSES_ROOT\Directory\Background\shell
2. Again, right-click on the “shell” key and then click on “New>” and then on “Key“.
3. Name the key as the application name which you want on the right-click context menu (We have named it “PainDotNet” ).

4. Again, right-click on the new key and then click on “New>” and then on “Key“.
5. Name the key as “command“.

Minimize the Registry Editor window.
6. What you need to do is to right-click on the application icon on the desktop and click on “Properties“.

7. Navigate to the “Shortcut” tab.
8. After that, copy the path mentioned in the “Target:” box.

Close File Explorer window.
9. Select the created key from the left pane. (On our system, it is the ‘PaintDotNet‘)
10. Next you need to double click on the “(Default)” string.

11. Here, you can set what you will see in the right-click context menu of the desktop.
(For us it is – “Paint it with Paint.Net”. Whenever we will right-click on an item, ‘Paint it with Paint.Net‘ will appear. )
12. Click on “OK” to save the changes on your computer.

13. You need to double click on the “command” key.
14. On the right-hand side, double click on “(Default)” to modify it.

15. Set the ‘Value data:’ in this format.
“application location“.
As for this pc, the value data is the ‘location PaintDotNet’. So the value will be like this –
16. Click on “OK” to save the changes.

That’s it! You have the desired app just two clicks away anywhere from the desktop.
Just refresh the desktop and right-click once to witness the change yourself.

Modify the right-click context menu on desktop
You can modify the right-click menu on the folder. You can find the list of available keys under any of these header keys –
HKEY_CLASSES_ROOT\Folder\shellex\ContextMenuHandlers\
HKEY_CLASSES_ROOT\Directory\shell
You can add/remove any of the application shortcuts in the particular menu simply by following the process mentioned before.
ALTERNATIVE APPROACHES
The process of altering or adding new items to the context menu is a time-consuming affair. You have to be careful at each step as you are altering sub-sequent registry keys.
That is the reason, context menu editors are available. We have given a list of context editors here –
1. Ultimate Windows Customizer, Right-Click Extender, Ultimate Windows Tweaker, & Context Menu Editor
2. ContextEdit
3. ShellExtView or ShellMenuView
5. MenuMaid
You can use any of the above mentioned tools to modify the right-click context menu without modifying the registry on your own.