Some Windows 11 and Windows 10 users are complaining about a particular issue of absence of “NEW >” context menu from their respective Windows 10 systems. In case, if you are right-clicking on desktop window and unable to find the “NEW >” context menu on your computer, simply follow the process described in this article and the problem will be solved.
Fix 1 – Editing Registry to Fix missing New
1 – Search regedit in Windows search and click on it to open Registry editor.

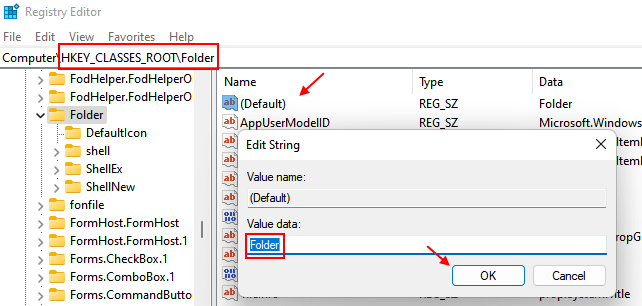
2 – Now, Go to the following location in Registry editor.
HKEY_CLASSES_ROOT\Folder
3 – Now, in the right side , Double click on Default.
4 – Now, make sure the Value data is Folder.
If it is not Just change it to Folder and click OK.

Fix 2 – Restore missing “NEW” context file
To restore your old context menu, follow these steps-
1. At first, type “regedit” in the search box and hit ‘Enter‘ from your keyboard to access the Registry Editor.

2. In the Registry Editor window, click on “File” on the menu bar and then click on “Export“.
3. Save the file in a secure location.

This is to create a backup of the registry.
If anything goes wrong, it will be easy for you to recover the registry.
5. In Registry Editor window, on the left pane, simply expand on the left side-
HKEY_CLASSES_ROOT\Directory\Background\shellex\ContextMenuHandlers\New\
6. Now, on the right pane of Registry Editor window, check if there is a “Default” key or not.
7. Check if the Value Data of “(Default)” is “{D969A300-E7FF-11d0-A93B-00A0C90F2719}.
Otherwise, follow the next steps to create the ‘(Default)‘ string on your computer.

8. Following two cases may prevail-
9. If the ‘Value Data’ of (Default) is different– you have to change the ‘Value Data‘.
Follow the steps-
a. Double click on “(Default)” string.

b. Now, copy-paste this data in the Edit String window, and then click on “OK“.
{D969A300-E7FF-11d0-A93B-00A0C90F2719}

10. If you see there is no “Default” string in the right pane- then you have to create the string on your computer.
a. Right-click in the open space in the Registry Editor window and then click on “New >” and then click on “Multi-String Value“.
b. Name the string as “(Default)“.

c. Double click on “(Default)” string.

d. Now, copy-paste this data in the Edit String window, and then click on “OK“.
{D969A300-E7FF-11d0-A93B-00A0C90F2719}

Now, you have to restart File Explorer on your computer.
Follow the steps to do the same-
a. Press Ctrl+Shift+Enter to launch Task Manager on your computer.
b. In the Task Manager window, scroll down and find the “File Explorer” process on your computer.
c. Right-click on it and then click on “Restart” to restart the process on your computer.

After restarting File Explorer, right-click and check, “New” context menu will be restored successfully.
Fix 3 – What to do if Creating new Folder creates a shortcut
Some user reported that when they Tried to create new shortcut using CTRL + SHIFT + N, then it is creating a blank shortcut. To fix this issue , follow the steps given below.
1 – Search regedit in Windows search and click on it to open Registry editor.

2 – Now, Go to the following location in Registry editor.
HKEY_CLASSES_ROOT\Folder\ShellNew
3 – Now, In the right side locate Handler and NullFile.
4 – Delete Both of them