What is “Send Do Not Track requests”?
The tracking protection measure goes by the “Send Do Not Track requests” option in Microsoft edge Windows 10. It works by giving the user protection against third party websites; that is, none of those sites and advertisers will not be able to see your browsing activity anymore after you’ve enabled “Send Do Not Track requests”. The setting, when enabled, will send a request to the sites and advertisers concerned, whose ads may be displayed on the websites you visit.
Send Do Not Track requests: why to enable it
Often, when you are browsing sites on the Internet, certain third party websites and advertisers tend to track your web activity. Often this is just so that they can prompt and recommend the types of sites, or the types of products, articles, etc that you might like to view online. But certain malicious websites may also be tracking your Internet activity, and that certainly is not a comfortable thought for any user. All of us would like to protect our privacy, even on the Internet, which is why, Edge, the new browser for Windows 10 being a venture initiated by Microsoft, should have better cyber protection to offer its users. As Microsoft has become increasingly concerned about user security, and has enabled various protection measures on the Windows 10 OS, it’s surprising to some that the tracking protection measure on Windows 10 is disabled by default.
How to Enable Send Do Not Track requests in Microsoft Edge
Microsoft is basically offering users an open choice: they can enable the tracking protection option if they so prefer, but if they aren’t concerned about sharing their browsing history, they are free to let the setting remain disabled. Honestly, there isn’t much cause for concern with regards to user security if tracking protection is disabled, but a lot of users would prefer their activity to remain confidential.
For those users who want to keep their browsing info private to themselves, here’s how to enable “Send Do Not Track requests” for Edge on Windows 10-
- First, you need to open the Edge browser.
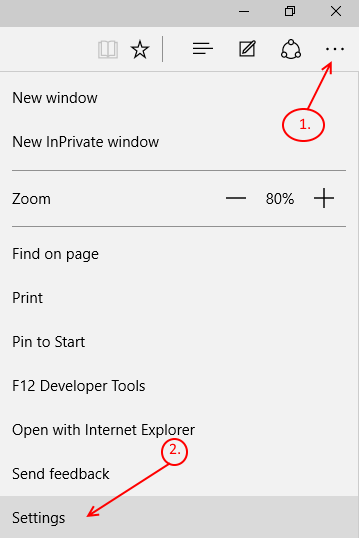
- Next, click on the More Actions option (represented by three horizontal dots) at the top right hand corner of your browser.
- Choose the last option from the list, “Settings”.

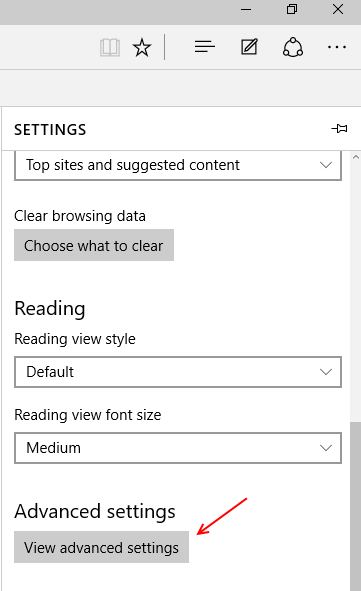
- Scroll down and Select “View Advanced setting” from the bottom of the Settings menu.

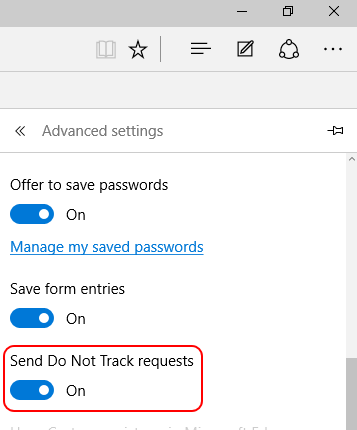
- Now under Privacy and services category, you will find an option called “Send Do Not Track requests”. Just switch the slider from Off to On. This will enable tracking protection for your browsing activity on Edge.

Note: Some websites may still be able to track your browsing history even if you have enabled tracking protection using the “Send Do Not Track requests” option.
- These websites will most likely ignore the request not to track your browsing info, and will track it anyway, you can’t particularly prevent that.
- They might react to your request by making a few modifications: for instance, they might put up random ads for you to see, rather than ads recommended specially for you, based on your surfing history and interests.
- Other websites might request you to let them access your browsing info, and if you feel that they can be trusted, or that you want those particular sites to track you, grant them the permission.