The drag and drop functionality in Windows 10 or windows 11 , makes it convenient for you to move files and folders from one location to another. But, there are times, when the drag and drop feature stops working making it difficult for you to move files or folders directly. The good news is, the drag and drop feature not working issue in your Windows 10/11 PC can be fixed. But, before you proceed with the below methods, make sure you check if the USB cables, ports or the hub is working properly, check if the wireless device can be reset, or if the mouse (external device) is not damaged. If these don’t help, proceed with the below methods to check if they fix the issue.
Method 1: Using the Left Click and Esc Key
Step 1: Go to the file or folder on your desktop that you want to drag, left-click on it.
Step 2: While holding down the left-click mouse button, press the Escape (Esc) key on your keyboard once.
Step 3: Now, release the left-click.
You should now be able to use the drag and drop feature normally.
Method 2: Restart the App or Program
Just Save your work and quickly close the program and then open it again. Now, try dragging and dropping again.
Method 3: Restart Windows explorer
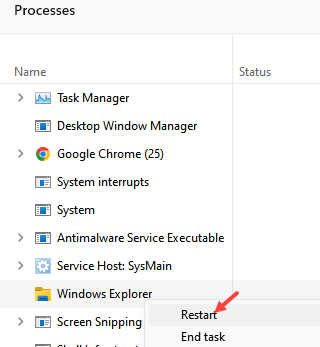
1 – Open Task manager by hitting CTRL + SHIFT + Esc keys jointly.
2 -Now, Locate Windows eplorer from the list.
3 -Do a right click on Windows explorer and then click restart

Method 4: Check if Your Drag and Drop Sensitivity is Set Too High
Step 1: Press the Win + X shortcut key to open the context menu. Select Run from the menu to open the Run command box.
Step 2: Here, in the Run command box, type regedit in the search field and press OK to open the Registry Editor window.

*Note – Before you edit the Registry Editor, make sure to create a backup of the registry data, so that, in case you lose in data during the process, you can recover the same.
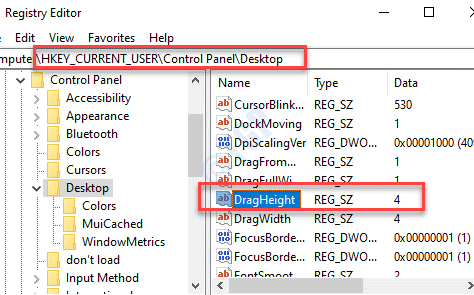
Step 3: In the Registry Editor window, navigate to the below path:
HKEY_CURRENT_USER\Control Panel\Desktop
Now, go to the right side of the pane and select the DragHeight string value. The Data value as seen on the right, is set to 4 by-default.
Double-click on the string value.

Step 4: In the Edit String window, go to the Value data field and change the value to a little higher. For instance, we changed it to 50.
Press OK to save changes and exit.
*Note – You can change it to a value your prefer, however, avoid setting it too high. Setting a too high value can again create problems with the drag and drop feature.

Step 5: Once you are back to the Registry Editor, select the DragWidth string value (just below the DragHeight string value) and double-click on it.
This is also set to 4 by-default.

Step 6:Now, repeat the Step 4 for this string value also and set the same value as shown in Step 4.
Press OK to save the changes and exit.

Now, exit Registry Editor and reboot your machine. The drag and drop feature should be working now.
Method 5: By Disabling UAC Through Registry Editor
Step 1: Press the Win + R keys together on your keyboard to launch the Run command box.
Step 2: Type regedit in the Run command search box and press OK to open the Registry Editor window.

*Note – Before you make any changes to the Registry Editor, make sure you create a backup of the Registry settings. This will help yo restore any data that you may lose during the process.
Step 3: Now, copy and paste the below path in the Registry Editor address bar and press Enter:
HKEY_LOCAL_MACHINE\SOFTWARE\Microsoft\Windows\CurrentVersion\Policies\System
Now, go to the right side of the pane, locate EnableLUA and double-click on it.

Step 4: In the Edit DWORD (32-bit) Value box that opens, change the Value data field from 1 to 0.
Press OK to save the changes and exit.

Now, exit Registry Editor and restart your PC. You should now be able to use the drag and drop feature as normal.
Method 6: By Running SFC /Scannow in Command Prompt
Step 1: Press the Win + X hotkey on your keyboard to open the Run command window.

Step 2: Write cmd in the Run command search box and press the Ctrl + Shift + Enter shortcut key together on your keyboard to launch the Command Prompt in elevated mode.

Step 3: In the Command Prompt (admin) window, run the below command and hit Enter:
sfc /scannow

Now, wait for sometimes, as the process takes a while. It will run a scan and if any issues detected, will fix them immediately.
Once done, restart your PC and your drag and drop issue should be resolved.
Method 7: By Running DISM in Windows PowerShell
Step 1: Right-click on the Start menu and select Windows PowerShell (Admin).

Step 2: In the Windows PowerShell (admin) window, execute the below command:
DISM.exe /Online /Cleanup-image /Restorehealth

Now, wait for the process to get over. It will run a scan and remove any corrupted system files on the spot.
Once complete, exit PowerShell and reboot your PC. You can now try the drag and drop feature anad it should be working now.
Method 8: Modifying the User Account Control Settings
Step 1: Press Windows key + R keys together to open run.
Step 2: In the Run command window, write useraccountcontrolsettings in the search field and hit Enter. This will open the User Account Control Settings window.

Step 3: In the User Account Control Settings window, set the bar to the recommended settings which is, Notify me only when applications try to make changes to my computer (default).
Press OK to save changes and exit.

Step 4: Press Yes in the UAC prompt to confirm the changes.
Now, go back and check if the drag and drop feature is working now.
Method 9: By Setting the Virtual Memory to Automatic
Step 1: Right-click on the Start and click on Run in the context menu. This will open the Run command window.

Step 2: In the Run command search field, write sysdm.cpl and hit Enter to open the System Properties.

Step 3: In the System Properties window, go to the Advanced tab and under the Performance section, click on Settings.

Step 4: In the Performance Options window, click on the Advanced tab and under the Adjust for best performance of section, select Programs.
Now, under the Virtual Memory section, click on the Change button.

Step 5: In the Virtual Memory window, check the box next to Automatically manage paging file size for all drives.
Press Apply and then OK to save the changes and exit.

Now, restart your system and check if you can now drag and drop files and folder as before.
Method 10: By Uninstalling and Reinstalling Mouse Drivers
Step 1: Right-click on Start menu and select Device Manager.

Step 2: In the Device Manager window, go to Mice and other pointing devices.
Expand the section, right-click on the mouse you want to remove and click on Uninstall device.

Step 3: In the Uninstall Device pop up, click on Uninstall to confirm the action.

Now restart you PC and Windows will automatically detect and install the mouse driver.
You can now try using the rag and drop functionality and it should work fine now.
Method 11: By Restarting File Explorer
Step 1: Right-click on the Taskbar and select Task Manager.

Step 2: In the Task Manager window, go to the Details tab and look for explorer.exe.
Select it and click on the End task button at the bottom right.

Step 3: The desktop will disappear.
Now, go to the File tab and select Run new task.

Step 4: Go to the Explorer and press OK. This will restart the explorer.exe which will revert the desktop to its original state.
Now, try using the drag and drop feature for a file or folder and it should work normally.
Method 12: By Running the Hardware and Devices Troubleshooter
Step 1: Press the Win + R hotkey on your keyboard and it will open the Run command window.
Step 2: In the Run command window, write cmd and press the Ctrl + Shift + Enter keys together on your keyboard to open Command Prompt in admin mode.

Step 3: In the elevated Command Prompt window, run the below command and press Enter:
msdt.exe -id DeviceDiagnostic

Step 4: This will open the Hardware and Devices window.
Click on Advanced.

Step 5: Now, check the box next to Apply repairs automatically and then click Next.

The troubleshooter will now start detecting any problems. If any problems detected, simply follow the on-screen instructions to complete the troubleshooting process. It will fix any issues found on the spot.
Once completed, reboot your PC and you should be able to drag and drop files and folders once again.
Method 13: By Running Startup Repair
Step 1: Press the Shift key and keep it pressed and then click on restart to go to advanced recovery mode.
Here, select Advanced options.
Step 2: In the Choose an option window, click on Troubleshoot.

Step 3: Next, under the Troubleshoot section, select Advanced options.

Step 4: Next, in the Advanced options screen, click on Startup Repair.

Once the repair process is complete, check if the drag and drop feature is working.
You can now run the Windows Update to check if there are any recent updates. If any updates available, it will download and install the updates and drivers automatically. This should fix your drag and drop isue.
However, if the issue still persists, you may check if you have the Fences app. If it is on your system, uninstall the app and then re-install it again. restart your PC and the problem should be resolved. Alternatively, you can also try using a VPN to stay anonymous and keep yourself safe from 3rd parties tracking you online activities, which may be a reason why your drag and drop feature stops working. Make sure that you also keep your system protected from malware and ransomware, that may block some of your system features. You may also try performing a repair upgrade using a Windows 10 installation media.
If nothing works, the only option left would be to Reset your PC. Here’s how you can reset your Windows 10 PC without losing your files.