Are you experiencing Windows 11 slow shutdown and restart issue? Well, this is a common issue that occurs for all PC users someday. When shutting down your PC you may notice that it’s taking longer than usual, sometimes even a few minutes. Same is the case when you try to reboot your PC.
While the issue can sometimes arise due to too many apps running in the background, a lot of startup items that load during the Windows 11 startup, due to a 3rd party antivirus software, due to a recent driver update or due to an outdated BIOS. Whatever may be the reason, this issue needs your urgent attention before things get too complicated. Here are a few possible solutions that may help fix the Windows 11 slow shutdown and restart issue.
*Note – Before you proceed with any methods below, try removing any USB device connected to your PC before you shut down your PC. Sometimes, a bug in the USB Type- C Connector System Software Interface (UCSI) may lead to the shut down delay, like about a minute. If this does not fix the issue, proceed with the below methods.
Method 1: Close Background Apps in Task Manager
The slow shut down or restart issue may often occur due to too many apps open in the background which can cause your PC to slow down the startup and shut down automatically. Let’s see how to close these background apps that you are not using:
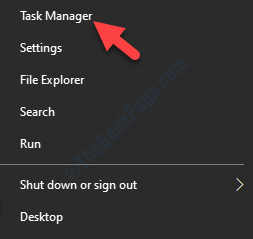
Step 1: Right-click on the Start and select Task Manager.

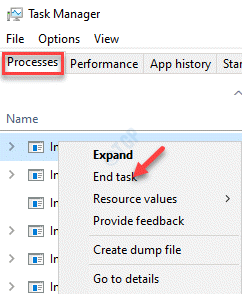
Step 2: In the Task Manager window, under the Background processes the apps that are running.
If you find any app that’s running in the background which you are not using, right-click on it and select End task.

Once you have closed the task, you can shut down or restart your PC to check if the issue is resolved.
Method 2: Close Startup Items through Task Manager
Sometimes, your Windows 11 PC may take longer to start due to some apps or services that get loaded during the system startup.However, disabling the startup items which you may not be using at the moment and need later, can resolve the issue. Let’s see how:
Step 1: Press the Win + R keys together on your keyboard to open the Run command window.
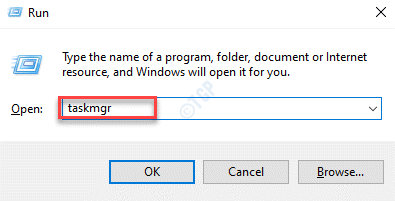
Step 2: In the Run command search field, type Taskmgr and hit Enter to open the Task Manager.

Step 3: In the Task Manager window, select the Startup tab, select the Startup item that you may not require, right-click on it and select Disable.
Now, disable all the unused Startup items one by one.

Once done, exit the Task Manager window and try shutting down or restarting the PC and it should work normally now.
Method 3: Turn Off Fast Startup
Sometimes, the slow shut down and restart issue on your Windows 11 PC could be simply due to the fast start-up feature. Hence, disabling the fast start=up feature may help fix the issue. Here’s how:
Step 1: Right-click on Start and select Run from the right-click menu.

Step 2: This will open the Run command window.
Here, type powercfg.cpl in the search bar and hit Enter to open the Power Options screen in the Control Panel window.

Step 3: In the Power Options window, go to the left side and click on Choose what the power buttons do.

Step 4: Next, in the System Settings window, go to Define power buttons and turn on password protection > Change settings that are currently unavailable.

Step 5: Now, scroll down and under the Shut-down settings section, uncheck the box next to Turn on fast start-up (recommended) option.
Press Save changes button to apply the changes and exit.

You can now try shutting down your PC and you should not notice any lags.
Method 4: Run Power Troubleshooter
Step 1: Press the Win + R shortcut keys on your keyboard to launch the Run command box.
Step 2: In the Run command search field, type control.exe and hit Enter to open the Control Panel window.

Step 3: In the Control Panel window, go to upper right and next to the View by field, select Large icons from the drop-down.
Next, select Troubleshooting from the list.

Step 4: In the Troubleshooting window, click on View all on the left side of the pane.

Step 5: You will now be redirected to the All Categories window.
Here, in the Troubleshoot computer problems field, click on Power.

Step 6: It will open the Power troubleshooter.
Click on Next.

The troubleshooter will now start looking up for issues and if any found, it will apply the fix automatically.
Once done, exit the troubleshooter and control panel and try shutting down your PC.
Method 5: Create a Shutdown Shortcut
Step 1: Go to desktop, right-click and select New > Shortcut.

Step 2: In the Create Shortcut window, go to the Type the location of the item field and type the below shortcut:
Shutdown.exe -s -t 00
Click on Next.

Step 3: In the next screen, go to the Type a name for this shortcut field and name the shortcut according to your convenience.
For instance, we named it as Shutdown Shortcut.
Click on the Finish button below.

Once done, simply go to the desktop and double-click on the Shutdown Shortcut created and your PC should shut down without any issue.
Method 6: Make Changes to the Registry Editor
Step 1: Right-click on the Windows icon (Start) located at the center of the Taskbar and select Run.

Step 2: In the Run command window that opens, type regedit in the search bar and press OK to launch the Registry Editor window.

Step 3: In the Registry Editor window, navigate to the below path:
HKEY_LOCAL_MACHINE\SYSTEM\CurrentControlSet\Control
Now, go to the right side of the window and look for the String value – WaitToKillServiceTimeout.
Double-click on it.

Step 4: In the Edit String dialogue box, set the Value data to anywhere between 1000 to 20000.
This indicates a range between 1 to 20 seconds.
Press OK to save and return to the Registry Editor.

Step 5: Now, copy and paste the below path in the Registry Editor address bar and press Enter:
HKEY_LOCAL_MACHINE\SYSTEM\CurrentControlSet\Control\Session Manager\Memory Management
Now, go to the right side and locate the DWORD Value – ClearPageFileAtShutdown.
Double-click on it.

Step 6: In the Edit DWORD (32-bit) Value dialogue box, set the Value data field to 0.
Press OK to save the changes and return to the Registry Editor.

Step 7: Again navigate to the below path in the Registry Editor:
HKEY_CURRENT_USER\Control Panel\Desktop
Now, travel to the right side of the pane and right-click on an empty area.
Select New > String Value.

Step 8: Rename the new string value as HungAppTimeout.
Double-click on it.

Step 9: In the Edit String Value dialogue box, set the Value data field to a minimum of 1000 ms.

Step 10: Again, right-click on a blank space, select New > String Value.
Rename this new String Value as WaitToKillAppTimeout.

Step 11: As the Edit String Value dialogue box opens, set the value in the Value data field to a minimum of 1000 ms.

Now, reboot your system and the slow shut down and restart issue for your Windows 11 PC should be resolved.
Method 7: Roll Back AMD driver update
If your system is using AMD processor, you can try rolling back the driver to the older version and check if that helps. Here’s how to roll back the AMD driver:
Step 1: Press the Win + X shortcut on your keyboard and select Run.

Step 2: This will open the Run command window.
In the search box, type devmgmt.msc and hit Enter to open the Device Manager window.

Step 3: In the Device Manager window, go to System devices and expand the section.
Now, right-click on the AMD Audio CoProcessor device and select Properties.

Step 4: In the Properties window, select the Driver tab and press the Roll Back Driver button.
Once done, click on the OK button to save the changes and exit.

Restart your PC for the changes to be effective and you should not face the slow shutdown or restart issue.
Method 8: Run an SFC Scan
System File Checker is a built-in Windows tool that that runs a scan to detect and repair any corrupt system files or replace the damaged files with new ones, thus, may help you fix the issue sometimes. Here’s how to run an SFC scan:
Step 1: Press the Win + R hotkeys to open the Run command window.
Step 2: In the Run command search field, type cmd and press the CTRL + Shift + Enter keys together on your keyboard to open the elevated Command Prompt window.

Step 3: In the Command Prompt (admin) window, run the below command and hit Enter:
sfc /scannow

Now, wait for the scan to get over since it takes a while.
If it finds any corrupt system files it will either try to fix them on the spot or replace them fresh ones.
*Note – Before you proceed to make any changes to the Registry Editor, make sure you create a backup of the registry data so that, in case you lose any data during the process, you can recover the same.
Once the process is successfully complete, exit Command Prompt and reboot your PC. Your PC should now restart or shutdown normally, without any delay.
Method 9: Run CHKDSK Command
Step 1: Press the Win + R keys simultaneously on your keyboard and the Run command window opens.
Step 2: In the search field, type cmd and press the Ctrl + Shift + Enter keys together on your keyboard to open the elevated Command Prompt.

Step 3: In the Command Prompt (admin) window, run the below command and hit Enter:
CHKDSK C:/F

The process takes a while to complete, so wait till it’s over.
Once done, close the Command Prompt window and restart your PC to check if the slow shut down and restart issue is fixed.
Method 10: Run a DISM Scan
Once you are done with the SFC scan, you should also run a DISM scan to repair your Windows image or to make changes to the Windows installation media. Let’s see how:
Step 1: Press the Win + X keys together on your keyboard and select Run from the menu.

Step 2: In the Run command window that opens, in the search field, type cmd and press the Ctrl + Shift + Enter hotkeys to open the Command Prompt with administrator rights.

Step 3: Copy and paste the below command in the elevated Command Prompt window and hit Enter:
Dism /Online /Cleanup-Image /RestoreHealth

The DISM process takes a while so wait patiently till it gets over.
Once the process is complete successfully, close the Command Prompt window and restart your PC. Your PC should now restart and shut down without delay.
Method 11: Reset Your Power Plan
This method is useful if you have a customized power plan active and hence, resetting the existing power plan may help fix the issue. Let’s see how:
Step 1: Go to Start, right-click on it and select Run from the context menu.

Step 2: In the Run command box that opens, type powercfg.cpl in the search bar and press OK.

Step 3: This will open the Power Options screen in the Control Panel window.
Here, go to your active power plan and click on Change plan settings next to it.

Step 4: Next, in the Edit Plan Settings screen, click on the Change advanced power settings link at the bottom.

Step 5: In the Power Options dialogue box that opens, go towards the bottom and click on Restore plan defaults.
Press Apply and then OK to save the changes and exit.

Now, close the Control Panel window and reboot your PC to check if it restarts normally.
Method 12: Remove McAfee Antivirus Software
Try removing the McAfee antivirus and check if it resolve the issue. Let’s see how:
Step 1: Find and download the McAfee removal tool online.
Step 2: Once downloaded, double-click on the .exe file to open the McAfee Software Removal tool.
Step 3: In the McAfee Software Removal window, click on Next to proceed.

*Note – It will remove all the components installed by McAfee on your system.
Step 4: Next, select Agree to accepts the End User License Agreement.

Step 5: In the next screen, type the Captcha as security validation and press Next.

Step 6: Now, wait for the uninstallation process to complete.
Once done, exit the McAfee Software Removal window and restart your PC. Going forward, you should not face the slow shut down or restart issue.
Method 13: Restore Default Settings of PC by Entering BIOS
This method helps you to potentially fix the issue by restoring the default settings of the PC by entering the BIOS through the Advanced Recovery screen. You can refer to this article to open the UEFI BIOS settings in Windows 10. Your system will now reboot into BIOS instead of directing you to the login screen.
Once you have entered into the BIOS mode, press the F9 key on your keyboard to open the Load Default Options window.
Simply press Yes to confirm restore default settings procedure.
Now, wait for the process to complete. Once it’s over, restart or shut down your PC to check if it’s still slowing down.
*Note: In addition, you can also update your BIOS if you have not updated since long. Before you proceed to update the BIOS, check your current BIOS version. Now, visit your computer manufacturer’s website and check for the latest BIOS version. Download and install it, and check if it helps fix the issue.
Method 14: Run Startup Repair
When none of the above method works, you can try running a startup repair through the Advanced Recovery mode. Here’s how to run the startup repair:
Step 1: Press the Win + I keys together on your PC to launch the Settings app.
Step 2: In the Settings window, click on System on the left.

Step 3: Next, on the right side of the pane, click on Recovery.

Step 4: Now, go to the right side of the window and under the Recovery Options section, go to Advanced startup and click on Restart now.

Step 5: Your computer will now restart into Choose an option screen.
Select Troubleshoot.

Step 6: In the Troubleshoot screen, click on Advanced options.

Step 7: Next, in the Advanced options screen, click on Startup Repair/Automatic Repair.

Now, wait for Windows to repair any startup issues. Once done, it will restart your PC and the delay in reboot or shut down should be gone.