As we know webcam is an important part of every user’s computer setup and is used considerably for different activities by the user so it is prone to errors. Many users have been complaining of an issue with their webcam where it repeatedly keeps turning off and on again.
Some possible causes are malware intrusion or outdated system drivers. In this article, we have outlined solutions that have been adopted by users facing this issue to overcome it. Before trying the fixes in the article check the workarounds mentioned below.
Workarounds
1. Try using the webcam with another system and check if it works without any issue.
2. Connect the webcam to your PC without any extension cable or hubs.
3. In the streaming application being used, make sure the webcam is not set to the default ‘video in’.
4. Try booting your system in clean boot mode and check if it clears the webcam issue.
5 – Disable problematic Apps. Some apps are known to cause this camera conflict and create this issue. Some of them are listed below:-
- Nvidia Shadowplay
- Skype
- WaveMaxx Audio/WavesSysSvc/Waves Audio
- VirtualBox
- Desktop App Viewer
- Cortana
Disable these apps in task manager or try uninstalling them. After that check whether your issue got resolved or not.
Fix 1 – Turn Off Power Saving Feature for Webcam’s Port
1. Use the Windows and R keys to open the Run dialog.
2. Type devmgmt.msc to open the Device Manager.
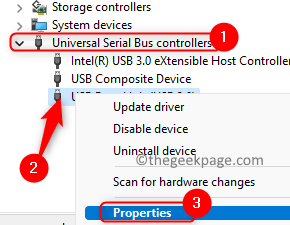
3. Double-click on Universal Serial Bus Controllers to expand it.
4. Locate the USB port to which the camera is connected. You might need to disable each port one by one to find the camera port.
5. Right-click on the Webcam’s USB port and choose Properties.
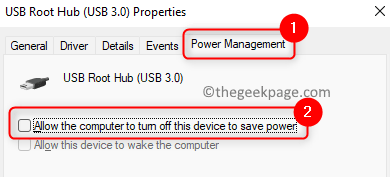
6. In the Properties window, go to the Power Management tab.
7. Uncheck the box associated with Allow the computer to turn off this device to save power.
8. Click on OK to save the changes.
9. Restart your computer and check if the webcam problem is solved.
Fix 2 – Modify the System Registry
1. Press Windows key + R to open Run.
2. Type regedit to open Registry Editor. Click on Yes when prompted by User Account Control.
3. Copy and paste the location in the navigation bar of your Registry Editor.
HKEY_LOCAL_MACHINE\SOFTWARE\Microsoft\Windows Media Foundation\Platform
4. Right-click on the Platform key and select New –> DWORD (32-bit) Value.
5. Name the new entry as EnableFrameServerMode.
6. Double-click on it and set the Value Data field to 0. Click on OK.
7. Go to the following location in the Registry Editor and repeat the steps from 4 to 6.
HKEY_LOCAL_MACHINE\SOFTWARE\WOW6432Node\Microsoft\Windows Media Foundation\Platform
8. Restart your PC and check if you have been able to fix the webcam.
Fix 3 – Change the Name of the RsProviders Folder
1. Press Windows key + R on your keyboard to open the Run dialog.
2. Type or copy and paste the location below
\Program Files\Realtek
3. Select the RsProviders folder and click on the Rename icon at the top.
4. Change the name of this folder to RsProviders_Backup or anything you prefer.
Note: If you are not able to rename the folder, use the Task Manager and end the Realtek process running on your system.
5. Reboot your PC and check if the webcam is working fine now.
6. If the issue still persists, ensure that you have renamed the above folder. Now copy and paste the same folder from another trusted computer.
7. Once you have the replaced folder, reboot your system and check if the webcam issue is solved.
Fix 4 – Update / Reinstall the Camera Application
Update Camera App
1. Press Windows + S and type Camera in the search box.
2. Right-click on the search result Camera App and click on Share.
3. Now you are redirected to the Windows Camera app page of Microsoft Store.
4. Check whether there is any update available for the app.
5. If there is any, perform the update. Restart your PC and check if the problem is fixed.
Reset the Camera App
1. Hit the Windows key and type Camera to search for the Camera app.
2. Right-click on Camera and choose the option App settings.
3. On the Camera settings page, click on the Terminate button.
4. Scroll down and click on the Reset button under the Reset group.
5. On the confirmation prompt, click on Reset again.
6. Restart your computer and check if the issue is resolved.
Reinstall the Camera App
1. Open Run (Windows + R). Type powershell and press Ctrl + Shift + Enter to open PowerShell as admin.
2. Enter the command below
Get-AppxPackage Microsoft.WindowsCamera | Remove-AppxPackage
3. Once the command executes, restart your PC.
4. Open PowerShell as in Step 1 mentioned above.
5. Run the command below to reinstall the Camera App.
Get-AppxPackage -allusers Microsoft.WindowsCamera | Foreach {Add-AppxPackage -DisableDevelopmentMode -Register “$($_.InstallLocation)\AppXManifest.xml”}
Note: You can use Microsoft Store to reinstall the Camera app
6. Restart your computer and check if the webcam problem is fixed.
Fix 5 – Uninstall and Reinstall the Camera Driver
1. At first go to the OEM website and download the latest drivers for your Camera.
2. Just press the Windows and R keys simultaneously to open the Run dialog.
3. Type devmgmt.msc to open the Device Manager.
4. Locate and double-click on Camera to expand it.
5. Right-click on your webcam in the list and click on Uninstall device.
6. In the confirmation prompt, check the option Delete the driver software for this device.
7. Then click on Uninstall button. Wait for the uninstallation process to finish.
8. Go to the View menu and choose Show hidden devices.
9. Now remove all the hidden untrusted devices like audio, video, and camera devices. In case there is another Camera then consider removing it as well.
10. Restart your system.
11. Windows will automatically try to install these missing camera drivers. In case the drivers are not installed, you can install the drivers downloaded in Step 1. Check if the problem is fixed.
Fix 6 – Disable Camera Access in Privacy Settings
1. Open Run (Windows + R) and type ms-settings:privacy to open Privacy & Security Settings.
2. Scroll down and select Camera under App permissions.
3. In the Camera privacy settings, turn off the toggle associated with Let apps access your camera to disable the camera.
4. Also, turn off the toggle associated with Let desktop apps access your camera.
5. Restart your computer and check if the webcam is working properly.
Fix 7 – Install the Latest Updates for Windows, Drivers, and BIOS
Update Windows
1. Open Run dialog using the Windows and R keys on your keyboard.
2. Type ms-settings:windowsupdate-action to open the Windows Update.
3. Click on Check for updates to see if there are any new updates available.
4. It will automatically download and install the new updates if any. Check that all the optional updates are also installed.
5. Restart your PC and check if the problem is fixed.
Click on Update drivers to update the drivers on your PC.
Follow the steps in this link to update the BIOS.
Check if the webcam is functioning properly after the update.
Fix 8 – Disable / Remove Problematic Programs
To find the problematic application:
1. Clean boot your PC to see if it helps clear the issue.
2. If the problem is solved, then enable the processes disabled in the clean boot mode one at a time until you find the one that is triggering the error.
3. Once you find the conflicting application, use any one of the methods below:
a. Open the Task Manager (Ctrl + Shift + Esc). Right-click on the application and select End Task to kill the application process.
b. Disable the camera options for the particular application if available.
c. Uninstall the application.
- Open Run and type ms-settings:appsfeatures to open Apps & Features.
- Locate the problematic application.
- Click on the three vertical dots next to it and select Uninstall.
That’s it!
Your webcam must be working without any issues now. Comment and let us know the fix that worked for you.
Fix 9 – Run a Malware/Antivirus Scan
1. Disconnect the internet on your PC.
2. Open Run using Windows and R keys combination.
3. Type cleanmgr to launch the Disk Cleanup utility.
4. Select the drive on which you want to perform cleanup and click on OK.
5. In the next window, make sure to select Temporary files, Offline pages, and Temporary Internet Files that need to be deleted. Click on OK.
6. Wait for the cleanup process to complete.
7. Now run an antivirus/malware scan for your PC using any third-party antivirus software.
8. Once the scan completes, check if the webcam issue has been fixed. If any malware is detected, it is advised to contact professionals to clear the problem.
Note: In case you are not able to run the scan at any point, then boot your system in safe mode and try running the scan again.


