Clean Booting is an enhanced feature of the normal booting process. During the booting process, usually , all the files and programs required for the OS to execute, as well as customizing the environment is done. Clean booting differs from the normal booting in the sense that, it eliminates all the optional features, and loads only those that are absolutely required by the OS currently. Also,there might be certain errors which can’t easily be identified at start up, but they appear frequent enough. Clean boot does certain diagnostic tests which can help troubleshooting certain errors that might creep in during the normal booting process. Clean booting is adopted in many systems for a faster execution as well as to clean up the whole system from further errors.
The Safe mode can be adopted in the system by pressing the F8 button on the system start up. It minimizes the drivers needed by the operating system for speeding up execution, but does not correct any error. This is the reason why we need to prefer Clean boot over the Safe mode process. The method of doing so in Windows 10 operating system is a bit different from how you perform it in it’s previous versions.
Also see: – what is fast startup and how to turn it on in windows 10
In order to adopt Clean boot in your system, navigate through the steps in their order provided below. This process requires many actions to be undertaken. After each such action, you will have to restart your system. Also, it is always better to create a system restore point before starting this, in case anything goes wrong.This brings back the system to the state where you left off when you started performing the clean boot.Let us now move on to accomplish our need.
Steps to Perform CLEAN BOOT in Windows computer
STEP 1 – Initially, you will have to type msconfig in the Search bar provided at the bottom left of your desktop. Hit Enter once you are done. This is to open up all the system configurations of basic Microsoft Settings.
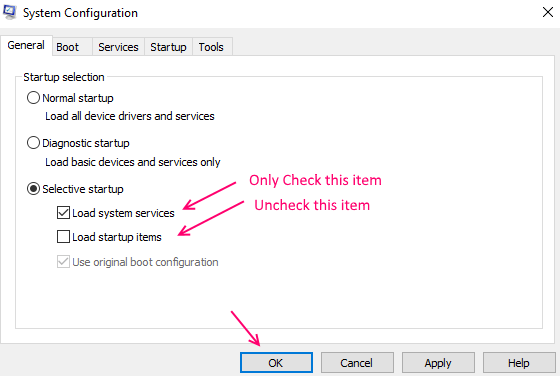
STEP 2 – On the window that pops up, click on the radio button just before Selective Start up below the tab Startup Selection. Also make sure that only “Load system services” option is checked in selective startup.

Hit the OK button once you are done.
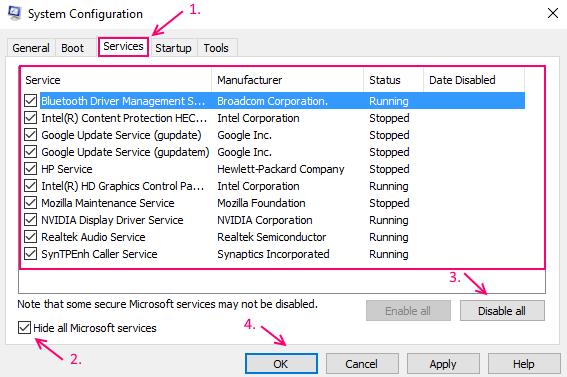
STEP 3 – Now from the menu at top, you will have to choose the Services tab. This includes all the services that is provided by Microsoft on your Windows system.
STEP 4 – Now, check the option that says Hide all Microsoft Services. . Now choose the option Disable All.

Hit the Apply button and then OK.
Step 5 – Now, click on startup Tab.
Step 6 – Now, click on Open Task manager.

Step 7 – Now, Right click and disable everything you see in the startup tab.

STEP 8 – Now restart you computer which will open itself in the clean boot mode. All the errors will now be fixed and the system behaves normally, with faster execution of programs.
That’s it. Hope you found this article useful!.
How to revert back to Normal boot from CLEAN BOOT state
STEP 1 – Initially, you will have to type msconfig in the Search bar provided at the bottom left of your desktop. Hit Enter once you are done. This is to open up all the system configurations of basic Microsoft Settings.
Step 2 – Now, Click on General Tab and then select Normal Startup.
Step 3 – Click on Ok and then restart your computer.
