Windows 11 now has a new privacy feature called DNS over https (DoH). Every computer has default DNS settings inbuilt. Changing these settings and using encrypted data communication ( DoH) provides security and also helps in improving privacy and browsing speed.
DNS is called DOMAIN NAME SYSTEM. It is the phone book/address book of the internet. When you wish to visit a website you will type the site name in the domain name (like google.com), a request is sent to the Domain Name System Server. DNS Server converts this into an IP address so that the web browser will understand, and will open the site you asked for. This process was done unencrypted initially making it more prone to cyber-attacks and man-in-the-middle attacks. Using this new DNS over https (DoH) feature, data communication between your system and DoH based DNS server is encrypted and has privacy on the web. Continue reading this article to know how to enable this feature in Windows 11.
How to Enable DNS Over https in Windows 11?
Before you get down to configure DNS Over https (DoH) on your computer, you need to know the DNS Services which accept DOH. Below is the list of supporting DNS Servers for both IPv4 and IPv6 connectivity.
Supporting IPv4 DNS Server Services
Cloudflare:
Preferred DNS: 1.1.1.1
Alternate DNS: 1.0.0.1
Google:
Preferred DNS: 8.8.8.8
Alternate DNS: 8.8.4.4
Quad9:
Preferred DNS: 9.9.9.9
Alternate DNS: 149.112.112.112
Supporting IPv6 DNS Server Services
Cloudflare:
Preferred DNS: 2606:4700:4700::1111
Alternate DNS: 2606:4700:4700::1001
Google:
Preferred DNS: 2001:4860:4860::8888
Alternate DNS: 2001:4860:4860::8844
Quad9:
Preferred DNS: 2620:fe::fe
Alternate DNS: 2620:fe::fe:9
Once you have the DNS Servers to use to enable DoH, just follow the steps below one by one to configure DNS Over https for more secured browsing.
Step 1: Press Win+I keys to open the Settings page.
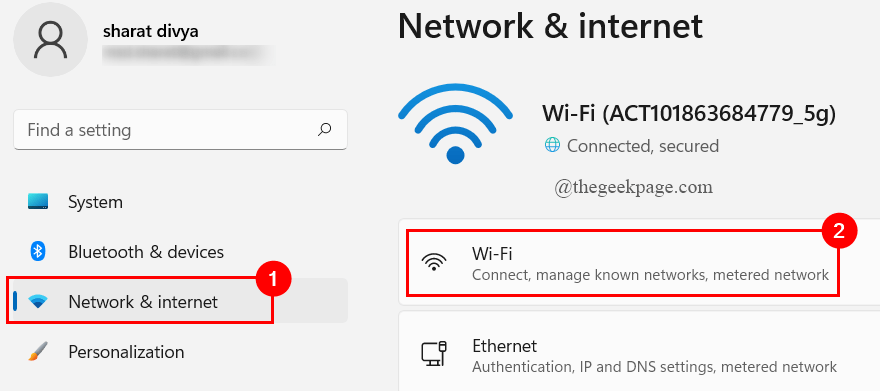
Step 2: Click on Network & Internet.
Step 3: Now, click on the network that you are using currently.
( We are using a Wifi connection here, so we selected that)
NOTE: If you use an Ethernet connection, simply click on Network & Internet > Ethernet.
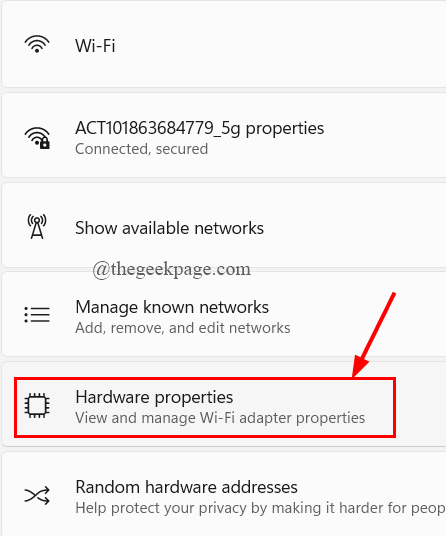
Step 4: Click on Hardware Properties.
Step 5: You can find DNS Server Assignment, Click on Edit.
NOTE: When you are using Ethernet Connection, you will be directed to the DNS Server Assignment page. Hardware Properties Step is not required.
Step 6: In the appearing window, click on the drop-down button to select Manual.
Step 7: Next, you will see two connectivity options – IPv4 or IPv6. First, toggle the switch to ON for IPv4.
Step 8: Under Preferred DNS settings, type 8.8.8.8.
Step 9: Next, set the Preferred DNS Encryption to Encrypted only ( DNS over https).
Step 10: Now, under Alternate DNS Settings, type 8.8.4.4.
Step 11: Next, Set Alternate DNS Encryption to Encrypted only ( DNS over https).
Step 12: After this, Repeat the above process (Step 7 – Step 11 ) for IPv6 connectivity.
( Set Preferred DNS to 2001:4860:4860::8888 and Alternate DNS to 2001:4860:4860::8844 )
Step 13: Finally, click on Save.
Step 14: Now, you can see your encrypted DNS Servers as shown below.
Additional Tip: If your computer uses either IPv4 or IPv6 connectivity, you can simply use only the particular change of settings related to the connectivity. ( Here, our computer uses both IPv4 and IPv6. Hence, we changed both the settings)
To check your adapter Network Connectivity type, follow the path given below.
Settings > Network & Internet > Wifi > Properties – If you are using a Wifi Connection.
Settings > Network & Internet > Ethernet > Status – If you are using an Etherenet Connection.
That’s all.
You are all set and your browsing is secure and private.
Hope this article is informative and useful.
Thanks for Reading.


