While installing Microsoft .NET Framework, users have encountered the error message as below:
“Installation Did Not Succeed
.NET Framework 4.8 has not been installed because:
The timestamp signature and/or certificate could not be verified or is malformed.”
Generally, this error is seen when Windows on your system is outdated, or you have an outdated .NET installer, driver, or root certificate. Also if the system drivers are not digitally signed then there are chances of seeing this error. In this article, you will get to know some solutions to overcome this Timestamp Signature or Certificate not verified error on your Windows PC.
Fix 1 – Try to download Offline installer
If none of the fixes above work, check if downloading the Offline installer from the Microsoft download page for the .NET framework works in resolving the issue.
1. Go to the Microsoft Download page for the .NET framework.
2. Click on the link for the latest version (currently .Net Framework 4.8).
3. Scroll down to Advanced downloads.
4. In the Download type Offline Installer, click on Runtime at the right end to download the offline installer.

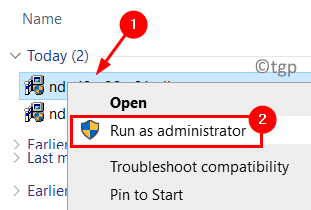
5. Right-click on the installer and select Run as administrator.

6. If the installation completes, it means the error has been fixed.
Fix 2 – Perform a Windows Update
Some users have reported that the timestamp error may be due to a mismatch between your Operating System and the application throwing the error. Updating Windows to the latest release has helped many to resolve this error.
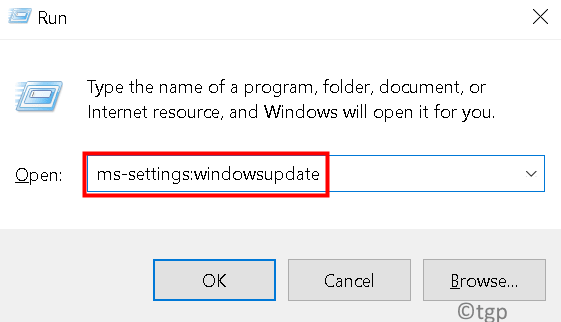
1. Press Windows + R to open Run.
2. Type ms-settings:windowsupdate to open Windows Update.

3. Now, click on the Check for updates button.

4. Download and install any available updates (even the optional updates).
5. Restart your system and then check if the issue is resolved.
Fix 3 – Download Latest Security Update for Windows
1. Click on this link to redirect to the browser for obtaining the Security Update for Windows .
2. Here, click on the Download button specific to your Windows architecture.

3. Once downloaded, run the installer to start the installation process.
4. Follow the on-screen instructions to complete the security update installation.
5. Click on the Restart Now button when it asks for a system restart.
6. After restart, perform the installation process for the .NET framework and check if the error is fixed.
Fix 4 – Check Certificate Timestamp
If you have an expired certificate, then Windows will not allow installing driver or .NET framework on your computer.
1. Right-click on the installer file and select Properties.

2. Go to the Digital Signatures tab.
3. Select the signer and click on the Details button.

4. In the Digital Signature Details window, click on the View Certificate button in Signer Information.

5. Check the Valid from date to Valid Till date.

6. If the certificate is expired, then you can download the latest version of the installer. Else look at the other fixes mentioned below.
Fix 5 – Use Latest .NET Framework Installer
1. Using your browser, go to the Microsoft website Download page for the .NET framework.
2. Select the latest and recommended .NET framework version (currently 4.8).

3. Click on the Download .NET Framework 4.8 Runtime button.

4. Once the download completes, double-click to launch the installer. Check if it installs without encountering the Timestamp or Certificate Verification error.

Fix 6 – Disable Code Signing for the Driver Package
1. Open Run by holding the Windows and R keys together.
2. Type gpedit.msc to open the Group Policy Editor.

3. In the Group Policy Editor window, expand User Configuration. Then move to the following folders:
Administrative Templates –> System –> Driver Installation
4. When you select Driver installation, on the right side double-click on Code signing for Driver packages.

5. In the new window that opens, select the Enabled option.
6. Open the dropdown below When Windows detects a driver file without a digital signature: and select Ignore.

7. Click on Apply to save the changes.
8. Reboot your system.
9. After startup, check if the error-throwing driver can be installed without any issues.
Fix 7 – Disable Auto Root Update of the Root Certificates
Using the third-party software DigiCert you can disable the auto root update of the root certificates.
1. Go to the DigiCert Download page using your browser.
2. Click on the Download button. Launch the utility once the download completes.

3. In the DigiCert utility window, go to the Tools tab on the left.
4. On the right side, click on the Auto Root Update button under Windows Automatic Root Update.

5. Change the setting to Disabled and click on OK.

6. Close the utility.
6. Restart your computer and check if the error is resolved.
Fix 8 – Disable Driver Signature Enforcement
Users have reported that if disabling the driver signature enforcement has helped them clear the issue. Follow the steps in the link Turn off driver signature enforcement.
Thanks for reading.
We hope this article has been informative enough to clear the Timestamp Signature and/or Certificate Not Verified error. Comment and let us know the fix that worked for you.