While in the usual circumstances you would not need to find out the BIOS version, there are certain situations when you would want to know. For instance, if there’s a BIOS update available, you would need to check the current version before you proceed.
The BIOS or the motherboard of your system keeps receiving updates at regular intervals just like most other software on your PC. The updates usually come with bug fixes, security patches, or to add new features. Knowing the BIOS version can also be helpful when you are having issues with the RAM or the CPU leading to errors and the information can help you troubleshoot the issues effectively.
However, with the all new Windows 11, users are still struggling to adjust with the new UI and features. Hence, this post will help you check the current BIOS version of your Windows 11 PC using a few methods. Let’s see how:
Method 1: Through System Information
This is one of the easiest and quickest methods to check the current BIOS version on your system. All you need is to pull up the details using the Microsoft system information program. Since this a built-in program, you do not need to install anything separately. Let’s see how to check the BIOS version:
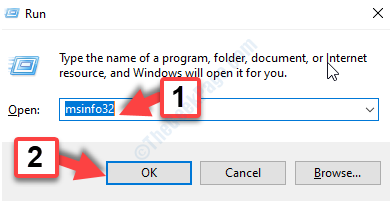
Step 1: Press the Win + R keys together on your keyboard to open the Run command window.
Step 2: In the Run command window, type msinfo32 in the search bar and press OK to open the System Information window.
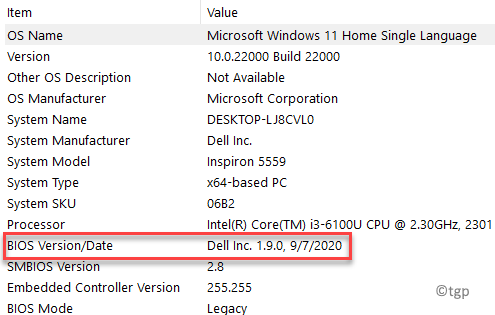
Step 3: In the System Information window, go to the right side and check for the BIOS Version/Date.
Now that you know the current BIOS version, make note of it to proceed with the troubleshooting process. You can also export the details by clicking on the File tab and then click on Export.
Method 2: Through Command Prompt
Command Prompt is another great way to find out the current BIOS version of your system, instantly and conveniently. For this, you would need to run the Command Prompt in the elevated mode:
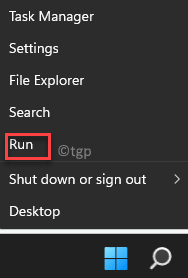
Step 1: Right-click on the Start menu and select Run.
Step 2: In the search field, type cmd and press the Ctrl + Shift + Enter keys together to open Command Prompt with admin rights.
Step 3: In the elevated Command Prompt window, run the below command and hit Enter:
systeminfo | findstr /I /c:bios
Wait till it pulls up the BIOS information, that is, the current BIOS version your system is running.
Method 3: Using the DirectX Diagnostic Tool
Alternatively, you can also get the system information using the DirectX Diagnostic Tool which is a built-in command. Follow the below instructions to run the command and find out the BIOS version in your Windows 11 PC:
Step 1: Go to Start and type dxdiag in the Windows search bar.
Now, go to the Best match section and click on the result to open the DirectX Diagnostic Tool.
Step 2: In the DirectX Diagnostic Tool window, under the System tab go to the System Information section and check for BIOS.
Here you will find the current BIOS version running on your system.
Once done, click on Exit to close the tool and proceed with the troubleshooting process with the information.
Now that you have the BIOS version information, you can proceed to fix any issues with your Windows 11 PC.
Method 4: By Rebooting Your PC
You can try this method, if you are comfortable checking the post results after a reboot. This is the conventional method to find the BIOS version of your Windows 11 PC. Here’s how to check:
Step 1: Simply go to the Start menu and Restart your PC normally.
Step 2: Now, patiently watch as the PC reboots and displays the BIOS version.
But, if you see the PC brand logo instead (as shown by most manufacturers), press the Esc or Tab key on your keyboard and it will show the POST details hidden behind the logo.
The POST details contain the BIOS version.
*Note – If the POST result page goes off before you can check the information, simply press the Pause key on your keyboard and this will give you enough time to check the POST results including the BIOS version.
Note down the BIOS version details. Make sure you write down the full details since it’s not clear which is exactly the BIOS version.
You can now use it for troubleshooting Windows issues.
Downloading a BIOS update tool is another good option as the tool interface shows all the details including the BIOS version. For this, you would need to find the online support for your PC or its motherboard manufacturer and then visit their official page to download the tool and then run it.
Alternatively, you can choose to download a 3rd party tool to show you all the details of your system BIOS including the BIOS version.


