Are you not receiving any new mails in your Microsoft Outlook client after upgrading to the Windows 11 from Windows 10? If that is the problem you are facing, you are not alone. A small number of users have escalated this error message “There is a problem with proxy server’s security certificate.” appearing in the Outlook screen. These are the only solutions you will need to fix the Outlook inbox once again.
Fix 1 – Enable the TLS 1.0 using regedit
You have to enable the TLS 1.0 using the Registry Editor on your device.
NOTE – You are going to modify the registry settings on your device. So, you should create a backup of the system registry. You can follow these steps just to do that.
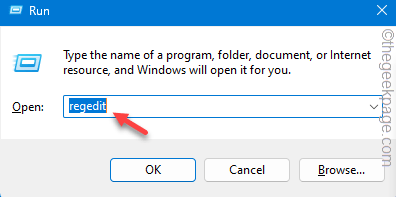
Step 1 – Call up a Run dialog box using the Win+R shortcuts.
Step 2 – Next, input this term and hit Enter.
regedit
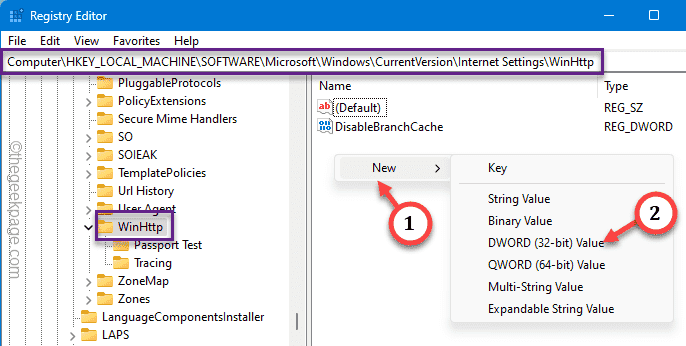
Step 3 – After getting access to the Registry Editor page, guide to this point in the system registry –
HKEY_LOCAL_MACHINE\SOFTWARE\Microsoft\Windows\CurrentVersion\Internet Settings\WinHttp
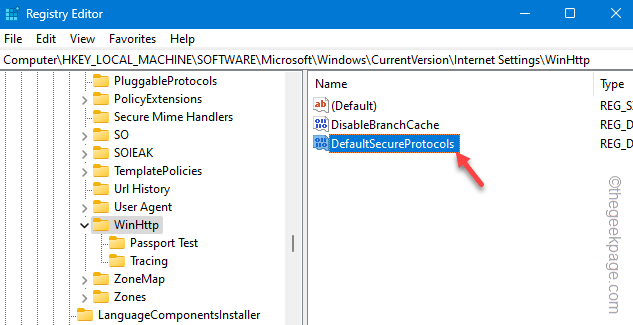
Step 4 – Look for the “DefaultSecureProtocols” DWORD value in the right-hand pane or not.
[
If you can’t see the value is present in the right-hand pane, you have to create this particular value.
1. To do this, just right-click on the right-hand pane and choose “New>” and “DWORD (32-bit) Value” consecutively.
2. After this, name this value as “DefaultSecureProtocols“.
]
Step 5 – Now, double-tap the “DefaultSecureProtocols” to edit that.
Step 6 – Type or copy-paste this “00000080” in the blank dialog box and hit Enter.
Quit the Registry Editor.
After you have closed the Registry Editor, you should restart the machine. As the machine reboots up, the registry edit does take its effect.
Launch the Outlook client. Check whether you can get to the Outlook inbox or not.
Fix 2 – Add TLS 1.2 to the exchange server
The TLS 1.0 and 1.1 security protocol is disabled in Windows 11 by default. So, if you are an IT admin, run this script on the server to add safely add TLS 1.2 to the Exchange servers.
Step 1 – Search and open the Notepad.
Step 2 – Then, copy-paste this script in the Notepad.
Windows Registry Editor Version 5.00
[HKEY_LOCAL_MACHINE\SYSTEM\CurrentControlSet\Control\SecurityProviders\SCHANNEL\Protocols\TLS 1.2]
[HKEY_LOCAL_MACHINE\SYSTEM\CurrentControlSet\Control\SecurityProviders\SCHANNEL\Protocols\TLS 1.2\Client]
"DisabledByDefault"=dword:00000000
"Enabled"=dword:00000001
[HKEY_LOCAL_MACHINE\SYSTEM\CurrentControlSet\Control\SecurityProviders\SCHANNEL\Protocols\TLS 1.2\Server]
"DisabledByDefault"=dword:00000000
"Enabled"=dword:00000001
Step 3 – Use Ctrl+Shift+S keys or tap “File” > “Save as“.
Step 4 – Choose a location to save the file and then, set the ‘File type’ to “All files“.
Step 5 – Then, name the file as “Enable-TLS.reg” and tap “Save“.
Quit Notepad and go to the location where you stored the script.
Step 6 – Finally, double-tap the “Enable-TLS” registry batch file to run it.
Step 7 – If there is a warning message (there will be one), tap “Yes” to confirm and proceed.
Restart the server after this.
Now, you won’t see the proxy server security message again.
Fix 3 – Run the AutoDiscover service
Check whether the AutoDiscover function is available with the Exchange Server or not.
Step 1 – You have to run a test on the Outlook servers. To do this, just click the arrow sign on the taskbar.
Step 2 – Look for the “Microsoft Outlook” logo in there. Now, press and hold the Ctrl key and then right-click that icon.
Step 3 – Now, tap the “Test Email AutoConfiguration” option to access that.
Step 4 – In the Test Email Auto Configuration page, write the email ID and password in individual boxes.
Step 5 – Now, make sure to tick the “Use AutoDiscover” function.
Step 6 – Finally, tap “Test” to test the function of the email.
Step 7 – Now, you may have to input your account password (mainly if you are using a gmail account) and tap “Allow” to allow the Outlook to manage your emails.
This may take a few seconds for it to verify your account status.
Step 8 – Once this entire process is done, you will be returned to the Test Email Auto Configuration page.
Step 9 – Now, go straight to the “Logs” tab.
Step 10 – Go to the bottom of the panel and test the “AutoDiscover to <exchange server>” message.
If the message ends with “succeeded” then the AutoDiscover feature is functioning properly.
Otherwise, the exchange server information is corrupt.
If that is the case, you should remove the account and add it further. Follow these steps to do that –
Step 1 – To do this, go to the “File” settings in Outlook.
Step 2 – After this, go to the “Info” tab.
Step 3 – Click the “Account settings” and further click “Account settings…” to access that.
Step 4 – Go the “Email” tab.
Step 5 – Now, select your business email account that you have and tap “Remove” to remove it.
Ignore any prompts and complete the removal process.
Step 6 – Now, you have to add the account once more. So, tap “New” to start adding the email.
Follow the steps on the screen and complete setting up the email account.
Fix 4 – Connect to MS Exchange using TCP/IP
If you are using a business account that uses Microsoft Exchange server, consider using the standard TCP/IP instead of http.
Step 1 – Open the Outlook. Ignore the error message for now.
Step 2 – Next, go to the “File” tab. There, go to the “Info” section and click “Account settings” and finally, choose “Account settings” to open that up.
Step 3 – When the Email Account setting loads up, get to the “Email” tab.
Step 4 – Double-tap the business email account that uses the Microsoft Exchange server.
Step 5 – As the Microsoft Exchange panel appears, go to the “Connection” tab.
Step 6 –In the Outlook Anywhere section, clear the “Connect to Microsoft Exchange using HTTP” box.
Step 7 – Save the change using the “Apply” and “OK” option.
Now, just close the Outlook client. Go ahead and quit it from the Taskbar Corner Overflow as well.
Relaunch the client and test. You won’t see the “There is a problem with proxy server’s security certificate.” error message in Outlook again.


