It’s a well known fact, how outdated device drivers can cause a glitch in your Windows system. You may see errors, or you may simply not be able to access certain files or programs just because the drivers are outdated. One such issue is when you see the “igfxEM module has stopped working” error as soon as you boot your Windows 10 PC.
This error is not common and usually shows up if you have an old version of Intel Graphics driver or if it’s unstable. It is a part of the Intel Common User Interface and are mostly found in laptops where it works as a display resolution. While it poses no security risks to your Windows system, you would need to update your graphics driver or roll back the driver to get rid of the error.
Here we have found a couple of workarounds for you that can help you get rid of the “igfxEM module has stopped working” error.
Method 1: By Updating the Display Driver
Step 1: Go to Start and type Device Manager in the search field.

Step 2: Now, left-click on the result to open the the Device Manager window.

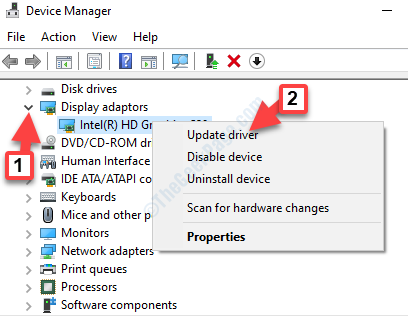
Step 3: In the Device Manager window, navigate to the Display adapters section and expand it.
Now, right-click on the Intel Graphics driver and select Update driver.

Step 4: Next, in the Update Drivers window, click on Search automatically for updated driver software.

Step 5: If there’s an update available, Windows will display the name or the list to select from. Follow the instructions thereafter, to complete the driver update. Now, restart your PC and you should not see the error anymore.
But, if it does not show any updates, then move on to the next method.
Method 2: By Installing the Driver on Your Own
Before you proceed with the manual installation of the driver, you must first check the Intel graphics card model and then, based on that info look up for the driver on the official website of Intel. You would firstly need to disable your internet and then uninstall your display driver. Once done, restart your computer to follow the below instructions to manually install the display driver.
How to Check your Graphics Card Model
Step 1: Navigate to Start and in the Windows search field, type dxdiag.

Step 2: Now, click on the result to open the DirectX Diagnostic Tool.

Step 3: In the DirectX Diagnostic Tool window, go to the Display tab and under Device, check Name.

Now that you know your Graphics card model, proceed with the manual installation of your driver.
How to Install Graphics driver Manually
Step 1: Click on the below link to open the Intel’s official page to download device drivers:
https://downloadcenter.intel.com/product/80939/Graphics
In the Drivers & Software section, go to the View by product field and select your product from the drop-down. You will have to make a selection based on your Intel Processor Generation.
*Note – To know how to find the Generation of your Intel Processor in Windows, refer to this article.

Step 2: Or, you can choose to go to Filter by and select the download based on your Operating system. For instance, if it’s Windows 10 32 bit/64 bit model or Windows 8 32 bit/64 bit, etc.
*Note – To know how to check your Windows 10 PC is 32 bit or 64 bit, read this article.

Step 3: In the next page, again navigate to View by product and this time select the Intel Graphics Card Model from the drop-down using the process as explained above.

Step 4: Or, you can choose to go to Filter by and select the download based on your Operating system. For instance, if it’s Windows 10 32 bit/64 bit model or Windows 8 32 bit/64 bit, etc.

Step 5: Now, select the driver from the list, preferably the first one in the list which is posted most recently.

Step 6: Next, on the left side of the pane, under Available Downloads, click on the Download button based on whether you want to download the .exe file or the zip file.

Once downloaded, proceed with the setup and once the installation is complete, restart your PC and the error should be gone. But, if you still see the error, try the next method.
Method 4: By Rolling Your Driver Back
Step 1: Go to Start and type Device Manager in the search field.

Step 2: Now, left-click on the result to open the the Device Manager window.

Step 3: In the Device Manager window, go to Display adapters and expand it.
Now, right-click on the Intel graphics driver and select Properties from the menu.

Step 4: In the Properties window, go to the Driver tab and click on the Roll Back Driver button.

Step 5: It will open the Driver package rollback with a list of options. Select the appropriate option and click Yes.

Wait for the process to complete. Once completed, restart your computer for the changes to be effective. Now, try opening the files and you should not see the error anymore.