The Trusted Platform Module or TPM usually doesn’t have any effect on the functioning of Microsoft Outlook program. But, some users have reported about an malfunction in MS Outlook related to TPM. If the Outlook client on your machine is also using the TPM, it can get into this mess and throw up this error message “Your computer’s Trusted Platform Module has malfunctioned.” in the screen. Follow these solutions to fix the problem.
Fix 1 – Turn off the ADAL feature
There is an authentication feature in Outlook that can cause this Trusted Platform Module malfunction. So, disable the Authentication Directory Authentication Library or ADAL using regedit.
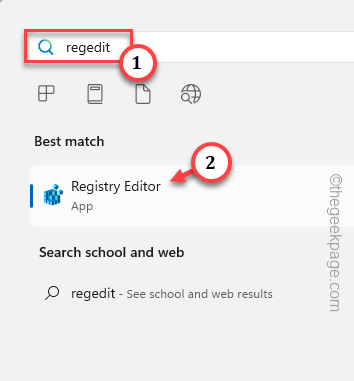
Step 1 – To do this, you have to press the Windows button, first and then write “regedit” in the search box.
Step 2 – Later, tap the “Registry Editor” in there to open that up.
NOTE – Before you proceed any further, check whether you have a registry backup on your system. To build one, you should follow these steps to backup the registry on your system.
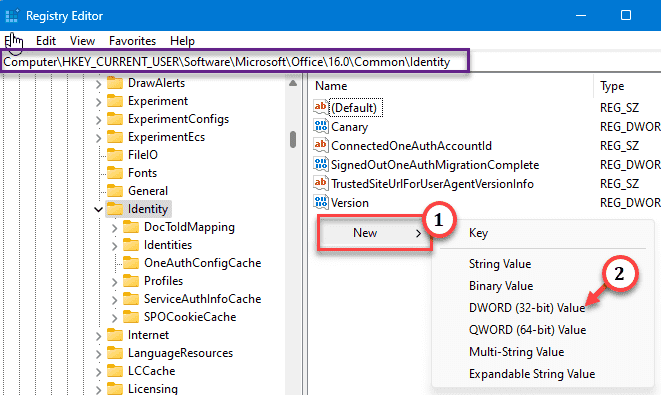
Step 3 – After getting into the Registry Editor page, go to this section –
HKEY_CURRENT_USER\Software\Microsoft\Office.0\Common\Identity
Step 4 – Now, go to the right-hand pane on the same page. There, right-click in that space and click “New>” and “DWORD (32-bit) Value” to carve a new value there.
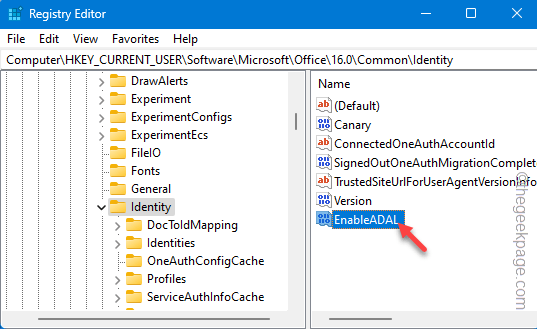
Step 5 – Next, name this value to “EnableADAL“.
Step 6 – Just go ahead and double-tap this “EnableADAL” value to adjust that.
Step 7 – After this, set this to “0“.
Step 8 – Finally, click “OK” to disable the ADAL feature in MS Outlook.
This way, as you have finally disabled ADAL, close the Registry Editor page. Next, restart your computer, because this change will only take effect at system startup.
So, do check the Outlook at the next startup. If you are still getting the same error message, go to the next solution.
Fix 2 – Delete the mail account
Delete the mail account from the Outlook app and add the account afresh.
NOTE – There are two ways of doing this. If you can’t access the Outlook client due to the TPM error, you can do this from Control Panel page.
Step 1 – You have to open the Control Panel. The quickest way of doing this is to open up a Run box, using the Win+R hotkeys.
Step 2 – To open Control Panel, type this and tap “OK“.
control
You have to arrange the view of the Control Panel to all small items.
Step 3 – Just go to the “View by:” page and set that to “Small icons“.
This way, you will have the complete view of all the items in the Control Panel.
Step 4 – Go to the “Mail (Outlook Setup) (32-bit)” to directly load the Email Setup page.
Step 5 – Going into the Email Setup page, tap “Email Accounts…“.
Step 6 – Go to the “Email” tab.
Step 7 – Look for the email ID you have there. Select the email ID and tap “Remove” to remove the email ID.
Step 8 – There will be a security prompt on your screen. Ignore that and tap “Yes” to complete the process.
Though the email ID is removed, the data file of that email ID is there. So, in the next step, you have to remove that.
Step 9 – Go to the “Data Files” tab, next.
Step 10 – Identify the data file directly associated to the email ID (you can do that by reading the email ID at the end of the file name).
Step 11 – Then, tap “Delete” to delete the .ost file.
Step 12 – Ignore any prompts that it throws. Confirm the action and proceed.
Step 13 – Get back to the “Email” tab.
Step 14 – Here, tap “New” to start the email ID addition process.
Step 15 – Flow through the account setup process and sign into your account using the log in ID, password.
Once you have setup the account,.
Fix 3 – Disable the Add-ins
The external plug-ins can cause this TPM malfunction as well. So, turn off the add-ins in the MS Outlook and reload.
Step 1 – Load the Microsoft Outlook.
Step 2 – Next, go to the “File” menu at top-left corner of the tool.
Step 3 – After this, you have to go to the “Options“.
Step 4 – There should be a dedicated “Add-ins” tab in there. Go there.
Step 5 – Set that to “COM Add-ins” and click “Go“.
Step 6 – Uncheck all the add-ins one-by-one in that box.
Step 7 – After this, click “OK“.
Doing this will deactivate the add-ins in the MS Outlook. Restart the MS Outlook and check again.
Fix 4 – Execute SFC, DISM scanner codes
If delete the email and adding the same in MS Outlook didn’t help, try running the SFC, DISM codes.
Step 1 – Go to the search box in the Taskbar and write “cmd“.
Step 2 – Then, right-click the “Command Prompt” as it appears in the search tab and tap “Run as administrator“.
Step 3 – This way, after opening the terminal as an administrator, copy-paste the first code in there and hit Enter.
sfc /scannow
This is file scanning process scans all the files in there and replace any corrupt files with the real files in the process. Wait until the progress bar reaches to 100%.
Step 4 – Copy-paste this Deployment Image Scanning code and hit Enter.
dism.exe /Online /Cleanup-image /Restorehealth
After running both the codes, you may close the terminal.
Don’t forget to restart the system after this. Check if this helps.


