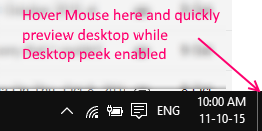
Desktop Peek is a feature offered by Windows by which a user can temporarily view the desktop without having to minimize any open windows. While Desktop Peek for Windows 7 is enabled by default; in versions 8 and 10, it is disabled by default. On Windows 7, one can access Peek easily by hovering with the cursor over the right edge of the Taskbar. The user can then see the icons on the desktop through his or her open browser windows, which you could say, go transparent. On moving the cursor away from that area of the Taskbar, the desktop is not visible anymore. That is how Peek functions.

This article goes through the steps of how to enable and disable Peek for Windows 10 as well as older versions 7 and 8.
How to Turn on Desktop Peek for Windows 10
For Windows 10, Peek is disabled by default, but enabling this feature is just a few clicks away.
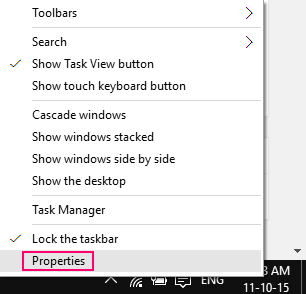
The user has to simply right click anywhere on the Taskbar (provided that space is empty),

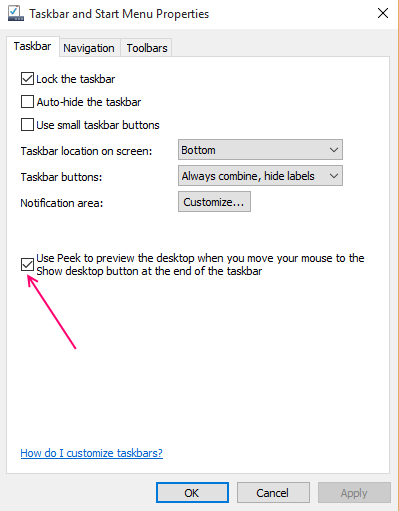
and select Properties from the options that appear. Under the Taskbar tab, the user will find a checkbox saying “Use Peek to preview the desktop when you move your mouse to the Show desktop button at the end of the taskbar”. If the user checks this option, and selects Apply, Peek is enabled.

For those users who face a greyed out checkbox for Peek to be enabled, it i recommended to check under System Properties if Peek is completely switched off; that could be causing the checkbox to appear greyed out and making it impossible to use.
To disable Peek after it has already been enabled; the user can just uncheck the above mentioned checkbox, and press Apply. Peek will then be disabled again.
Shortcut keys may also be used to enable Peek on Windows 10. Pressing the Win (Windows icon) key with comma (,) will activate Peek.
Desktop Peek for Windows 8
Windows 8 is another version on which Peek is disabled by default. One simple method to turn Peek on would be to right click on the Show Desktop option when the user is on the desktop. An option called Peek at desktop will appear under Show Desktop, which the user has to check in order for Desktop Peek to be enabled.
Another method to enable or disable Peek is one that matches the method used for Windows 10: enabling or disabling Peek through Taskbar properties. The same checkbox as in Windows 10 will be shown below the Taskbar tab, the user has only to check or uncheck it according to their own preferences.
Desktop Peek for Windows 7
In this version of Windows, Peek is enabled by default, and not only that, it comes under the name Aero, part of three different features- Aero Peek, Aero Snap and Aero Shake. Since this article is devoted to Peek only, Snap and shake will not be discussed here.
Unlike the newer versions of Windows, to use Peek on Windows 7, the Aero theme must be enabled instead of the Basic and High Contrast themes. Moreover, Peek will only function when more than one window is open.
Peek on Windows 7 is used in the same way as in other version though. The user can access a desktop preview by hovering the cursor on the right side of the Taskbar. The Taskbar method to enable or disable Peek is slightly different on this version.
The user must select Properties after right clicking the Start button, or imply right click an empty area on the Taskbar. Both these methods of navigation will lead to Taskbar and Start menu Properties, under which the Taskbar tab should be selected. A checkbox saying “Use Aero Peek to preview the desktop” will be present under this tab. Checking this box will enable Aero Peek, and unchecking it will disable the same.
The Peek at Desktop under the Show Desktop option on the Taskbar may also be used to enable or disable Peek.