If you do not share your PC with anyone then you could discard passwords and program it to automatic sign in.It is important to note the obvious security reason. Firstly do not use this setting if you share PC with someone on the basis of multiple accounts. Secondly, when in public with a windows 10 laptop it is better not to use automated log in setting.Only use this setting when you are sure about the security of the location as this does allow you to log in faster.This setting does have the added benefit of not having to remember the password.It will save you the hassle of typing in the password every time and reboot will also occur couple of second faster.
Also read: Change the password of the currently signed in user in windows 10 without knowing the password
How to turn on the automatic log on in Windows 10
The process is easy and quite similar to the one in windows 7 and windows 8.
Method 1
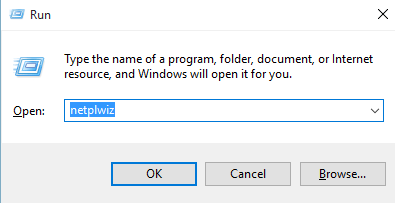
Step 1 Right-click the Start button and select Run
Or press Windows Key+R simultaneously to bring up the Run dialog.
Step 2 Type in netplwiz into the dialogue box and then press Enter.

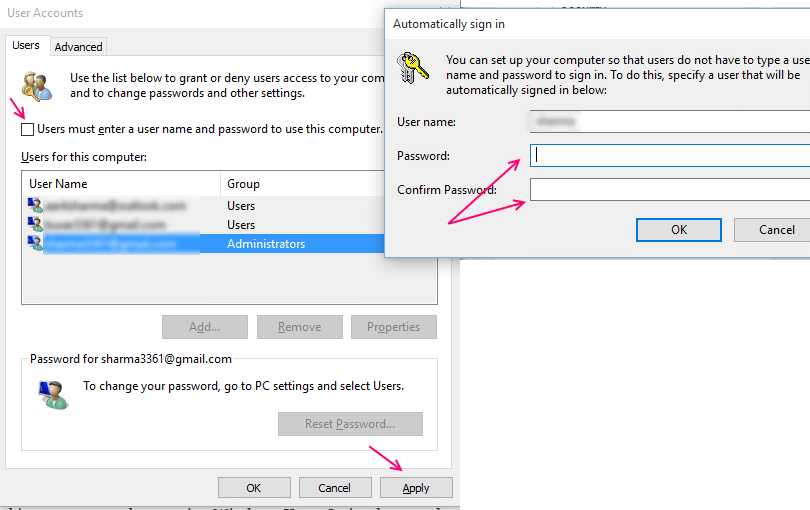
Step 3 Uncheck the command Users must enter a user name and password to use this computer and then click OK or Apply.

Step 4 enter your log in user name and the password twice and click OK.
You will need to restart your system for this to take effect. This time you will glimpse the sign in screen but no log in pass word will be required.
This process also skips the Lock screen and save time.
Now you can successfully log in without using your password.
Note: – Under this setting you will still have the option of locking your screen by pressing Windows Key + L simultaneously.Then you will have to log in with your pass word to unlock it
Remember to disable the automatic login when you are in public places or travelling as a security measure.As this might give free access to important data if anyone attempts to log in.
If for some reason you are not able to activate the automatic log in by the first method then you can try out using the registry editor.
Method 2 – With Registry
Turn on automatic log-in using Registry in case the Method 1 does not work
Step 1 Press the windows +R keys on your keyboard simultaneously.
The Run dialogue box will appear
Step 2 Type in regedit without quotes and press Enter

Step 3 When the UAC (User account Control) box appear select yes
This will in turn open the registry Editor
Step 4 navigate to the following Registry Key
HKEY_LOCAL_MACHINE –> SOFTWARE –> Microsoft –> Windows NT –> CurrentVersion –>Winlogon
Step 5 Double click on the entry named DefaultUserName, (it would be on the right – side of the window). Confirm the appearance of your Microsoft account or local user account name under Value data box.
Step 6 Locate the entry DefaultPassword. If you don’t find it, then create on by right – clicking on empty space. Select “New” from the list then choose String Value.Rename it DefaultPassword and then enter your password in the Value data box. Then click ok
Step 7 Change the value of the entry AutoAdminLogon from 0 (zero) to 1 (one).

Now you need to restart your PC to see the result. This time you won’t need to use you pass word to login.
The second method is complicated and lengthy but it is better to have a second option in case the first one does not work.