Whenever you install a new third-party program or delete a shortcut file from the Desktop, it automatically refreshes. This is normal and the Desktop refreshes automatically whenever you make some changes. But, what if the Desktop stops refreshing? We have these sets of fixes that should be helpful in troubleshooting the automatic refresh rate problem. Usually, the stacked files in the File Explorer lead to this problem.
Fix 1 – Change the UpdateMode value
Changing the UpdateMode value in the system registry should help you resolve the issue.
NOTE – This is just a standard warning about the potential complications a registry edit may lead to. So, you must create a registry backup before you proceed.
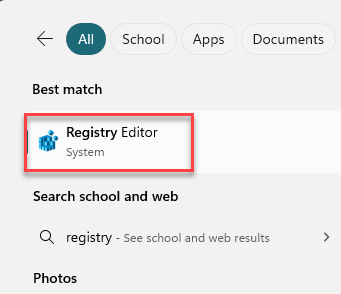
Step 1 – Start searching for “registry“.
Step 2 – Now you may open the “Registry Editor“.
Step 3 – Go to this place in the Registry Editor page –
HKEY_LOCAL_MACHINE\SYSTEM\CurrentControlSet\Control\
Step 4 – Look for the “Update” sub-folder.
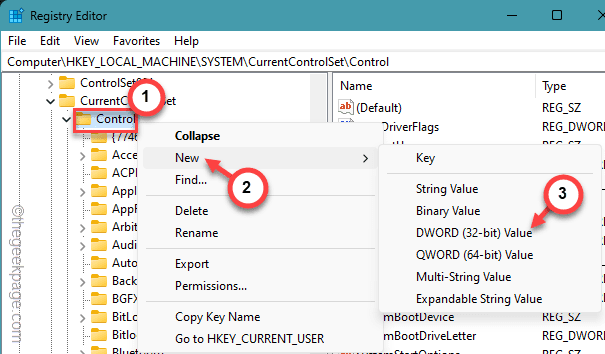
Step 5 – If you can’t find the “Update” folder there, right-click the “Control” folder and tap “Key“.
Step 6 – Name this “Update“.
Step 7 – Now, on the right-hand pane, look for the “UpdateMode” value.
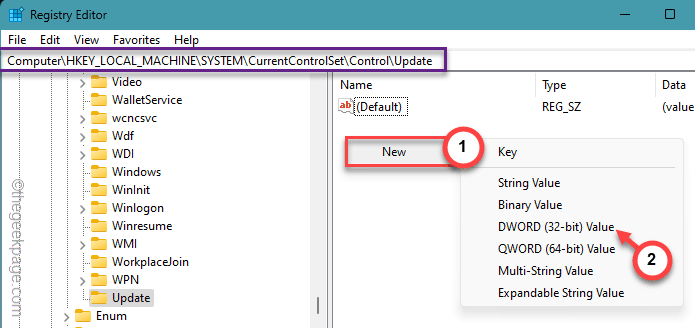
Step 8 – If there is no value called “UpdateMode“, right-click the space and tap “New>” and “DWORD (32-bit) Value“.
Step 9 – Name this new value “UpdateMode“.
Step 10 – Next, double-tap the same value so that you can adjust it manually.
Step 11 – Fix the value to “0“.
Step 12 – Next, tap “OK“.
Later, quit the Registry Editor tool. After this, restart your computer.
Check the Desktop’s automatic refreshing issue once more. Go to another solution, if this one doesn’t work.
Fix 2 – Change the OneDrive settings
Even when you remove the items locally from the Desktop, if the files are synced with the OneDrive, it won’t get removed from there.
Keep the Desktop out of OneDrive –
Step 1 – You can stop the syncing process in OneDrive. So, open the OneDrive app.
Step 2 – Wait till you see a grey cloud icon on the taskbar. That is the OneDrive icon.
Step 3 – Right-click that OneDrive icon. When a box opens up, tap the ⚙️ button and click “Settings“.
Step 4 – In the main OneDrive page, go to the “Sync and backup” tab.
Step 5 – On the right-hand tab, find the ‘Back up important PC folders to OneDrive’ and click “Manage backup“.
Step 6 – This reveals all the folders you have synced up in OneDrive.
Step 7 – In the Backup folders on this PC page, just disable the “Desktop” toggle.
Step 8 – It will show you this message –
Are you sure you want to stop the backup?
Step 9 – Tap “Continue backup” to confirm your action.
Step 10 – Click the “Close“.
This way, OneDrive won’t sync any items on the Desktop.
After this, retry removing any files from the Desktop and check again.
Delete the Desktop folder from File Explorer
Another way of doing this is to omit the Desktop folder directly from the File Explorer tab.
Step 1 – At first, tap the arrow button on your taskbar.
Step 2 – There you will see the OneDrive cloud icon. Right-click that to open the OneDrive panel.
Step 3 – In that elevated panel, tap the three-dot button and further click “Pause syncing“.
This must pause the syncing operation of all the files.
Step 4 – Next, go to your File Explorer.
Step 5 – On the right-hand tab, find the “Desktop” entry on the right-hand pane.
Step 6 – Next, right-click that and click “Delete” to delete the entire folder from there.
Your Desktop will behave normally once again.
Fix 3 – Clear the File Explorer history
Clearing the File History settings may resolve the problem at your end.
Step 1 – Start by pressing the Windows and the R keys together briefly.
Step 2 – Next, paste this shorcut term in there and hit the Enter key.
control folders
Or, if you are a Windows 11 user, you may do these –
Step 1 – Open the File Explorer page.
Step 2 – Next, tap the three-dot button next to the ‘View‘ option and open the “Options” menu.
Step 3 – Once you have opened the Folder Options page, go to the “General” tab.
Step 4 – In the Privacy section, tick these boxes –
Show recently used files
Show frequently used folders
Show files from Office.com
Step 5 – In the ‘Clear File Explorer history’ tab, click “Clear” to clear the complete file explorer history.
Step 6 – Finally, tap “Restore Defaults” to restore the default settings.
Step 7 – To save these alterations, click “Apply” and then, tap “OK“.
After performing these steps, return to the Desktop and check whether the items on the Desktop are refreshing automatically or not.
Fix 4 – End the File Explorer process and restart
The quickest trick to solving this problem is to close and restart the File Explorer process.
Step 1 – Check whether any instances of the File Explorer are already open or not. If there is none, press the Win+E buttons together.
Step 2 – Next, right-tap the Windows button and open the “Task Manager“.
Step 3 – Find the “File Explorer” thread and click “Restart” to terminate the File Explorer process and restart the same.
Windows will reboot the File Explorer process on your device within a few seconds.
Test this solution by deleting a random file from the Desktop and checking.
Go for the next solution, if this one doesn’t work.
Fix 5 – Remove any network drives
If the files you are removing are mapped to a separate network drive, you must disconnect the mapped drive from your computer before removing the files.
Step 1 – To do this, open the File Explorer.
Step 2 – After this, go to the “This PC” from the left pane.
Step 3 – Find the mapped drive that contains the file on the Desktop.
Step 4 – Next, just right-click the same drive and click “Disconnect“.
After disconnecting the mapped drive, you can easily remove the files from the Desktop.
It will automatically refresh the desktop.


