Some Windows 10 and windows 11 users are complaining about an issue they are currently facing with the WiFi on their Windows 10 devices in the forum. According to them, they are unable to connect to the WiFi when the computer wakes up from sleep or hibernation state. If you are facing the similar kind of issue at your end, there is no need to worry. Follow the fix described in this article and the problem will be solved very easily. But, before you make any changes to your computer, you should consider following these initial workarounds primarily to check if they offer any simpler aid to the problem.
Workarounds–
1. Try restarting your computer. After rebooting your device, check if the computer is able to connect to the WiFi.
2. Check if any Windows Update is pending or not.
If any of these workarounds didn’t work out for you, try this solution
Fix 1 – Modify Power Management status of the network adapter-
Modifying Power management settings of the network adapter has worked out for many Windows users. Follow these easy steps to do the same-
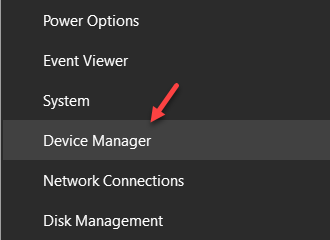
1. At first, right-click on the Windows icon and then click on “Device Manager” to open the Device Manager window.

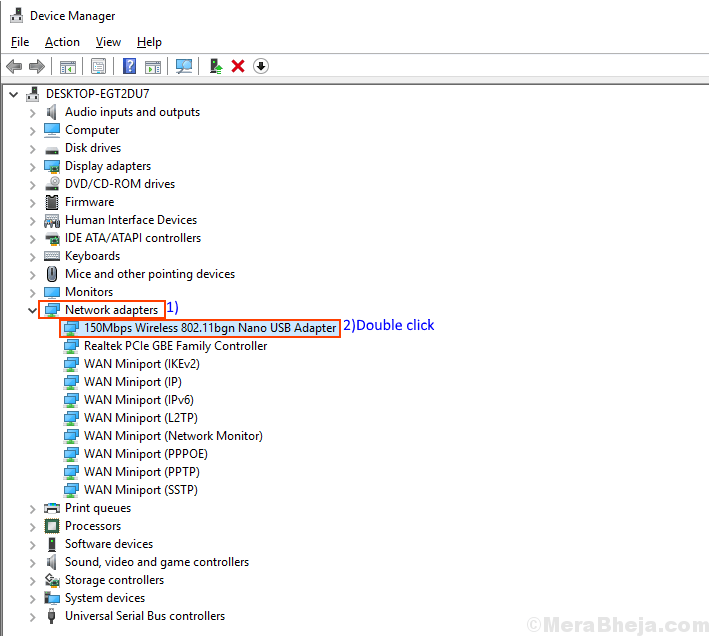
2. When you see the Device Manager windows has opened, simply click on the “Network adapters”.
3.

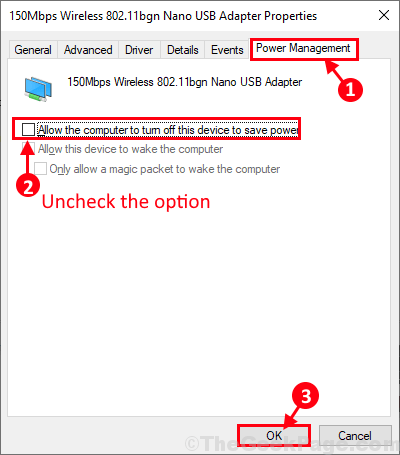
4. Next, go to the “Power Management” tab, uncheck the option “Allow the computers to turn off this device to save power“.
5. Then, click on “OK” to save the changes on your computer.

Close Device Manager window.
4. Now, you have to press the ‘Windows key+R‘ together to open the Run window. Once the Run window has opened copy-paste this command and hit Enter–
control.exe powercfg.cpl,,3

5. In the Power Options window, click on “Wireless Adapter Settings” to expand it and then click on “Power Saving Mode” to expand it again.
6. Now, click on “On battery:” and set it to “Maximum performance” from the drop-down list. Set “Plugged in:” to “Maximum Performance” also.
7.. Finally, click on “Apply” and “OK” to save the changes on your computer.

Reboot your computer to let the changes take effect. After rebooting the problem should be solved on your device.
Fix 2 – Create a bat file to restart Network adapter
1. Press Windows key + S together to open windows search.
2. Search Notepad and open Notepad.
3. Now, copy and paste the following lines given below in the notepad.
netsh interface set interface "Wi-Fi" disable
netsh interface set interface "Wi-Fi" enable
4. Save the file as restartwifi.bat
Don’t forget to select All files in Save as type dropdown while saving the file.

5. Right click on restartwifi.bat you just created and create a shortcut.
6. Now, right click on the shortcut and click on properties.

7. Click on Advanced, Check Run as administrator.
8. Click on OK, Again click on Apply and OK and close all the windows.

9. Now, click on this Every time after sleep to connect to WiFi.
Fix 3 – Restart WLAN Auto config service
WLAN auto config service is used to manage WiFi connection on windows PC. Some users reported that WLAN Auto config service could not get restarted automatically after hibernation and that is the root cause of this issue.
1 – First of search services in search box and click on services icon to open service manager

2 – Now, locate WLAN Auto config service, double click on it and set startup type as automatic.
Also, click on Start to start the service.

If it is already running , right click on WLAN Auto config service and click Restart.

Note: If you get and error saying Windows could not start the WLAN AutoConfig service on Local Computer, then follow the steps given below.
We will create a Powershell bat file to start it after hibernation.
1 – Open Notepad
2 – Copy and paste the content given below in Powershell
$WLANProc = Get-CimInstance Win32_Process | Where-Object {$_.CommandLine -eq "c:\windows\system32\svchost.exe -k LocalSystemNetworkRestricted -p"}
Stop-Process -Id $WLANProc.ProcessId -Force
Start-Service WlanSvc

restart-netadapter -InterfaceDescription 'your_wireless_adapter_name' -Confirm:$false
Just replace your_wireless_adapter_name with your wireless adpater name
To know your wireless adapter name , run Get-NetConnectionProfile command in Powershell
3 – Svae this file with .ps extension.
4 -Now, run this program after hibernation
Fix 3 – Change network profile to private
1 – Search Powershell in search box.
2 – Right click and choose run as admin.

3 – Run the command given below to know network name
Get-NetConnectionProfile

4 -Now, note down the name from the Name field.
Now, run the command given below in powershell again to change your network to private
Set-NetConnectionProfile -Name "Name you just Noted" -NetworkCategory Private
5 – Close the powershell window.
Fix 5 – Run TCP / IP reset commands
1 -Open command prompt as admin
2 -Run the command given below one by one
netsh winsock reset

netsh int ip reset

ipconfig /release

ipconfig /renew

ipconfig /flushdns
3 – Now, close the window.