Are you hearing any stutters/distortion sound coming out of the sound devices which you are using in Windows 10? If the answer to this question is ‘Yes‘, then you are not alone. Some Windows 10 users are also complaining about similar kind of problem in the forum. But, there is no need to worry. In this article, we have prescribed some solutions for this problem, just follow them and the problem should be solved in no time. But, before moving on to the main solutions we suggest you to go through these workarounds first and check if these simpler solutions solve your problem or not.
Workarounds
- If this is the first time you are having this kind of trouble at your end, a simple restart of your system may solve this issue on your computer.
- Try connecting the speaker/ headphone with another computer/pc. Check if it works fine or it still sounds stutters/distorted.
- Some users have reported that switching to Ethernet connection from Wi-Fi connection fixes this issue.
- If you have an External drive connected to your PC, try to disconnect it once and see if it works.
If any of these workarounds didn’t work out or if the speaker/ headphone is working perfectly in other computer, go for these fixes-
Fix-1 Audio Enhancements
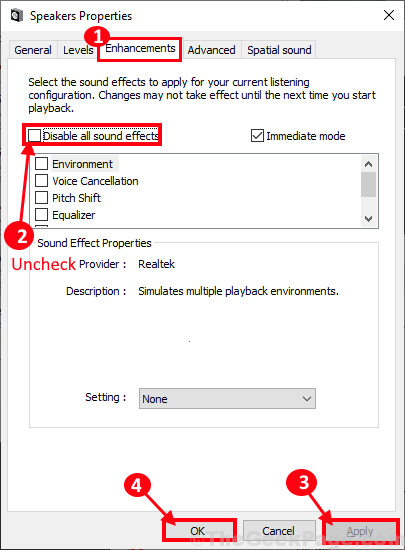
Disabling Audio Enhancements has worked out for many users. Follow the same at your end-
1. At first, what you need to do is to press ‘Windows key‘ along with the ‘R‘ key to open the Run window. Now, type “mmsys.cpl” and hit Enter.
The Sound window will be opened.

2. In the Sound window, scroll through the list of sound devices on your computer, and right-click on the device you are currently using and then click on “Properties” to open the properties of it.

3. In Properties window, go to “Enhancement” tab and then uncheck the option “Disable all sound effects“.
4. Finally, click on “Apply” and “OK” to save the changes on your computer.

Try to check if you are experiencing stutters/ distortion on your computer. Go for the next fix if this didn’t fix the problem.
Fix-2 Check various sound formats
1. At first, what you need to do is to press ‘Windows key‘ along with the ‘R‘ key to open the Run window. Now, type “mmsys.cpl” and hit Enter.
The Sound window will be opened.

2. In the Sound window, scroll through the list of sound devices on your computer, and right-click on the device you are currently using and then click on “Properties” to open the properties of it.

3. In Properties window, go to Advanced tab.

4. Now, Select a different format from dropdown and then test again. If it seems to be OK. select it finally and click on apply and ok and close the window.
You may Also Read: –
- Fix Laptop Speaker Crackling Sound
- Fix Audio Buzzing in Windows 10
- Audio / Sound Popping on in Windows 10
Fix-3 Disable and check every single driver in device manager
If all of the above given methods do not work, then do this.
1. Search device manager in windows 10 search box and then click on device manager.

2. Now, just expand every device drivers and right click and disable every item one by one and keep checking the sound again. If sound is still stuttering then enable them and move to the next driver.

3. Again disable that and check again. In this way , keep on disabling , checking and enabling every item.
4. Now, if after disabling a particular item , if your sound get fixed , that particular driver may be the issue. Either leave that disabled or reinstall that.
Fix-4 Run Audio Troubleshooter-
Running the audio troubleshooter may fix this issue on your computer.
1. By pressing Windows key+I you can open the Settings window.
2. In the Settings window, click on “Update & Security“.

2. In the Update & Security window, click on “Troubleshoot” on the left-hand side of the window.
3. Now, on the right-hand side, scroll down to find and click on “Playing Audio” and then click on “Run the troubleshooter” to run the troubleshooter on your computer.

The troubleshooter will run on your computer to detect any problem with the audio device and attempt to fix the problem.
Check if the problem still persists or not.
Fix-5 Reinstall Audio Driver on your computer-
Uninstalling and reinstalling audio driver on your computer may work out for you.
1. Press Windows key+X together to open the “Device Manager“.
Device Manager window will be opened.

2. In Device Manager window, expand the section “Sound, video and game controllers“.
3. Now, right-click on “Realtek(R) Audio” and then click on “Uninstall device” to uninstall the device temporarily from your computer.

4. Simply click on “Uninstall“.

Once the uninstallation process is complete, restart your computer.
Upon rebooting, Windows will reinstall the uninstalled audio driver on your computer.
If you see the audio driver is not installed on your computer, follow these steps to install it manually on your computer-
a. Press Windows key+X and then click on “Device Manager” to open the Device Manager window on your computer.
b. In Device Manager window, click on “Action” in the menu bar, and then click on “Scan for hardware changes“.

Windows will scan for any missing driver and will install the audio driver in that process.
The problem should be fixed on your computer.