Fallout 4, though released in 2015, continues to be used while testing new GPU, CPU. So, without the proper configuration, you will face lag and stuttering issues in Fallout 4 for sure. In this article, we have mentioned a few easy steps so that you can have a buttery smooth open world experience in Fallout 4.
Fix 1 – Lower Fallout 4 graphics
The best way to improve the quality of the game is to lower the Fallout 4 graphics.
Step 1 – Open the Fallout 4 from Steam or directly using the icon on desktop.
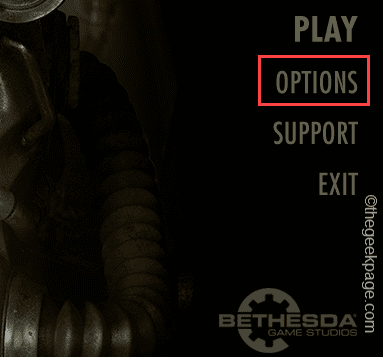
Step 2 – Wait until Fallout 4 Launcher opens up. Tap “Options“.
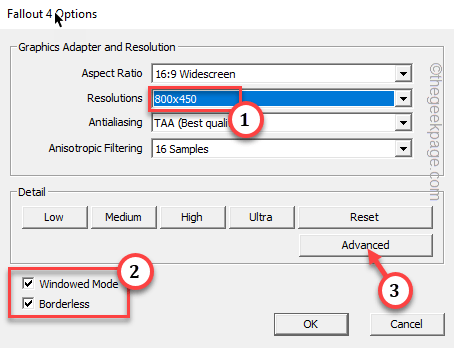
Step 3 – Just set the “Resolutions” to “800*450” [Depending upon the system configuration you have, you can set this to higher resolution if you want. But, don’t do that right now. Continue to follow the steps. Try it another time.]
Step 4 – Then, make sure to check the “Windowed Mode” and “Borderless” check box.
Step 5 – Finally, tap “Advanced“.
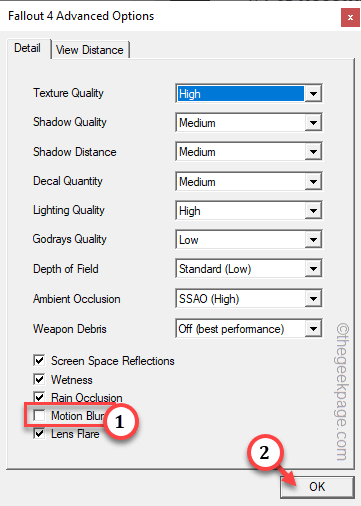
Step 6 – You will notice several display features like Texture Quality, Shadow Quality, Shadow distance, etc. You can lower these settings.
Step 7 – If Motion Blur option is checked, make sure to uncheck the “Motion Blur” option or vice-versa.
Step 8 – Then, tap “OK“.
Coming back to main Options page, click OK to save the settings. Now, launch the game directly from the Fallout 4 Launcher and test.
You won’t notice in Fallout 4 anymore.
Fix 2 – Change the iPresentInterval to life FPS limiter
Fallout 4 automatically limits the FPS value to a static value. You have to take care of this.
Step 1 – Go ahead and open the File Explorer.
Step 2 – Then, get to this point –
C:\Users\YourWindowsName\Documents\My Games\Fallout 4
Step 3 – Once you are there, look for the “Fallout4Prefs.ini” file. Just, right-click the file and tap “Open with>“.
Step 4 – Choose “Notepad” from the list of apps.
Step 5 – When that particular file has opened up in Notepad, press Ctrl+F keys together.
This will open up a Find box.
Step 6 – Write “iPresentInterval” in the blank box.
Step 7 – Tap “Find Next” to find it.
The iPresentInterval term will be highlighted in the Notepad.
Step 8 – Set the value this way-
iPresentIngterval=1
Step 9 – Now, press the Ctrl+S to save this change.
Exit Notepad. Launch Fallout 4 on your computer.
Check if this works.
Warning –
After altering the iPresentInterval value, you may experience some issues in the UI. If you face those issues, revert the iPresentInterval value to 0. This way, you won’t face the problem.
Fix 3 – Change the NVIDIA Control Panel settings
Add the game executable file and then, set various modifiers.
Step 1 – Make sure that you closed Fallout 4 game launcher.
Step 2 – Then, just click on the system tray icon on your taskbar and locate the NVIDIA icon there.
Step 3 – Next, right-click that and tap “NVIDIA Control Panel” to open it up.
Step 4 – Select the “Current Resolution” from the left pane.
Step 5 – You will see all the possible resolutions for your screen. Set the resolution to a lower value (like if you are using a 4k monitor, set it to “1080p“.
Step 6 – Set the “Refresh rate” to “60hz” as well.
Step 7 – Select the “Current 3D settings” from the left menu.
Step 8 – Go to “Program Settings“.
Step 9 – Tap “Add” to add the program.
Step 10 – Select “Fallout 4” from the list.
Step 11 – Then, tap “Add selected program“.
Step 12 – Now, change the program settings this way –
- Turn Maximum pre-rendered frames to 1
- Toggle Triple buffering to On
- Set Power management mode to Prefer maximum performance
- Switch Vertical sync to On
Step 13 – After committing these changes, tap “Apply” to apply the settings.
Exit Nvidia Control Panel. Relaunch Fallout 4 and test. You will notice very less lag or stutter.
Fix 4 – Kill all the resource-hungry processes
Kill all the resource hungry processes that you don’t need right now.
Step 1 – Use the Ctrl, Shift and Esc keys together to call up the Task Manager page.
Step 2 – Take a look at the CPU, RAM usage of all the apps and processes. Look which app is eating up huge resources.
Step 3 – So, right-click that app and tap “End task“.
This way, end all the unnecessary programs hogging the memory, CPU power in the background.
Then, play Fallout 4 and test.
Fix 5 – Use the latest graphics driver
Fallout 4 is a high-end game and require the latest graphics driver. So, install the latest graphics driver on your system.
Usually, gamers use either NVIDIA or AMD card to play the game. So, open the NVIDIA GeForce Experience app or AMD Adrenalin. Download the latest driver and install it on your computer. Follow the steps on the instructions and check if this works.
Launch Fallout 4 and test.


