How to fix your CPU has melted issue on Windows 10: – After the upgrade to Windows 10, many users have encountered some minor issues on their PC. Reduced battery backup, performance degradation etc. were some of them. Longer booting time compared to Windows 8 was the major issue that affected most of the users. After the upgrade, my PC now takes more time to boot than before. Though some errors are minor, they sound like some hefty issues. When you start your system, you may find a warning message which says that your CPU is getting melted.When you get such a message, don’t worry about it. This issue can be solved very easily. The main reason behind this issue is that some part of the built-in autoloader is not deleted correctly. The autoloader is a program which gets loaded when you turn on your PC. The autoloader is responsible for the automatic loading of many programs on startup. Some of the automatically loaded programs will terminate themselves after they perform their desired task. But some of the programs remain in running state even after a long time from startup. Such programs may slow down your system.
See also: How to Solve windows 10 high cpu and high ram usage problem
So, CPU melting issue is due to the autoloader program of Windows. You can fix this issue by disabling some of the programs from loading when the system boots up. You have to check each of the automatically loaded programs to find which one is causing the problem. Read on, to learn how to fix the issue which warns you that your CPU gets melted.
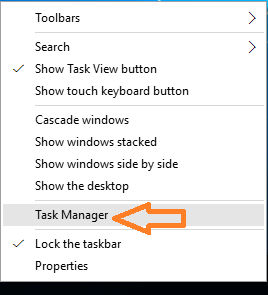
- Right-click at any unoccupied area on the taskbar and select Task Manager from the context menu. Alternatively, launch Task Manager by pressing Cntrl + Shift + Esc.
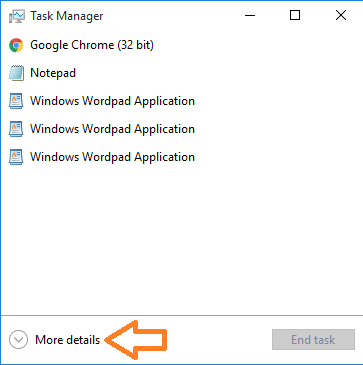
- If you can’t see tabs on top of the Task Manager i.e the Task Manager is not showing all the running processes, then click on More details to expand the Task manager window.
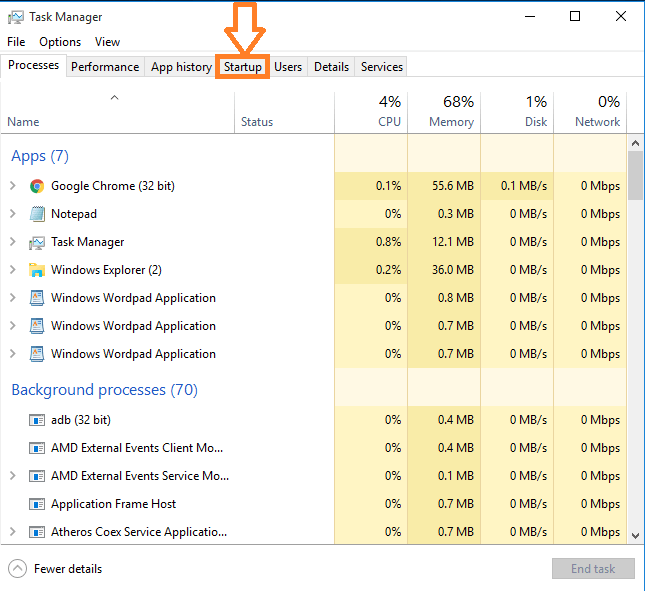
- Now from the expanded Task Manager click on the Startup tab.
- Inspect the list of programs that are enabled during the startup of your system. Right-click on any suspected program and select Disable.
- Now confirm that the suspect was the troublemaker by restarting the system. If the problem persists then try disabling another app or program. Continue the process of disabling and rebooting until you find the app which is causing the issue.
Now you have learned how to fix the CPU getting melted issue on your Windows PC.


