Microsoft introduced the Emoji Panel with Windows 10 that helps you to insert emojis to any document or areas where you write text. This built-in Emoji Panel can be activated by simply pressing the Win + period (Win + .) or Win + semi-colon (Win + 😉 shortcut keys on your keyboard. Now, the emoji panel appears on the screen and you can pick your favorite emojis to add to the document.
*Note – You must make sure that you the mouse cursor is active in the document while you press the shortcut keys to launch the Emoji Panel.
However, some users complain that when they press the Win + period (Win + .) or Win + semi-colon (Win + 😉 shortcut keys, it doesn’t open the Emoji Panel. In short, the Emoji Panel keyboard shortcut simply stop working in your Windows 10 PC. While sometimes restarting your PC can help fix the issue, in most cases it does not. Hence, we have some workarounds that may help fix the Emoji Panel keyboard shortcut not working on your Windows 10 PC.
Method 1: Change Region and Language to United States
During the initial days, the Emoji Panel was only available for United States EN as the keyboard input language. However, after the recent updates, you can now use it for all other keyboard input languages. In case, you have still not updated to the latest Windows 10 version that supports the latest Emoji Panel update and you are facing the keyboard shortcut not working for the emoji panel issue, you can change the input language of your keyboard to en_US (English – United States). Neverthesless, if you are facing the issue even with the updated version, you can try this method and see if it works:
Case 1 – For Windows 11
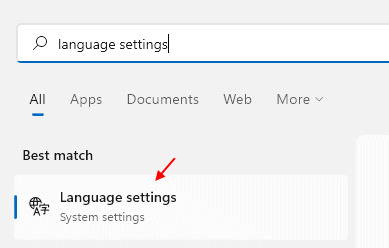
1 -Search Language Settings in Windows search and click on it.

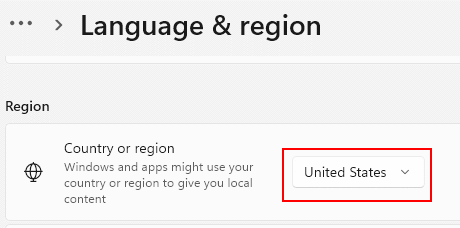
2 – Change Region to United states.

Now, In preferred language, Make sure English (United states) is in the list of Languages
If it is not in the list, then Click on Add a Language.

3 – Search English (United states) in the search box and then select english (United states) from the search result and then click on Next.

4 -Once It gets Installed, Just Click on 3 horizontal dots to the right of it and click on Move Up, to Move it at the top.

Case 2 -For Windows 10
Step 1: Press the Win + I keys together on your keyboard to open the Settings app.
Step 2: In the Settings window, click on the Time & Language option.

Step 3: Next, on the left side of the pane, click on Region.

Step 4: Now, go to the right side of the window and set the Country or region to United States.

Step 5: Now, click on Language on the left side of the pane.

Step 6: Next, on the right side of the window, under the Windows display language section, select English (United States) from the drop-down.
*Note – If Windows display language is set to some other language, then, follow the below steps to add English (United States) language:
Step 1: Go to the Preferred languages section and click on Add a language.
 h
h
Step 2: In the Choose a language to install window, look for English (United States), select the language and press Next.

Step 3: Next, press Install while you keep the Text-to-speech, speech recognition and the Handwriting options selected.

Step 4: You will now see the language pack added under the Preferred languages section.

Step 5: Just Click on Newly Installed English United States and expand it.
Then , Click on Top arrow to Move it Up and Bring to the top to make it default language.
You can now try the keyboard shortcut and the Emoji Panel should open.
Method 2: Run CTFMon.exe Manually
The keyboard shortcut for the Emoji Panel may also stop working sometimes when the Ctfmon.exe stops running in Windows. This can break down the Windows functionality and that may lead to this error. In such cases, running the Ctfmon.exe manually may fix the issue. Let’s see how:
Step 1: Press the Win + X shortcut keys and select Run to launch the Run command window.

Step 2: Copy and paste the below text in the Run command search field and press OK:
C:\Windows\System32\ctfmon.exe

Now since, it has been run manually, you can try opening the Emoji Panel using the keyboard shortcut and it should work.
*Note – Running the Ctfmon.exe through Run command is a workaround and so, if you want it to fix it for once and for all, you can make it start itself with Windows by adding an entry of the .exe file to the registry editor. Follow the below steps:
Step 1: Press the Win + R keys together on your keyboard to open the Run command box.
Step 2: In the search field, type regedit and hit Enter to open the Registry Editor window.

Step 3: In the Registry Editor window, navigate to the below path:
HKEY_LOCAL_MACHINE\SOFTWARE\Microsoft\Windows\CurrentVersion\Run
Now, go to the right side of the window and right-click on an empty area.
Select New and then select String Value to create a new string.

Step 4: Rename the new string as ctfmon and then double-click on it.

Step 5: In the Edit String, go to the Value data field and set it to C:\Windows\System32\ctfmon.exe
Press OK to save changes and then exit.

*Note – Before you edit the Registry Editor, create a backup of the registry editor data, so that, in case you lose any data during the process, you can recover it back.
Close the Registry Editor window and reboot your PC. It will now keep running in the background and you should now be able to use the emoji panel keyboard shortcut as usual.
Method 3: Enable the Touch Keyboard and Handwriting Panel Service
Sometimes the keyboard shortcut for the emoji panel may stop working because the Touch Keyboard and Handwriting Panel Service is not running. Hence, you can try enabling the service and check if it resolves the issue:
Step 1: Right-click on Start menu and select Run to launch the Run command window.

Step 2: In the Run command search box, type services.msc and hit Enter to open the Service manager.

Step 3: In the Services window, go to the right side of the pane and under the Names column, look for Touch Keyboard and Handwriting Panel Service.
Double-click on it.

Step 4: In its Properties window, under the General tab, go to the Startup type section and set it to Automatic.
Press Apply and then OK to save the changes and exit.

Close the services window, restart your PC and now the keyboard shortcut for the Emoji Panel should be working fine.
Method 4: Edit the Registry Editor Settings
Sometimes, editing the registry editor settings may fix the issue. However, before you make any changes to the Registry Editor settings, make sure that you create a backup of the registry editor data because in case you lose any data during the process, you can recover it easily.
Step 1: Press the Win + R hotkey to open Run command.
Step 2: In the search field, type regedit and press OK to open the Registry Editor window.

Step 3: Copy and paste the below path in the Registry Editor address bar and hit Enter:
HKEY_LOCAL_MACHINE\SOFTWARE\Microsoft\Input\Settings
Now, navigate to the right side of the pane, right-click on an empty area, select New and then select DWORD (32-bit) Value.
Step 4: Now, rename the new DWORD value as EnableExpressiveInputShellHotkey and double-click on it.
Step 5: In the Edit DWORD (32-bit) Value, go the Value data field and set the field to 1.
Press Apply and then OK to apply the changes and exit.
Now, exit the Registry Editor and reboot your PC. You can now check if the issue is fixed.
Method 5: Install any Pending Windows Update
If you miss to install a crucial Windows update, it may cause issues with the functioning of your system and one such issue is the Emoji Panel keyboard shortcut not working. Make sure to install any pending Windows update to fix the issue.
Step 1: Right-click on Start and select Settings.

Step 2: In the Settings window that opens, click on Update & Security.

Step 3: You are directed straight to the Windows Update page.
On the right side of the window, if you see any pending update, click on the Download & Install button.

Windows will now start downloading the update. It will also install the update automatically.
Once done, restart your PC for the changes to be applied. You can now try pressing the shortcut key and the Emoji Panel should launch normally.