StreamLabs has continued to cater to the ever-growing number of streamers around the world. This freemium software is one of the easiest streaming platforms that integrate the Open Broadcaster Software (OBS). Usually, StreamLabs runs without any complications. But sometimes you may see this “Error Fetching Your Channel Information” error message while starting the stream. You can’t stream further if you don’t solve the problem on your own.
Workarounds –
1. Check the connection settings on your system.
2. Close the StreamLabs and then start it up again.
Fix 1 – Sign out & into StreamLabs
At first, try to sign out from StreamLabs and then again sign in to it.
[NOTE – You have to use your browser to enact this solution, not the StreamLabs. ]
Step 1 – Disconnect
1. First of all, open your browser.
2. Then, go to the Twitch.TV and sign in with the same account that is linked to the StreamLabs.
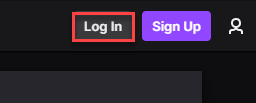
3. Just click on the “Log In” to log in to the Twitch.

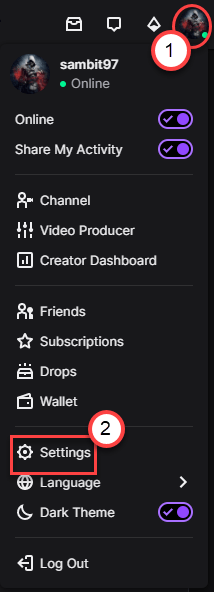
4. Once you have logged in to the Twitch, next, click on the gear-shaped icon on the right-top corner.
5. Click on the “Settings” icon.

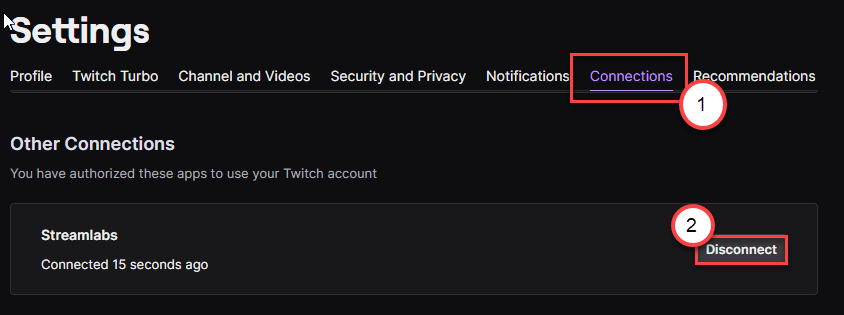
6. Now, go to the “Connections” tab.
7. Here you will notice all the connections. Scroll down to the ‘Other Connections’ tab.
8. You will notice “StreamLabs” here. Click on “Disconnect” to disconnect the StreamLabs from Twitch.

9. Finally, click on “Yes, Disconnect” to disconnect the StreamLabs.

STEP 2 – RECONNECT
Now, you have to reconnect the StreamLabs with the Twitch service.
1. As you have disconnected from Twitch, StreamLabs should be automatically disconnected from Twitch.
2. Click on “Log in” to log in to the StreamLabs.

3. Then, select the “Twitch” icon from the available login options.

4. Type your Twitch credentials and log in to your account. Click on “Authorize” to authorize the account setup and complete the process.

Now, try to stream again. You won’t see the annoying error message again.
[NOTE – We have explained the process with Twitch. This method is the same and efficient for other log-in options (like – YouTube, Mixer, etc.).]
Fix 2 – Run the StreamLabs as an admin
Try running the StreamLabs as an administrator.
1. Go to your desktop.
2. Then, right-click on the “StreamLabs” and click on “Run as administrator” to run with admin right.

Try streaming and check further.
Fix 3 – Alter the StremLabs language
Some users have solved this issue with a weird solution.
1. Open the StreamLabs on your computer.
2. Then, click on the gear-shaped settings icon on the left-hand side to open the settings.

3. In the Settings window, go to the “General” tab on the left-hand side.
4. After that, click on the “Language” drop-down and choose any language other than the language that StreamLabs is currently using (normally, English is the default language).
(Example – Just for an example, we have toggled it to “Deutsch“.)

5. Now, you will be asked to restart the app, click on “Yes“.

Wait for the StreamLabs to start up.
6. Again, click on the gear-shaped icon in the left-hand corner.

7. As the same as before, click on the first option (which is the “General” settings irrespective of the language ) on the left-hand pane of the Settings screen.
8. On the right-hand side, you will notice only one drop-down option (which is the “Language“). Click on it and select “English” from there.

9. Finally, click on the first option of the prompt to confirm the restart.

Once the StreamLabs appears on your computer, try to start a new stream.
Fix 4 – Remove the frontend.dll file
One of the reasons behind this error can be due to corrupted frontend.dll files in the StreamLabs directory.
1. Open the File Explorer window.
2. Then, go to this location –
C:\Program Files\Streamlabs OBS\resources\app.asar.unpacked\node_modules\obs-studio-node\obs-pluginsbit
[If you have installed the StreamLabs on your computer, go to that location instead.]
3. Here, try to find the “frontend-tools.dll” file.
4. Then, right-click on the particular file and click on “Delete” to remove the dll file from your computer.

Once you have deleted the particular dll files, reboot your computer. Open the StreamLabs after restarting your system. Try to stream again and check if that helps.
Fix 4 – Bind to a particular IP
You can bind the StreamLabs to the particular IP address that your network adapter is set to.
STEP 1
1. Press the Windows key and start to type “cmd“.
2. Now, right-click on the “Command Prompt” and click on “Run as administrator”.

3. To check out all the configurations of all the network connections, write this command and hit Enter.
ipconfig /all

4. Check which network configuration is your computer using.
5. Now, carefully note down the “IPv4 Address“.

Then, close the Command Prompt window.
STEP 2 –
1. Open the StreamLabs on your computer.
2. Then, on the left-hand side, click on the gear-shaped icon on the left-hand side.

3. On the Settings window, click on the “Advanced” settings on the left-hand side.
4. After that, scroll down through the right-hand side, scroll down to the “Network” section.
5. Now, click on the “Bind to IP” drop-down and select the particular IP that you have noted in the terminal.

6. Finally, click on “Done” to save the changes.

This should help you to resolve the problem. Check if that works out.
Fix 6 – Use the Optimizer
You can use the in-built Optimizer to optimize the StreamLabs according to your system specifications.
1. First of all open the Optimizer on your computer.
2.Then, on the left-hand side, click on the gear-shaped icon on the left-hand corner.

3. After that, click on the “General” settings.
4. Next, click on the “Auto Optimize” on the right-hand side.

5. To start the optimization process, just click on the “Start“.

Now all you have to do is wait for the optimizer to optimize the StreamLabs according to available bandwidth, system specifications.
After doing this, close the StreamLabs and re-launch it again.
Then, check if you are still facing the issue.
Fix 7 – Check if the stream key is correct
Sometimes if the Stream key is incorrect, you may face this error message.
1. Launch the Twitch from your browser.
2. Log in to Twitch and click on your channel icon in the right-hand corner.
3. Then, click on the “Creator Dashboard” to open it.

4. Once the Creator Dashboard opens up, on the left-hand side, expand the “Settings” and click on “Stream“.
5. On the right-hand pane you will notice the ‘Primary Stream Key‘. Click on “Copy” to copy the primary stream key from there.

Once you have copied the Primary Stream Key, close the Twitch.
6. After that, open the StreamLabs on your system.
7. Again, click on the cog-wheel to access the settings panel.

8. In the Settings window, click on the “Stream” on the left-hand side.
9. After that, on the right-hand side, click on the “Stream to custom ingest“.

10. Then, you have to paste the copied Stream key in the particular box of ‘Stream Key’.
11. Finally, click on “Done” to complete the process.

This should have fixed your problem with the StreamLabs.
Fix 8 – Download and install Visual C++ Redist 2017
1. Click on this link to visit the download page of the Visual C++ Redistributable for Visual Studio 2017.
2.Here, according to your system specifications, click on the particular links.
For 64- bit systems – Then, click on the “vc_redist.x64.exe”
For 32-bit systems – Then, tap on the “vc_redist.x86.exe”
For ARM64 systems – Click on the “vc_redist.arm64.exe”

In a few seconds, the download process will be complete.
Close the browser window.
3. After that, double click on the “vcredist.exe“.

6. Click on “Run” when the ‘Do you want to run this file?‘ prompt appears.
7. Accept the terms and conditions. Click on “Install” to start the installation process.
8. The installation process will be completed within a minute.
9. When you see ‘Setup Successful‘ message has appeared on your screen, click on “Restart” to restart your computer.

After rebooting your computer, check if this works.
Fix 9 – Uninstall and reinstall the StreamLabs
If nothing so far has worked out for you, try uninstalling and installing the StreamLabs.
1. At first, right-click on the Windows icon and click on “Run“.
2. Type this run-command and then hit Enter.
appwiz.cpl

3. When the Program & Features opens up, scroll down to find the “StreamLabs” application.
4. Then, right-click on the “StreamLabs” and click on “Uninstall“.

Then, follow the on-screen instructions to uninstall StreamLabs from your computer.
5. Once you have finished uninstalling the app, click on “Finish“.

Restart your computer. After rebooting your system, follow these steps to install the latest version of StreamLabs.
6. First of all, go to the StreamLabs site.
7. Then, click on the “Download” to download the StreamLabs.

8. After that, right-click on the “StreamLabs setup” and click on “Run as administrator“.

Complete the installation process. Open the StreamLabs and log in with your credentials.
Your problem should be solved.