Have trouble fine-tuning your Thrustmaster racing wheels from the Thrustmaster Control Panel? You have made all the right adjustments and still, something feels off. Don’t worry. You aren’t alone. Many ThrustMaster users are having the same issue with the Control Panel. So, we have stepped up and delved deep right into this matter and got some unique solutions to the problem. Just follow these steps and you will be back to the driving seat in no time.
Fix 1 – End the Thrustmaster processes
Terminate all the Thrustmaster processes running in the background on your system using Task Manager.
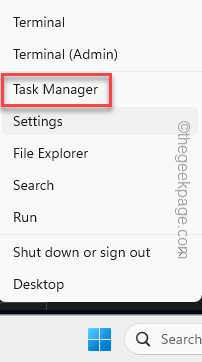
Step 1 – Hold the Win+X keys at once.
Step 2 – Now, click the “Task Manager” to open that up.
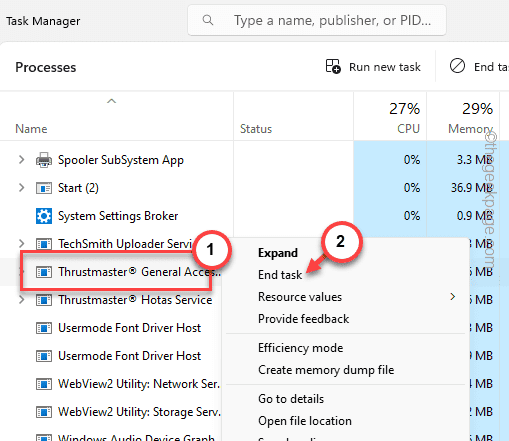
Step 3 – There should be Thrustmaster processes running in the background.
Step 4 – Next, right-click the first Thrustmaster process and click “End task” to kill that.
Step 5 – Following the same procedure, kill all those Thrustmaster processes.
After this, relaunch the Thrustmaster Control Panel. This time, you won’t face any errors or the Thrustmaster Control Panel will work correctly.
Fix 2 – Repair Thrustmaster components
There is a slim chance that the Thrustmaster components have got corrupted and that is the reason why the Control Panel is not functioning properly.
Step 1 – At first, hold the Windows and the R buttons together.
Step 2 – Next, type this and hit “OK“.
appwiz.cpl
Step 3 – Find the Thrustmaster software in there.
Step 4 – Next, just right-click that and tap “Change” to initialize the repairing process.
Wait until the Thrustmaster repair module loads up.
Step 5 – Make sure to select the “Repair” operation in there.
Step 6 – After this, hit “Next” to proceed further.
This will start repairing the Thrustmaster components on your computer.
Step 7 – After finishing the process, tap “Finish” to complete the process.
Go on and tweak the Thrustmaster controller once more.
Fix 3 – Automate the Thrustmaster services
Several Thrustmaster services need to be tuned to be automated on your system.
Step 1 – Start by searching “services” from the search box.
Step 2 – Next, click the “Services” panel to open that up.
Step 3 – Let the Services page open up. Next, find the “Thrustmaster General Accessories Service” in there.
Step 4 – Just right-click that and click “Properties“.
Step 5 – Next, switch the ‘Startup type:’ to “Automatic” mode.
Step 6 – Make sure the service is in ‘Running‘ condition.
Step 7 – Save these changes.
Step 8 – Coming back to the Services panel, look for any other Thrustmaster service in there.
Step 9 – You have to automate any Thrustmaster services that you may find in Services.
Quit the Services panel after this.
After this, try to tweak some functionality of the Thrustmaster controller and test it out.
Fix 4 – Check for Thrustmaster firmware updates
Thrustmaster updates the firmware of the controller frequently. So, check whether the firmware needs an update and update it.
Step 1 – To do this, open up a Run panel.
Step 2 – To open the Game Controllers menu, type this and hit click “OK“.
joy.cpl
Step 3 – Now, you will see the joystick there. Select that and tap “Properties“.
Step 4 – As the Thrustmaster console loads up, tap “Check for updates” to check for driver updates.
After this, Thrustmaster will check for the latest update and install that.
Fix 5 – Uninstall and reinstall Thurstamster packages
Uninstall the Thrustmaster packages from your device and reinstall the same on your system.
Step 1 – Go to your system Settings.
Step 2 – Select the “Apps” from the left pane.
Step 3 – Next, click “Installed apps” on the opposite side of the Settings.
Step 4 – Either you can perform a search for the “Thrustmaster” drivers or you can manually scroll down to find them.
Step 5 – Finally, click the three-dot button and click “Uninstall“.
This will launch the Thrustmaster setup utility.
Step 6 – Select the “Remove” radio dialog box and tap “Next“.
This shall automatically clear all the Thrustmaster-associated components from your computer.
Step 7 – Finally, tap “Finish” to complete the whole process.
Step 8 – Coming back to the list of installed apps, look for any other Thrustmaster utility and uninstall that as well.
You should close all the windows and reboot your computer.
Step 9 – Go to the Thrustmaster support center once you have rebooted the machine.
Step 10 – Tap the particular controller that you have (like Racing Wheels, Joysticks, Gamepads, etc.) to open it up.
Step 11 – After this, choose the specific device you have to open that specific product information.
Step 12 – Now, go to the “Driver” section and download the latest version of the driver (according to the OS version you are using).
Step 13 – Run this driver package on your system and complete the
This way, after installing the latest driver for the Thrustmaster controller, you won’t have any further issues with the Thrustmaster Control Panel anymore.
Fix 6 – Turn off xHCI mode
The xHCI mode and or EHCI can be the main cause of why you can’t get the most out of the Thrustmaster Control Panel.
Step 1 – Shut down the system as the first step.
Step 2 – Next, tap the Power button once to start that up.
Wait until the system boots up and shows up the manufacturing logo on the startup screen.
Step 3 – There, if you look closely, you will see the actual key that is bonded to the BIOS settings on your computer.
[Example – The functional buttons on the keyboard like F1, F2, F10, F12, or the Delete or End button are the keys that are to be used to access the BIOS settings.]
Use that to access the BIOS settings on your system.
Step 4 – When you get into the BIOS settings, go to the “Advanced” tab and find out the “USB Configuration“.
Step 5 – Now, scan the page for “EHCI Hand-off” and/or “XHCI Hand-off” features, and set those two to “Disabled” mode.
Step 6 – Save the changes in the BIOS settings.
As the system goes back to the normal startup, let it be and you should be at the Windows log-in console in no time.
The Thrustmaster Control Panel should behave normally again.
Fix 7 – Get rid of Windows updates
Was the Thrustmaster Control Panel working well before a Windows update? If that is the case, consider getting rid of the latest installed Windows Update.
Step 1 – To do this, launch a Run panel. Simply, press the Win+R keys quickly.
Step 2 – Simply, type this in the empty box. Hit Enter afterwards.
appwiz.cpl
Step 3 – Tap “View installed updates” to access that settings from the left-hand tab.
You will get to see the extensive list of installed updates installed on your system.
Step 4 – Next, right-click the most recent update and click “Uninstall” to start the process of uninstallation.
Now just follow the on-screen wizard and you don’t have to do anything else. Windows will automatically uninstall the update packages and restart the sytem, aftewards.
You won’t have any issues usign the Thrustmaster Control Panel any more.


