Windows 10 alerts you regarding different updates, changes, and important information by sending you a notification. On receiving a notification, you hear a sound and you see a banner along with a notification count at the bottom right side of the screen (message box icon). When you click on the message box icon, it opens up the Action Center, where you can see the message.
However, after the latest Windows Update, some users are reporting of notifications not working on their Windows 10 PC, however, the notification count keeps increasing. Since, the issue arise mainly due to Windows Update, you would need to enable a certain setting. Let’s see how:
Note: – Some users reported they solved this by Updating their windows 10 PC. Just Go to settings>Update & Security and check for updates and update your Computer.
Method 1: Restart Windows Explorer
Sometimes, a glitch in the Windows Explorer can cause issues with sorting of system files and generating notifications as the system may get confused between the timelines. Hence, restarting the Windows Explorer may fix the issue.
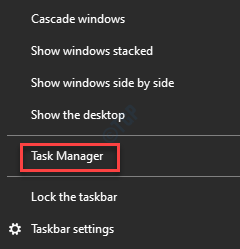
Step 1: Right-click on Taskbar and select Task Manager.

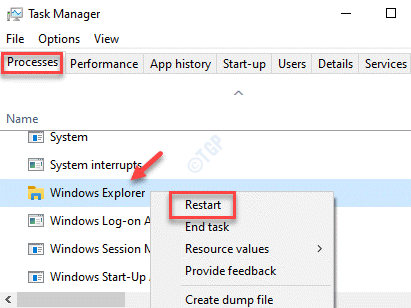
Step 2: In the Task Manager window, under the Processes tab, go to the Windows Processes section.
Now, look for the Windows Explorer process, right-click on it and select Restart.

As the Windows Explorer restarts, check if the Windows notifications are now working.
Method 2: Enable Let Apps run in the background
This method involves turning on the background apps option in the Settings app, which should then help you to see the notifications. Let’s see how:
Step 1: Press the Win + I keys together on your keyboard to launch the Settings app.
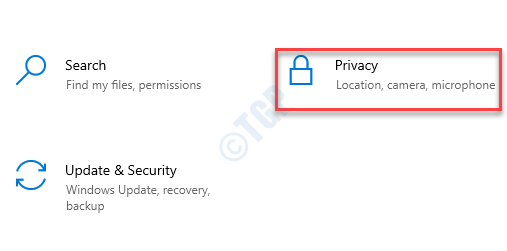
Step 2: In the Settings window, click on the Privacy option.

Step 3: In the next window, on the left side of the pane, scroll down and under the App permissions section, click on the Background apps option.

Step 4: Now, go to the right side of the pane and under the Background Apps section, turn on the Let apps run in the background option.

Now, exit the Settings app and check if the notifications are now working on your system.
Method 3: Turn on Notifications for Specific Apps
A lot of times, simply turning on the notifications on your Windows 10 should help fix the issue.
Step 1: Right-click on Start and select Settings to open the Settings app.

Step 2: In the Settings app, click on System.

Step 3: Now, on the left side of the pane, click on Notifications & actions.

Step 4: Next, go to the right side of the window and under the Notifications section, make sure that the Get notifications from apps and other senders is turned on.

Step 5: Now, scroll down to Get notifications from these apps sections.
Here, turn on any or all the apps from which you want to receive notifications.

Now, exit the Settings app and go back and check if you are receiving the notifications.
Method 3 – Reinstall Action centre
1 – Search Powershell in Search box of Windows
2 – Now, Right click and click run as administrator

3 – Now, copy and paste the command given below in Powershell and Press Enter key from keyboard
Get-AppxPackage | % { Add-AppxPackage -DisableDevelopmentMode -Register "$($_.InstallLocation)\AppxManifest.xml" -verbose }
4 – Close the powershell window.
Method 4: Performing an SFC Scan
There’s a possibility that the Windows 10 notifications has stopped working due to broken or corrupted system files, services, or drivers. In such cases, running a system file checker scan may help.
Step 1: Right-click on Start and select Run to open Run command.

Step 2: In the search field, type cmd and press the Ctrl + Shift + Enter keys together to open the Command Prompt in admin mode.

Step 3: In the Command Prompt (admin) window, execute the below command:
sfc /scannow

Now, wait for the process to complete as it takes a few minutes. It will detect any damaged or corrupt system files and if found, will automatically repair them
Once it’s over, exit Command Prompt and restart your PC. Now, you should start receiving the Windows 10 notifications again.
Method 5: Turn Off Fast startup
When the above methods fail to work, you may try performing a clean shutdown and see if it works. Let’s see how to perform a clean shutdown:
Step 1: Go to Start, right-click on it and select Run to open the Run command window.

Step 2: In the Run command window, type control.exe in the search field and press OK to open the Control Panel window.

Step 3: In the Control Panel window, go to the View by field and select Category from the drop-down next to it.
Now, select Hardware and Sound from the list.

Step 4: Next, go to the right side of the window and click on Power Options.

Step 5: In the next window, go to the left side of the pane and select Choose what the power buttons do.

Step 6: Now, in the System Settings window, click on Change settings that are currently unavailable link.

Step 7: Now, go to the Shut-down settings section and uncheck the box next to Turn on fast start-up (recommended).
Click on Save changes to apply the changes.
Now, exit Control Panel and shut down any open applications.

Step 8: Go to Start, select Power and then click on Shut down.

Once it’s completely shut down, turn on your PC again and check if you can now receive the notifications.
Method 6: Reconfigure Registry Settings
If the above method using the Registry Editor fails to resolve the issue, we can try to edit the Registry Editor manually and re-configure certain registry settings to fix the notifications not working issue on your Windows 10 PC.
Step 1: Press the Win + R shortcut keys on your keyboard to open the Run command window.
Step 2: In the Run command search field, write regedit and press OK to open the Registry Editor window.

Step 3: In the Registry Editor window, navigate to the below path:
HKEY_CURRENT_USER\Software\Microsoft\Windows\CurrentVersion\PushNotifications
Now, go to the right side of the pane and double-click on the ToastEnabled DWORD entry.

Step 4: In the Edit DWORD (32-bit) Value dialogue box, go to the Value data field and set it to 1 to turn on the notifications.
Press OK to save the changes and exit.

Step 5: Alternatively, you can turn on the notifications by changing the Value data to 1.
Then press OK to apply the changes.
*Note – If you the ToastEnabled DWORD entry does not exist, then create one using the below steps:
Step 1: Right-click on an empty area on the right side of the pane, select New and then DWORD (32-bit) Value.

Step 2: Rename the new DWORD value as ToastEnabled.

*Note – Make sure you create a backup of the registry settings, before you make any changes to the registry editor. This will help you restore any lost data during the process.
Method 7: Enable Settings Notifications in the Settings App
If the above method doesn’t work, you can enable all the important settings in the Settings app and see if it works. Let’s see how:
Step 1: Click on Start and select Settings (gear icon) to launch the Settings window.

Step 2: In the Settings window, select System.

Step 3: Next, select Notifications & actions on the left side.

Step 4: Now, navigate to the right side of the window and go to the Notifications section.
Here, make sure that you turn on the Get notifications from apps and other senders option.

Step 5: Now, click on the Settings app in the list.

Step 6: In the next window, turn on all the critical notifications options, for instance, Show notification banners, Show notifications in Action Centre, Play a sound when a notification arrives, etc.

Now, close the Settings window and check if the issue is resolved.
Method 8: Turn on/off Notifications via Registry
This method is a bit complicated process and hence, to make things simple, here’s a .bat file which you can download, double-click on the files in it and it will automatically turn on or turn off the notifications. Here’s how:
Step 1: Click on the below link to download the zip folder:
Step 2: Once the download is complete, open the zip folder and double-click on the file with the file name Turn_On_App_Notifications.reg.
If you see any prompts, confirm them to let them turn on the Windows notifications.

Now, go back and check if you are receiving notifications. You can then follow the Method 3 and turn on any or all critical notifications.
*Note – To turn off the notifications, double-click on Turn_Off_App_Notifications.reg file in the zip folder and the Windows notifications should be automatically turned off.
Method 9: Adding Action Center through Power Shell
Sometimes, the notifications may stop working if the Windows 10 Action Center has been turned off somehow. In this method, we will add the Action Center through Power Shell and see if it works.
Step 1: Press the Win + R keys together on your keyboard to launch the Run command window.
Step 2: In the Run command window, type PowerShell in the search field and press the Ctrl + Shift + Enter keys together to open the elevated PowerShell.

Step 3: In the PowerShell (admin) window, run the below command and hit Enter:
Get-AppxPackage | % { Add-AppxPackage -DisableDevelopmentMode -Register "$($_.InstallLocation)\AppxManifest.xml" -verbose }
This will add the Action Center to your Windows 10 PC. You can now check if this helps you receive the notifications.
Method 10: Run DISM Scan
It is also likely that your system’s drive or the partition got damaged due to some reason, thus, causing the notification not working issue. For this, running a DISM scan can help fix the issue.
Step 1: Press the Win + X shortcut keys and select Run.

Step 2: This will open the Run command window.
Here, type cmd in the search box and press the Ctrl + Shift + Enter hotkey to open Command Prompt with administrator rights.

Step 3: Now, run the below commands one by one in the Command Prompt (admin) window and hit Enter after each command:
DISM.exe /Online /Cleanup-image /Scanhealth
DISM.exe /Online /Cleanup-image /Restorehealth
The process takes a while, so wait patiently till it’s over. It will look up for any health issues with the driver or the partition and repair them automatically.
Once, the scan is complete, exit Command Prompt and reboot your PC.
The notifications not working issue should be resolved now.
Method 11: Create a Batch File to Restart Windows Explorer
While the Method 9 worked for many users, some users reported that they had to repeat the steps at frequent intervals for the notifications to work again. To avoid that, you can create a batch file that will automatically run on Windows every time and carry out these steps on its own.
Step 1: Go to desktop, right-click on an empty area, select New and then select Text Document.

Step 2: Open the Text Document and type the below text in it:
taskkill /f /IM explorer.exe
start explorer.exe
exit

Step 3: Now, go to the File tab on the upper left of the Text Document and select Save As.

Step 4: In the Save As window, select the location where you want to save the file. It’s usually the Desktop, so we selected the same.
Next, in the File name field, name the file as TaskMRestart.bat and select the Save as type field as All Files.
Hit Save to save the document and return to the text document.

Step 5: Exit the document and go to the Desktop.
Double-click on the document (.bat file) and it will automatically restart the Windows Explorer.
You can now check if the notifications are are working.
Method 12: Optimize Disk Drive
If the root partition of your PC where your Windows 10 OS is installed have got any bad sectors, you may try running the disk management tool and check if it resolves the issue:
Step 1: Right-click on Start menu and select Run to launch the Run command box.
 h
h
Step 2: In the search field, type diskmgmt.msc and hit Enter to open the Disk Management window.

Step 3: In the Disk Management window, right-click on the root drive from the installed partitions displayed under the Volume column, and select Properties.

Step 4: In the Properties window, select the Tools tab and press the Optimise button.

Step 5: You will now see a new window, Optimise Drives.
Here, select the root drive again from the Drives list and press the Optimise button below.

The defragmentation process will now start. Wait for it to finish and once completed, the notifications not worki ng issue should be gone.
Method 13: Hiding the Taskbar
One of the reason behind the Windows notifications error could be the Taskbar that may create the issue due to some glitch. Hence, hiding the Taskbar can help fix the issue. Here’s how:
Step 1: Right-click on Taskbar and select Taskbar settings.

Step 2: In the Taskbar settings window, go to the right side and turn off the option that says Automatically hide the taskbar in desktop mode.

Now, go back to desktop and check if the taskbar hides automatically.
The notification not working error should be fixed now.
Method 14: Low-Level Format on HDD
You may also encounter the notification issue due to a faulty HDD and hence, setting the HDD to a low level format can sometimes fix the issue. However, after completing the process, you will have reinstall Windows.
Step 1: Use a recovery drive to proceed with this method.
Once you boot using the recovery drive and reach the Choose an option screen, click on Troubleshoot.

Step 2: Next, in the Troubleshoot screen, click on Advanced Options.

Step 3: In the next screen, click on the Command Prompt option.

*Note – Before you proceed with the next step, make sure that you have a Windows installation media like a USB flash drive handy that you can use to reinstall Windows once the process is over. Also, make sure that you create backup of all the data.
Step 4: In the Command Prompt window, run the below command and hit Enter:
Format C: /P:4

*Note – Make sure that you replace the C: with the drive letter of the partition on your system where Windows is installed.
Step 5: Once the command execution is complete, use the bootable media to re-install Windows 10 on your PC.
Now, check if the notifications error is resolved.
Method 15: Uninstalling Updates
A lot of times, some error on your PC occur due to a recent Windows Update that may interfere with the notification system. You can try uninstalling these faulty updates and check if that works:
Step 1: Right-click on Start and select Settings to launch the Settings app.

Step 2: In the Settings window, click on Update & Security.

Step 3: In the next window, go to the right side of the pane and select View update history.

Step 4: Next, click on Uninstall updates and it take you to the Installed Updates window in the Control Panel.
Now, under Uninstall an update, right-click on the update and select Uninstall.

Wait for the uninstallation to get over and then restart your PC. You can now check if the notifications issue is resolved.
Method 16: Renaming UsrClass.dat File
If the user account data goes bad, it can trigger the notification error sometimes. Hence, in such cases, you can rename the file that has most of the data to generate a fresh file in its place.
Step 1: Press the Win + R shortcut key to open Run command.
Step 2: Copy and paste the below path in the search field and press Enter to open the folder location in the File Explorer:
%LocalData%\Microsoft\Windows
Step 3: In the folder location in the File Explorer window, select View from the tool bar, click on Show/hide and then select Hidden items.

Step 4: Now, in the Windows folder, check for the UsrClass.dat file.

Step 5: Rename the file as per your wish.
Now, exit the File Explorer and check if the Windows 10 notifications are working now.
*Note – If it shows that the file is still in use and it doesn’t allow you to rename the file, you can then try to rename the file using another user account. To reach the other user account, you can go to the below path:
C:\Users\%userprofile%\AppData\Local\Microsoft\Windows
There are quite a few other ways that you can use to fix the notification not working issue, in case, the above methods don’t work:
- Use a trusted third-party tool to do a smart defragmentation of your system partition and fix the issue.
- Check if there are any pending Windows updates and install them to check if this works.
- Uninstall the Akamai Netsession Client or the Dropbox from the Programs and Features window in Control Panel since these may trigger the notifications issue.
- Create a new user account and login to this account to see if the notification error is resolved.
- Try and reboot your PC a few times.
- Last but not the least, perform a system restore and see if it works.