Sometimes while using your computer you may see that the device is slowing down to high CPU usage. If you can access the Task Manager you will notice some of the processes are eating up a huge chunk of CPU resources on your computer. Simply follow the fixes on your computer and the CPU usage will be fixed in no time at all.
Also Read: How to Fix Windows 10 High CPU usage
Fix 1 – Use Task Manager
You can kill the processes that are consuming a huge chunk of processing power.
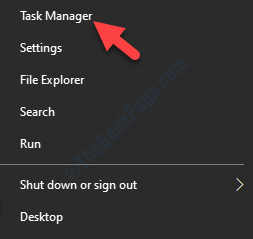
1. Press the Windows key+X.
2. After that, click on the “Task Manager“.

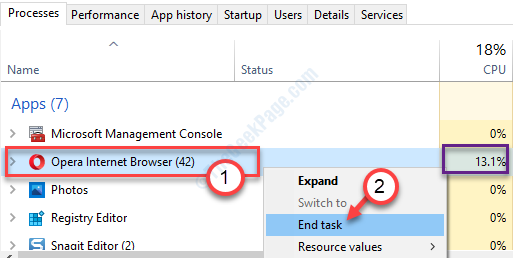
3. When the Task Manager opens up, check out the processes that are consuming higher processing power.
4. Right-click on the process and then click on “End task“.

After that, close the Task Manager and check if this solves the problem.
[NOTE– If any system process is consuming a high amount of CPU power, you can’t kill that process. In general cases, the system processes don’t consume a huge chunk of CPU power. Try other fixes if you are having trouble with system processes. ]
Fix 2 – Restore default settings in the Power Options
In most cases, the corrupted power settings can cause this problem on your computer.
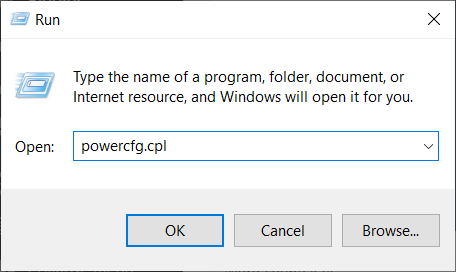
1. Press the Windows key+R.
2. After that, type “powercfg.cpl“. Hit Enter to access the Power Options settings.

3. When the Power Options window appears, check out which profile you are using (The power option which is checked is your current power profile).
(Example- The current Power Profile for this system is “Balanced“. )
4. Then, click on the “Change plan settings“.

5. After that, click on “Restore default settings for this plan“.

This should restore the default settings for the Power settings on your computer.
This should lower the CPU usage once again.
Fix 3 – Modify Power settings in CMD
If setting the power settings to default settings didn’t work you try this approach.
1. Press the Windows key+S.
2. Then type “cmd“. Right-click on the “Command Prompt” and click on “Run as administrator“.

3. In the CMD terminal, paste these codes one by-obe and hit Enter.
PowerCfg /SETACVALUEINDEX SCHEME_CURRENT SUB_PROCESSOR IDLEDISABLE 000
PowerCfg /SETACTIVE SCHEME_CURRENT

After executing these codes, close the terminal and restart your system.
Fix 4 – Modify Registry Editor
You can access the Registry Editor.
Warning – Registry Editor is a very sensitive location on your computer. Before you make any changes, we request to make a backup of the registry on your computer.
After opening the Registry Editor, click on “File“. Then click on “Export” to make a new backup on your computer.

1. Write “regedit” in the search box.
2. After that, click on the “Registry Editor” to access it.

3. Then, navigate to this registry location-
HKEY_LOCAL_MACHINE\SYSTEM\CurrentControlSet\Services\TimeBrokerSvc
4. On the right-hand side, double click on the “Start“.

5. In the Edit DWORD (32-bit) Value window, set the “Value data:” to “4“.
6. Click on “OK“.

After closing the Registry Editor, restart your computer and check if this solves the issue on your computer.
Fix 5 – Start the Application Management service
Starting the Application Management service may solve the problem on your system.
1. Click on the Windows icon and type “Services“.
2. Once you have done that, hit ‘Enter‘ from your keyboard.

3. Check the list of the services on your computer to find the Application Management service.
4. Then, double click on it to modify it.

5. Here you have to click on the ‘Startup type:‘ and set it to “Automatic” from the drop-down list.
6. To start the service if it hadn’t started yet, click on “Start“.

7. Finally, click on the “Apply“, followed by another click on “OK” to save.

Close the Services screen and check if this works for you.
Fix 5 – Turn off the Delivery Optimization
You have to turn off the Delivery Optimization on your computer.
1. Pressing Windows key+I.
2. You can access the “Updates & Security“.

3. Click on the “Windows Update“.
4. Then, click on the “Advanced options“.

5. Then simply scroll down and click on “Delivery Optimization“.

6. Then, set the ‘Allow downloads from other PCs‘ settings to “Off“.

Close the Settings window.
Reboot your compute once and check if this works for you.
Fix 4 – Run a full scan
Running a full scan on your computer.
1. Search for “Windows Security“.
2. Click on the “Windows Security”.

3. After that, click on the “Virus & threat protection“.

4. In here, click on the “Scan options” to view the possible scan options for your system files.

5. After that, click on the “Full scan“.
6. Next, click on the “Scan now“.

This scan process may take a while.
Fix 5 – Turn off the notification
Some Windows 10 users have exclaimed that the notification in the Windows 10 system may have caused the problem.
1. Press the Windows key+I.
2. Then, click on the “System“.

3. After that, click on the “Notifications & actions“.
4. Then, uncheck the “Get tips, tricks, and suggestions as you use Windows” settings.

Close the Settings window.
Check if this solves the issue on your system or not.
Fix 6 – Run SFC and DISM checks
SFC and DISM identify and fix the corrupt system files that may have caused the high CPU usage.
1. Press the Windows key+R.
2. Then type “cmd“. Press Ctrl+Shift+Enter together.

3. Simply type this code and hit Enter to run a simple SFC scan.
sfc /scannow

4. Now you have to run a DISM scan. To do so, copy-paste this command and then hit Enter.
Dism /Online /Cleanup-Image /RestoreHealth

Once both these scans are finished, reboot your device and check further.