Xbox app allows Windows users to play a large number of games on their PC. Many users have come across a situation where they are not able to launch any game in the Xbox app on their Windows 11 PC. There are many things that need to be working so that the Xbox games can be played like the different services, the Xbox app, and the operating system. If there is any issue with these then it stops your games from launching in the Xbox app.
Without bothering much about the cause of the problem, if you are encountering this issue where the Xbox app is not launching games on Windows 11, then read this post. Try the fixes mentioned in this post one after the other to check if it helps you resolve the issue and run the game on the Xbox app.
Fix 1 – Disable Game Mode
Step 1. Open the Settings app by pressing the Windows + I key combination on your keyboard.
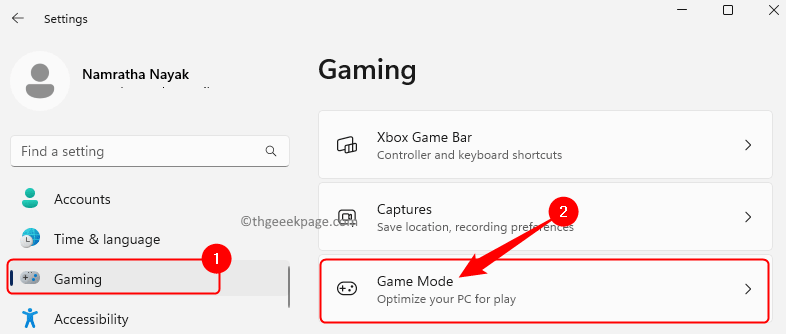
Step 2. Select the Gaming tab in the left pane.
Step 3. Moving over to the right, click on Game Mode.
Step 4. Now, turn off the toggle associated with Game mode.
Step 5. Close Settings and restart your computer.
Check if the issue with opening a game in Xbox app is fixed.
Fix 2 – Restart Xbox Services and Gaming Services
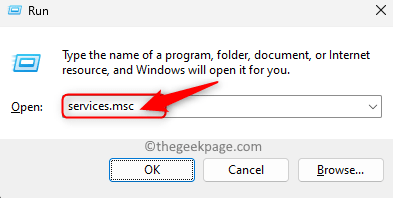
Step 1. Open the Run box by pressing the Windows and R keys simultaneously.
Step 2. Type services.msc and hit Enter to open the Services app.
Step 3. Locate the Gaming Services in the list of services displayed.
Step 4. Right-click on Gaming Services and choose Restart.
Step 5. Similarly, look for services related to Xbox.
Right-click on them and click on Restart.
Below are the services that need to be restarted.
Xbox Accessory Management Service
Xbox Live Auth Manager
Xbox Live Game Save
Xbox Live Networking Service
If any service is not running, then right-click on it and choose Start.
Step 6. Reboot your system and check if the issue still occurs or not.
Fix 3 – Repair or Reset Gaming Services
Step 1. Press Windows + R and type ms-settings:appsfeatures and hit Enter.
Step 2. On the Installed apps page, look for Gaming services using the search feature.
Step 3. Click on the three-dot menu associated with Gaming Services and choose Advanced options.
Step 4. Scroll down to the Reset section.
Step 5. First, click on the Repair button. Repairing the app will not make any changes to the application data.
Step 6. Restart your system and check if the issue is fixed.
Step 7. If it doesn’t fix the issue, then go back to the Advanced options page for Gaming Services as mentioned above.
Step 8. Then, scroll to the Reset section and click on the Reset button.
On the confirmation prompt, click on Reset again.
After resetting, the app will be in its default state.
Step 9. Restart your computer and check if the problem is solved.
Fix 4 – Modify the Registry
Before making any changes to the Registry, make sure that you create a backup of it so that it can be restored at any later point in time if you find some issues. Follow the method in this article to create a registry backup.
Step 1. Click on the Windows button on your taskbar and type registry in the search box,
Step 2. Select Registry Editor from the search result.
Click on Yes when prompted by UAC for permissions.
Step 3. Navigate to the path given below using the folders in the left panel.
HKEY_LOCAL_MACHINE\SYSTEM\CurrentControlSet\Services\GamingServices
Step 4. Right-click on the GamingServices key in the left panel and click on Delete.
Step 5. In the Confirm Key Delete dialog, click on Yes to delete the key along with its subkeys.
Step 6. Now, navigate to the location below.
HKEY_LOCAL_MACHINE\SYSTEM\CurrentControlSet\Services\GamingServicesNet
Step 7. Right-click on the GamingServicesNet key and choose Delete.
Step 8. Click on Yes to confirm the deletion of this key in the registry.
Step 7. Close the registry and restart your PC.
Check if the issue is resolved and if you are able to launch the game using your Xbox app.
Fix 5 – Check for Windows Update
Step 1. Press Windows + R to open the Run box.
Step 2. Type ms-settings:windowsupdate and hit Enter.
Step 3. On the Windows Update page, click on Check for updates.
Step 4. Windows will start checking for updates to Windows 11.
If any updates are available, you will need to download and install them.
Step 5. After the updates are installed, restart your PC and check if you are able to run the games on Xbox.
Fix 6 – Update Xbox App
Step 1. Hit the Windows key on your keyboard and type store in the search box.
Step 2. Click on Microsoft Store in the search result.
Step 3. Click on Library in the lower left corner of the Store window.
Step 4. Then, click on the Get updates button to check for updates to the Store apps installed on your computer.
Step 5. The MS Store will start checking for any newer versions of the Xbox app.
Step 6. After installing the latest version of Xbox, reboot your PC and check if the problem is resolved.
That’s it!
You must now be able to launch and play your favorite game in the Xbox app on your Windows 11 PC. Did you find this article useful enough in resolving this issue with the Xbox app? Comment and let us know your thoughts and the fix that worked for you.


