TeamViewer is software that allows remote access and control of other computers located at any place in the world. It works on all desktops as well as mobile platforms like Windows, Android, iOS, and macOS. Using TeamViewer, you can remotely log in to the other computer or mobile device and use them as though you are there in front of it.
Many users have reported seeing an error “Partner did not connect to router” while trying to connect to another computer using TeamViewer. Mostly, the error is seen when the partner computer is not connected to the network. But this can happen even when both computers are connected to the network. Problematic TeamViewer installation, versions of TeamViewer installed on the two computers are not the same, or inconsistent network connection or wrong configuration in the application may be some of the scenarios that trigger this error.
If you are confronting the “Partner did not connect to router” error message with TeamViewer and working to resolve it, then you need to read this article. Here, we have provided the different troubleshooting strategies that can be used to resolve the issue at hand.
Method 1 – Configure TeamViewer to Allow Full Access
Step 1. Launch the TeamViewer app.
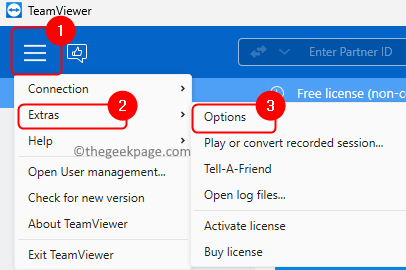
Step 2. Click on the button with three horizontal lines at the top left corner.
Choose Extras in the menu that opens.
Then, select Options to open the TeamViewer Options window.
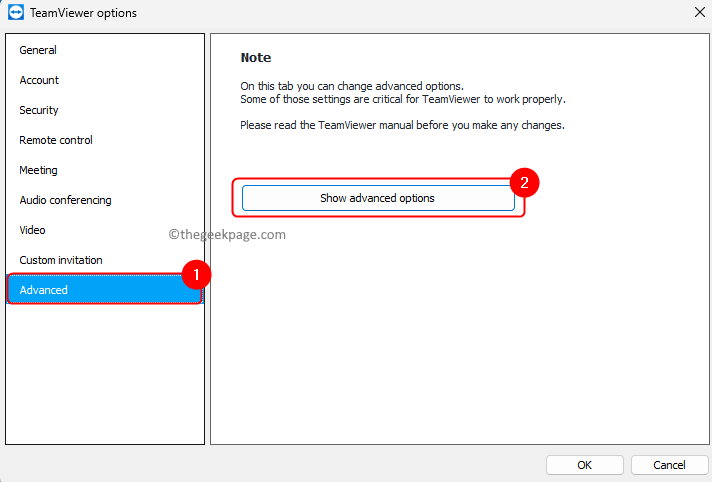
Step 3. Go to the Advanced tab in the left pane.
Step 4. Then, click on the Show advanced options button on the right side.
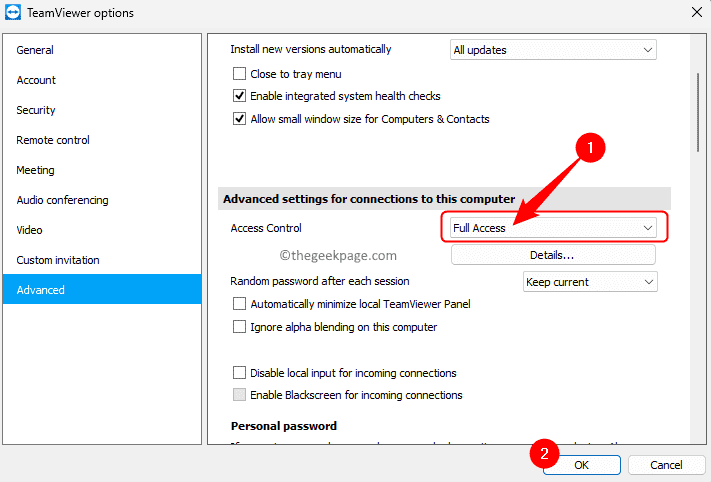
Step 5. In the Advanced settings for connections to this computer section, use the dropdown associated with Access Control and select Full Access.
Step 6. Finally, click on OK to save the changes.
Step 7. Close and reopen the TeamViewer app.
Check if the issue is fixed.
Note: The above method must be performed on both the computers that are trying to connect.
Method 2 – Flush the DNS Configuration
Step 1. Press Windows + R to open Run.
Step 2. Type cmd and press Ctrl + Shift + Enter to run Command Prompt as administrator.
Step 3. In the Command Prompt, type and execute the below commands one after another in the same sequence.
ipconfig /release

ipconfig /renew

ipconfig /flushdns
Step 4. Close the Command Prompt and check if you can connect to the partner computer without any error
Method 3 – Restart the network for both computers
Step 1. Disconnect your computer from the network.
Step 2. Remove the cable that is connected to your modem.
Step 3. Check that all the lights are off and let the modem be idle for one minute.
Step 4. Connect the cable to the modem and switch it on.
Step 5. Wait for the network connection to be re-established.
Step 6. Connect your computer to the network.
Try to create the TeamViewer connection and see if the issue is resolved.
Method 4 – Disable IPv6
Step 1. Open the Run dialog using Windows + R key combination.
Step 2. Type ncpa.cpl and hit Enter to open the Network Connections.
Step 3. Right-click on the current network adapter and choose Properties.
Step 4. In the Networking tab, uncheck the box next to Internet Protocol Version 6 (TCP/IPv6).
Step 5. Click on OK to save the changes.
Step 6. Perform the above steps on the partner computer and then check if you can connect using TeamViewer.
Method 5 – Check TeamViewer Version
Step 1. In the TeamViewer app, click on the three horizontal line menu at the top left corner.
Step 2. Click on About TeamViewer in the menu.
Step 3. Take note of the version number.
Step 4. Check the version of the app on the partner computer also to see if it is running the same version or not.
Step 5. Now, click on the menu and click on Check for new version.
Step 6. If any new version of TeamViewer is available, download and install it.
Make sure that both the computers in the connection are running the latest version of TeamViewer. Even if one of the computers has an outdated version, you will not be able to connect.
That’s it!
We hope you have been able to resolve the “Partner did not connect to router” error in the TeamViewer app on your Windows PC and are able to connect to the other computer. Did you find this article useful in resolving the TeamViewer error? Please comment and let us know the fix that worked for you.


