Microsoft introduced this service called Windows Update Medic Service (WaaSMedicSVC) in Windows 10 not so long back. The entire purpose of this service is to fix any damages suffered by the Windows Update components, so that you can continue to receive the Windows updates without any interruption. Therefore, the service is responsible for managing any repairs and for the safety of the Windows Update Components.
What is the SIH Client in Windows 10?
As you boot your Windows 10 system, the OS sets a task in the Task Scheduler on a daily basis and this daily task initiates the SIH client. The job of the SIH client is to identify any corrupt system components and accordingly repair them that are critical for the automatic update of any Windows and Microsoft program installed in your computer. The task actually goes online to check how relevant are the repairs, and then based on the analysis, it downloads the required fixes to complete the repair process.
Can We Turn Off the Windows Media Update Service?
Yes, if you want to disable the service at any time, you can, but when you try to disable it through the Service manager, it gives you an Access Denied prompt. Also, service is disabled only temporarily, as the Windows OS automatically turns the update on at some point.
How to Disable The Windows Update Medic Service
To disable the Windows Update Medic Service you can either use a freeware like a Windows Update Blocker or you can turn it off using the Registry Editor. Let’s see how.
Method 1: By Editing the Registry Editor
Before making any modifications to the Registry Editor, make sure you create a backup of the registry editor settings so that in case you lose in data, you can recover it easily.
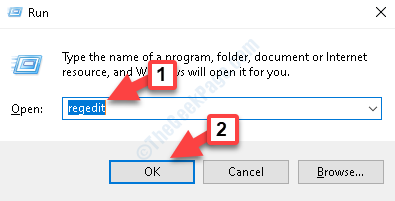
Step 1: Press the Win + R hotkey on your keyboard to open the Run command.
Step 2: In the Run command search field, type regedit and press OK to open the Registry Editor window.

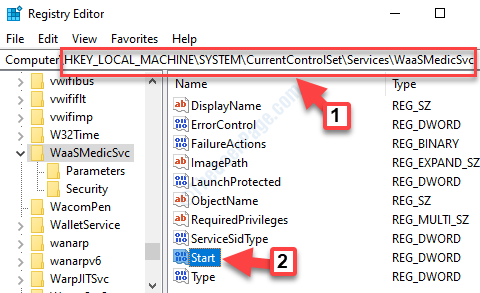
Step 3: Copy the below path and paste it in the Registry Editor address bar:
HKEY_LOCAL_MACHINE\SYSTEM\CurrentControlSet\Services\WaaSMedicSvc
On the right side of the pane, select Start.

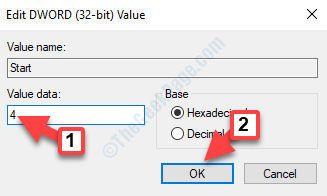
Step 4: Double-click on Start to open the Edit DWORD (32-bit) Value dialogue box.
Go to the Value data field to and change it from 3 to 4.

Exit Registry Editor and restart your system. The Windows Update Medic Service is now disabled.
Method 2 – Create a Batch file to disable it quickly
Windows 10 periodic updates override registry fix explained above. So, here is a method to create a batch file and keep it on desktop or any drive. Whenever , it gets started again, just click on this batch file and it will get disabled.
1. Open Notepad.
2. Copy and paste the text given below into the notepad.
echo Windows Update Medic Service
sc stop WaasMedicSvc
REG ADD HKLM\SYSTEM\CurrentControlSet\Services\WaasMedicSvc /v Start /f /t REG_DWORD /d 4
echo.


echo Servizio Windows Update
sc stop wuauserv
REG ADD HKLM\SYSTEM\CurrentControlSet\Services\wuauserv /v Start /f /t REG_DWORD /d 4
echo.


echo Aggiorna il servizio Orchestrator
sc stop UsoSvc
REG ADD HKLM\SYSTEM\CurrentControlSet\Services\UsoSvc /v Start /f /t REG_DWORD /d 4
echo.
3. Now, Click on File and then click on save as.

4. Now, Choose All Files in save as Type option.
5. Name this disablemedic.(You can name it as per your choice)

6. Now, whenever you want to disable , just click on this bat file.

Method 3: Using the Windows Update Blocker
Step 1: Click on the below link to go to download page. Now, locate Windows Update Blocker and click on it to download it:
Step 2: As soon as you click on the link, the download starts. Click to open the download file and then extract the file in your chosen folder.
Once completed, it will open the Windows Update Blocker box. Under Service Status, click on the Menu button.

Step 3: From the context menu, select Windows Services.

Step 4: It opens the Service manager window.
On the right side of the pane, under the Names column, locate Windows Update Medic Service.

Step 5: Double-click on the service to open its Properties window. Under the General tab, go to the Service name section and copy the name – WaaSMedicSvc.

Step 6: Now, go back to the folder where you have extracted the Windows Update Blocker software. Now, open the Wub.ini file in Notepad.

Step 7: In the Notepad, go to the Service List section and under dosvc=2,4 type WaaSMedicSvc=3,4.
Save and exit.

Step 8: Now, go back to the Windows Update Blocker box and press the Apply Now button to save the changes.

You have now disabled the Windows Update Medic Service.