Wondering how to hide or disable the microphone icon appearing on your taskbar? The microphone icon usually disappears from the taskbar just a while after you have connected your headphones. But, in some cases, the microphone icon is alleged to be appearing continuously on the taskbar, which can be very annoying.
Workarounds –
1. If you have multiple speakers or headphones attached to your system, this problem can appear. Unplug any unused microphone device from your computer and test.
2. Do you have a detachable mic? Windows may show the mic icon for brief few seconds after you plug it in. It is completely normal.
Fix 1 – Revoke the mic access of apps
The reason you are seeing the microphone icon on the Taskbar is some apps are using the microphone. So, you can revoke microphone access from unwanted apps.
Step 1 – If you hold the Windows and I key, you can open Settings.
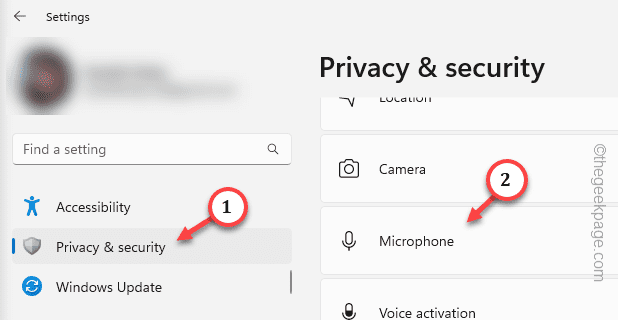
Step 2 – Head to “Privacy & Security” to open it.
Step 3 – Now, if you scroll down through the right-hand pane, you can open the “Microphone“.
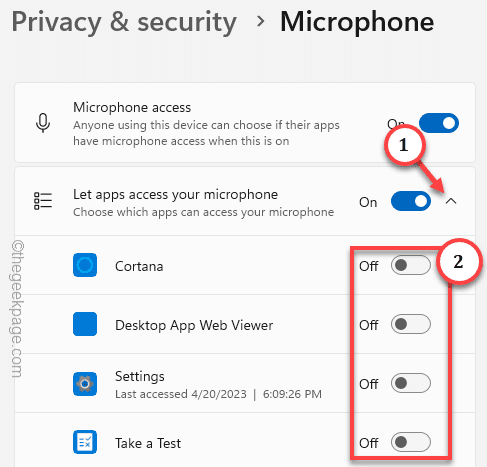
Step 4 – Here, you can see all the access you have given to the apps. To do that, you have to manually expand the “Let apps access your microphone” option.
Step 5 – Now, carefully revoke the microphone access from the apps you don’t want anymore.
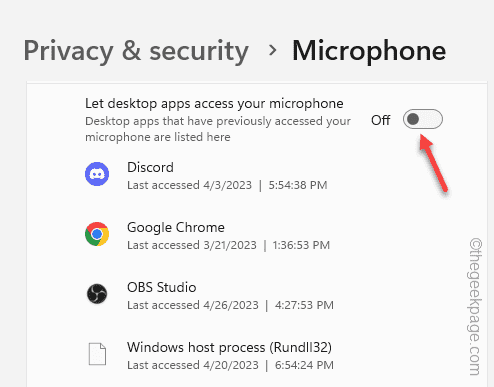
Step 6 (Optional step) – If you want you can go ahead and revoke the microphone access from the desktop apps.
In that case, scroll down through the same settings and toggle the “Let desktop apps access your microphone” to “Off” settings.
Quit the Settings.
Check whether you can see the microphone icon on the taskbar or not.
Fix 2 – Disable the mic via Device Manager
You can go one step further and put a stop on the microphone using the Device Manager.
Step 1 – Directly right-tap the Windows icon to get access to the power user menu. Click “Device Manager” on that menu.
Step 2 – You can view all your microphones in the “Audio inputs and outputs” section.
Step 3 – Directly, right-click the microphone and click “Disable device” to disable the microphone.
Step 4 – Windows will throw up a customary warning message. Ignore it and tap “Yes” to disable that.
This way, you can disable the microphone on your system.
No longer the microphone icon will disturb you on the
NOTE –
Wondering how to enable it? You can easily do that from the Device Manager page. You just have to right-click the microphone and tap “Enable device” to enable it.
Hope this has helped you resolve the issue.


