Windows 10 errors are common and errors related to Windows update are more common. So, when you try to install an update and you experience the Windows Update error 0x800f0984, it’s no surprise. This is yet another errors that prevents you from installing the latest updates for the smooth functioning of your Windows 10 system.
Moreover, you may also see an error message “PointPSFX_E_MATCHING_BINARY_MISSING (Matching component directory exists but binary missing)” sometimes preventing you from the installing the updates. Hence, we have come up with a few possible solutions that may help you fix the Windows Update error 0x800f0984. Here’s how:
Method 1: Clear SoftwareDistribution Folder
Follow the below instructions to execute the method:
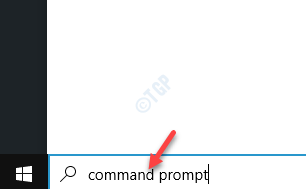
Step 1: Go to Start and type Command Prompt in the Windows search bar.

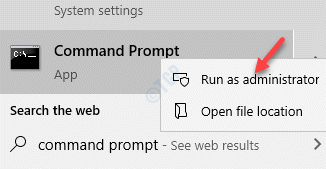
Step 2: Right-click on the result and select Run as administrator to launch the Command Prompt window with admin rights.

Step 3: In the Command Prompt window, type the below commands one by one and hit Enter after each command:
net stop wuauserv
net stop bits
Step 4: Now, wait till the process is over and you see the below message:
The Windows update service was stopped successfully.
Step 5: Leave the Command Prompt window open and press the Win + E shortcut keys on your keyboard to open the File Explorer.
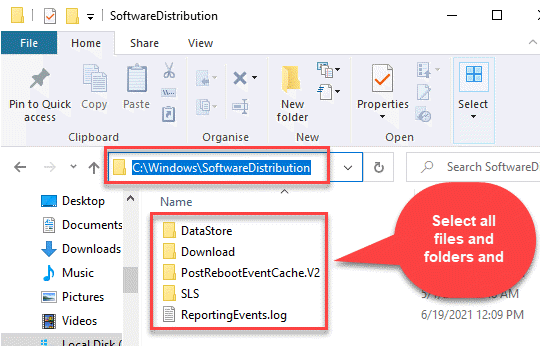
Step 6: In the File Explorer window, navigate to the below path:
C:\Windows\SoftwareDistribution
Step 7: Now, in the SoftwareDistribution folder, select all the files and folders in it and hit Delete.

Step 8: Return to the open Command prompt (admin) window and run the below two commands one after another and press Enter after each command to restart the two services:
net start wuauserv
net start bits
*Note – Alternatively, you an simply close the Command Prompt window and restart your system, and the two services will restart automatically.
Method 2: Reset Windows Update Agent Manually
Chances are, that you are experiencing the Windows Update error 0x800f0984 duet to corrupted Windows Update cache. The cache is known to store the files related to the Windows Update that help install the Cumulative patches. When any of these folders are broken, the DLL associated with the Windows Update automatically gets deregistered, thus, generating the error 0x800f0984. Here’s how you can fix it:
Step 1: Press the Win + R hotkeys to open the Run command box.
Step 2: In the search field, type cmd and press the Ctrl + Shift + Enter keys together on your keyboard to launch the elevated Command Prompt window.

Step 3: In the Command Prompt (admin), type the below commands one by one and hit Enter after each command:
net stop bits

net stop wuauserv

Del “%ALLUSERSPROFILE%\Application Data\Microsoft\Network\Downloader\qmgr*.dat”

cd /d %windir%\system32

regsvr32.exe atl.dll

regsvr32.exe urlmon.dll

regsvr32.exe mshtml.dll

regsvr32.exe shdocvw.dll

regsvr32.exe browseui.dll

regsvr32.exe jscript.dll

regsvr32.exe vbscript.dll

regsvr32.exe scrrun.dll

regsvr32.exe msxml.dll

regsvr32.exe msxml3.dll

regsvr32.exe msxml6.dll

regsvr32.exe actxprxy.dll

regsvr32.exe softpub.dll

regsvr32.exe wintrust.dll

regsvr32.exe dssenh.dll

regsvr32.exe rsaenh.dll

regsvr32.exe gpkcsp.dll

regsvr32.exe sccbase.dll

regsvr32.exe slbcsp.dll

regsvr32.exe cryptdlg.dll

regsvr32.exe oleaut32.dll

regsvr32.exe ole32.dll

regsvr32.exe shell32.dll

regsvr32.exe initpki.dll

regsvr32.exe wuapi.dll

regsvr32.exe wuaueng.dll

regsvr32.exe wuaueng1.dll

regsvr32.exe wucltui.dll

regsvr32.exe wups.dll

regsvr32.exe wups2.dll

regsvr32.exe wuweb.dll

regsvr32.exe qmgr.dll

regsvr32.exe qmgrprxy.dll

regsvr32.exe wucltux.dll

regsvr32.exe muweb.dll

regsvr32.exe wuwebv.dll

netshwinsock reset

net start bits

net start wuauserv
Step 4: Once the commands get executed, exit Command Prompt and reboot your PC.
You can now try installing the pending update and it should go through without any errors.
*Note – Alternatively, you can download the Reset Windows Update Agent tool as below:
Once you have downloaded the Zip folder, click to run the setup file and the diagnostics will start running in the command line to identify any issues with registry, Winsock, etc. Once the issues are detected, it will fix them automatically.
Try installing the update now and you should not experience the error anymore.
Method 3: Run System File Checker and DISM
A lot of times, the update error could be due to missing or corrupt system files. In such cases, using the System File Checker or the DISM (built-in tools in Windows 10) can help repair and restore the broken or missing files. Let’s see how:
Step 1: Press the Win + R keys together on your keyboard to launch the Run command window.
Step 2: Type cmd in the search field and press the Ctrl + Shift + Enter shortcut keys to open the elevated Command Prompt window.

Step 3: In the elevated Command Prompt window, run the below command and hit Enter:
sfc /scannow

Wait till the process is over. It takes a while so wait patiently till you get the success message.
Now, restart your PC and you should not get the error again while installing the update.
Method 4: Run the DISM Tool
DISM is a a command line utility that also comes built-in with Windows 10 that scans for any corrupt or broken Windows OS images and repair them if any found. Here’s how to run the DISM tool:
Step 1: Right-click on Start and select Run to open the Run command window.

Step 2: In the Run command search box, type cmd and press the Ctrl + Shift + Enter keys together on your key board to open the Command Prompt window in admin mode.

Step 3: Copy and paste the below command in the Command Prompt (admin) window and hit Enter:
Dism /Online /Cleanup-Image /ScanHealth

The process takes a few minutes to complete, so wait patiently till its over. Once open, close the Command Prompt window and reboot your PC. You can try installing the update and it should go through without any error.
Method 5: Manually Install Latest Cumulative Update
Sometimes, restarting your PC in clean boot mode can help fix some errors, as Windows starts with minimal drivers and startup programs. This helps resolve a lot of software issues that may arise when you install an update or a program. You can try installing the update in the clean boot state and it should go through, however, if it does not, you can try installing the latest cumulative update, manually.
Step 1: Click on the below link to visit the Windows Update History page:
Step 2: Now, go to the left side of the pane and select the current Windows 10 version on your system to expand the section.

Step 3: Next, note down the first cumulative update number (KB number)under it.

Step 4: Now, visit the Microsoft Update Catalog page and enter the KB number you noted in Step 3.
Press the Search button next to it.

Step 5: In the next page, you will see a list of results for the KB number you entered.
Here, click on the Download button next to the update based on your system architecture (32 bit/64 bit).

*Note – To know how to check if your Windows 10 PC is 32 bit or 64 bit, refer to this article.
Step 6: Once downloaded, click on the .exe file to open the set up file.
Follow the on-screen instructions to complete installing the update.
Method 6: Perform System Restore
When most of the methods don’t work, you can try performing system restore using a previously created system restore point. This way you can revert to a state when the system was working fine and you could install Windows update. The restore process takes a while, so wait till it’s done. Now, try installing the update and you should not encounter any errors.
Method 7: Reset This PC
You can try resetting the PC to see if it helps fix the issue:
Step 1: Press the Win + I keys together on your PC to launch the Settings window.
Step 2: In the Settings window, click on Update & Security.

Step 3: Next, on the left side of the pane, click on Recovery.

Step 4: Now, go to the right side of the PC and under the Reset this PC section, click on Get started.

Step 5: In the Reset this PC window that opens, click on Keep my files.

Now, let Windows complete the reset process. Once done, you should be able to install the pending update without any obstruction.
Method 8: Perform a Cloud Reset
If you are still unable to install the Windows Update, then there’s a possibility that your system has gone corrupt and hence, needs a different method to resolve the issue. In such cases, you can try Cloud Reset. It helps freset all Windows components and may fix the issue. Let’s see how to perform a Cloud Reset:
Step 1: Go to Start, click on it and select Settings (gear icon).

Step 2: It will open the Settings window.
Here, click on Update & Security.

Step 3: Next, on the left side of the pane, click on the Recovery option.

Step 4: Now, navigate to the right side and under the Reset this PC section, click on Get started.

Step 5: In the Choose an option window, select Keep my files or Remove everything option based on your requirement.

Step 6: Now, click on Cloud download.
Step 7: Click on Reset.
Once it’s over, you can continue to install the update without any error.