The Windows Defender is a security program provided with Windows to protect the PC from threats like Viruses, Malware, Spyware, and more. It may happen sometimes that the Windows Defender won’t start at all. There are several reasons behind Windows Defender not working in Windows 10 OR Windows 11, but it’s hard to pinpoint what exactly is the reason.
Here, we have compiled a list of solutions that will help you get the Windows Defender running back up on your PC. Know how to fix Windows Defender Won’t Start issue in Windows 10 & 11:
Solution 1 : Set date and Time Correctly
1– Press Windows key and R key together from your keyboard to open run.
2 – Now , type timedate.cpl in it and click OK.

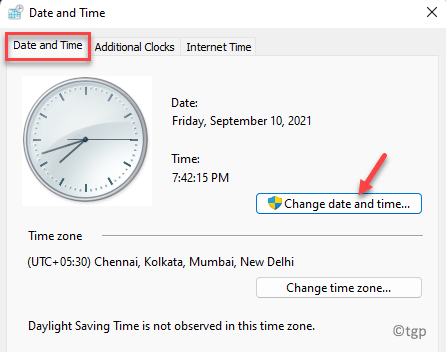
3 – Now, Make sure time and date are correct, if they are not correct, correct them.

To edit them , just click on Change date and time and correct them.
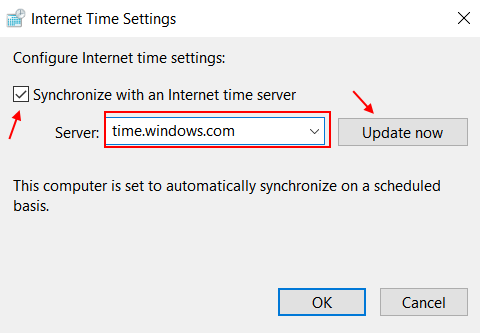
4 – You can also update time date to correct values using internet time servers. Just click on internet time tab.
5 – Check synchronization
6 – Select time.windows.com and click on update now.

Solution 2 – Change DisableAntiSpyware value data in Registry Editor
1 – Open Registry editor by searching Registry editor in Windows search box located in taskbar

2 – Now, go to the following location in Registry editor using address bar of registry editor. Just copy and paste the path pasted below in the Registry address bar.
HKEY_LOCAL_MACHINE\SOFTWARE\Policies\Microsoft\Windows Defender
3 – In the right side , Just locate and double click on DisableAntiSpyware key and Set the value data to 0 and click on OK.

Note: – If in the right side you can not find DisableAntiSpyware, just do a right click and choose New and then click on DWORD 32 bit value and name

Now, name it DisableAntiSpyware and then double click on it and change value data to 0.

Now, close the registry editor window and then Reboot your PC. After your PC starts again, try again.
Solution 3: Disable / Uninstall Antivirus
What was found to be the reason behind Windows Defender not starting in most cases was the presence of Antivirus Software on PCs. Antiviruses interfere with important Windows settings that could lead to conflicts like these. If you really want to run Windows Defender on your PC, the first thing you should do is Disable Antivirus on your PC. If this doesn’t work, you will have to uninstall the antivirus program from your PC.
Remember to uninstall the Antivirus software through a dedicated software remover tool. These tools ensure to remove software leftovers like useless files and undo unnecessary changes.
After uninstalling the antivirus, restart your PC and try to start Windows Defender. If it won’t start, try the next method.
Solution 4: Update Windows
According to many users, they weren’t able to start Windows Defender because the Windows 10 and 11 version installed on their PC was outdated. If you have an older version of Windows installed on your PC, update it and check for the issue.
Step 1: Press Windows key and R key together from your keyboard to open run.
Step 2 – Copy and paste the path given below and click OK.
ms-settings:windowsupdate

Step 3 – Now, Check for updates.
Solution 5: By Editing Local Group Policy
If your Windows Defender won’t start, then it might be possible that it is disabled by your PC’s Local Group Policy. To make sure that is not the case, you will have to access the Local Group Policy Editor. Follow the steps below:
Step 1: Open the Run box by pressing the Win + R keys, then type gpedit.msc and click on the Ok button.

Step 2: The Local Group Policy Editor window will open. Here, go to the left pane and navigate to the following location:
Computer Configuration > Administrative Template > Windows Components > Microsoft Defender Antivirus

Step 3: Go to the right pane and double-click on the Turn off Microsoft Defender Antivirus option. A new window will open; here, make sure that the Not Configured option is selected. Click on Ok and apply and exit the Local Group Policy Editor window.

Now, restart your PC and see if you are able to start Windows Defender.
Solution 6: Run SFC Scan
The SFC Scan is a command-line utility in Windows that scans for corrupt and broken system files on your PC. After the files are found, the tool also fixes them. It might be possible that you are unable to run Windows Defender because of system files with issues. Here are the steps:
Step 1: Open Command Prompt on your PC with elevated privileges. To do this, press Win + S, then in the Search Bar type cmd. Now right-click on the Command Prompt search result and click on the Run as administrator option.

Step 2: The Command Prompt window will open. Type the following command there and press the Enter key:
sfc /scannow
Let the scan run; it may take a while. When the scan is complete, restart your PC and try to run Windows Defender.
Solution 7: Do A Registry Cleanup
Another way to deal with the issue of Windows Defender not starting is by performing a Registry cleanup. There are many third-party tools available that can help you clean Registry in your PC. Running a Registry Cleanup will deal with unwanted and unnecessary entries in the Registry.
Solution 8: Check the Windows Defender Services
There are few services in Windows that are responsible for running the Windows Defender. You will have to check if these running and restart them, or you may have to change their Properties. Here’s how:
Step 1: Open the Services utility. For this, press the Win + R keys, then in the Run box that opens, type services.msc and press the Enter key.

Step 2: In the Services list, look for the following services and make sure they are running:
- Security Center
- Windows Defender Advanced Threat Protection
- Windows Defender Firewall
- Windows Defender Antivirus Network Inspection Service
- Windows Defender Antivirus Service
Once you have found these services, make sure they are running by checking the Status section. If any of these services is not running, select the service and press the Start button.

Step 3: In this step, you will have to restart the services that are already running. To do this, right-click on the service and select the Restart option and check if the Defender would start; if not, go to the next step.

Step 4: Double click on each of these services to open their Properties window. In the Properties window make sure the Startup type is selected as Automatic. If the startup type is set to something else, change it to Automatic. Click on Ok after making the changes and close the Services window.

Now, restart your PC and check if the issue was fixed.
Solution 9: Change Microsoft Directory Permissions
If the Microsoft directory in Windows doesn’t have appropriate permissions, you may not be able to start Windows Defender. Here are the steps to follow to make the changes:
Step 1: Open File Explorer on your PC and navigate to the following address:
This PC > Local Disk (C:) > ProgramData
There, locate the Microsoft folder, right-click on it and select the Properties option.

Step 2: In the Properties window, go to the Security tab and click on the Advanced option.

Step 3: In the new window that will open, look for Permission entries that are inherited. For this, check the Inherited from status of the permission entries. If any permission that was inherited, click on the Change permissions option and remove the permission entry.

After this, save the changes and exit the File Explorer, restart your PC and check whether you are able to start Windows Defender.
Solution 10: Do a Clean Boot
As reported by many users, performing a clean boot on their PC helped them get rid of this issue. It is a fairly simple process and has helped many users get rid of various Windows errors and issues like the Windows Defender not starting.
Here is how to Restart PC in Clean Boot Mode
After performing Clean Boot, check if you are able to run Windows Defender.
Solution 11: Create a New user Account
Here’s another fix that you can try if none of the above solutions worked for you. Go ahead and create a New User Account in Windows. After creating the new account, log off from your current user profile, and log in using the new profile.
Here is how to Create a New Local User Account in
If the Windows Defender won’t start using the new user profile, you can continue using your original profile. If the solution works, using the new account is advised.
Solution 12: Run a Registry Fix
In order to deal with the Windows Defender not starting issue, you can run a Registry fix on your PC. Here are the steps to follow:
Step 1: Open the Run box by pressing Win + R keys. Type regedit in the Run box and select Ok.

Step 2: In Registry Editor, go to the left pane and navigate to the following location:
HKEY_LOCAL_MACHINE > SOFTWARE > Microsoft > Windows Defender
Now, right click on the Windows Defender folder and click on the Permissions option.

Step 3: In the Windows Defender Permissions window, select the Advanced option.

Step 4: In the new window that opens, select the Change option available right beside the SYSTEM option.

Step 5: The Select User or Group window will open. Here, in the Enter the object name to select section, type Administrator and click on the Ok option.

Step 6: You will be taken back to the previous window. Here, select the Replace owner on subcontainers and objects checkbox. After that, go to the Permission entries section and double click on the Administrator entry.

Step 7: In the Permission Entry window that will open, select the Full Control checkbox and click on Ok. Again, press Ok then close the Registry Editor.

Step 8: Download the following ZIP file: DefenderFix. Unzip the ZIP file and run the DefenderFix.reg file that you will find in the unzipped folder. You will be prompted if you want to make the changes; select Yes.
Now, restart your PC and check if the Windows Defender is starting.
Solution 13: In-place Upgrade Windows
Carrying out an in-place upgrade of Windows could be your last resort to get rid of the Windows Defender not starting issue. An in-place upgrade means reinstalling Windows 10 over the currently installed operating system in order to replace the system files. While carrying out this upgrade, you get to choose whether you want to keep all the files on your PC.
Go ahead and download the Windows Media Creation tool on your PC.
Run the setup and select the Upgrade this PC now option.
Next up, select the Download and install updates (recommended) option.
Windows will now download the files on your PC that are required for the upgrade.
Now, follow the on-screen instructions and proceed with the installation. When prompted, make sure to select the Keep personal files and apps option.
A fresh version of Windows 10 will be installed on your PC now. You will be able to start Windows Defender on your PC.