The Networking Error 1068 in Windows 10 is associated with the Homegroup functionality. Microsoft got rid of the Homegroup feature in one of its updates; however, older builds of Windows 10 could trouble you with this error unexpectedly. The error message that usually shows up is Windows could not start the Peer Networking Grouping service on Local Computer along with Error 1068.
In this article, we take a look at the solutions to fix error 1068 in Windows 10.
Fix 1: Delete the idstore.sst File
One of the first things to try to get rid of the 1068 error is to delete the idstore.sst file from your PC. The solution requires only a couple of steps.
Step 1: Open File Explorer on your PC.
Step 2: Go to the following location:
C: > Windows > ServiceProfiles > LocalService > AppData > Roaming > PeerNetworking
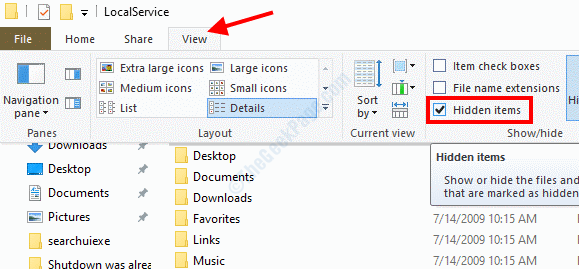
It might be possible that the AppData might be hidden in the LocalService folder. In that case, go to the View tab of the File Explorer, then select the Hidden items option.

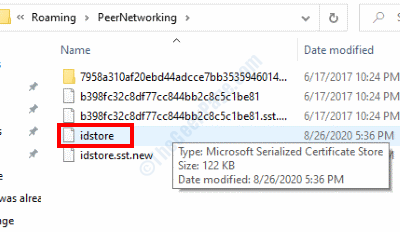
Step 3: Once you are in the Peer Networking folder, locate the idstore.sst file, delete it from your PC. You will see this file in the folder as idstore, and when you hover the cursor over it, you will see the file type as Microsoft Serialized Certificate Store file.

Once you have deleted the file, restart your PC and check for the error.
Fix 2: Make Sure the Peer Networking Services are Running
It might be possible that you are getting this error if the Peer Networking services in your PC are not running. To make sure, follow the steps below:
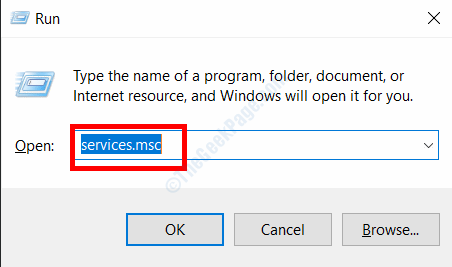
Step 1: Open the Run box by pressing the Win + R keys. In the box type services.msc and press the Enter key.

Step 2: In the Services window, look for the following services:
Peer Name Resolution Protocol
Peer Networking Identity Manager
Peer Networking Grouping
PNRP Machine Name Publication
Locate them, make a right-click and select the Start option.

Once you have made sure that the services have started successfully, the error 1068 issue would most likely be fixed.
Fix 3: Check the Peernet Registry Key
One of the Peernet Registry keys responsible for disabling it might be switched on. For this, you will need to access the Windows Registry Editor to make sure the Registry Key’s value is correctly set.
Step 1: Open the Registry Editor. For this, press the Win + R keys, then in the Run box that opens, type regedit , and press the Enter key.

Step 2: In Registry Editor, go to the left pane and browse the following location:
Computer > HKEY_LOCAL_MACHINE > SOFTWARE > Policies > Microsoft > Peernet
Step 3: Now, go to the right pane and double click on the Disabled entry. In the dialogue box that opens, see that the Value data is set to 0 (zero). If not, make it 0 and click on Ok.

If the value was set to 0 already, there was no issue with the Registry entry. If you had to change the value, did it fix the error?
Fix 4: Make sure Peer Networking is not disabled in Local Group Policy
One of the Local Group Policy settings could cause the Peer Networking Error 1068 in Windows 10.
Step 1: Open the Run box by pressing Win + R keys together. There, type gpedit.msc and click on Ok.

Step 2: When the Local Group Policy Editor window opens, go to its left panel and navigate to the following folder:
Computer Configuration > Administrative Templates > Network > Microsoft Peer-to-Peer Networking Services

Step 3: Now, go to the right panel and make sure that the state of Turn off Microsoft Peer-to-Peer Networking Services setting is set as Not Configured. In case the state is set to something else, double click on the Turn off Microsoft Peer-to-Peer Networking Services option. Then in the new window that opens, set the state as Not Configured.

After changing the Group Policy setting, restart your PC and check if the issue was solved.
Fix 5: Remove Files from MachineKeys Folder
Some of the users reported that removing files from the MachineKeys folder helped them get rid of the 1068 error in Windows 10.
Step 1: Open File Explorer in Windows and go to the following location:
C: > ProgramData > Microsoft > Crypto > RSA > MachineKeys
Step 2: Select all the files available in the directory and remove them. If possible, place the files somewhere else on your PC just as a backup.
Once the files are removed, restart your PC and see if the issue was taken care of.
Fix 6: Run the Homegroup Troubleshooter
Although Homegroup has been removed from the latest Windows 10, if you are using the older version of Windows 10, you can run the Homegroup Troubleshooter and fix the issue. Follow these steps:
Step 1: Press Win + S keys on your keyboard to initiate the Start search box. There, type homegroup and select the Homegroup option from the search result.

Step 2: The Homegroup window will open. There, click on the Start the HomeGroup troubleshooter option.

Now, wait till the troubleshooter looks for the issues and fixes them.
If you did not find the Homegroup option or running the troubleshooter did not work, go to the next solution.
Fix 7: Change MachineKeys Folder Security Permission
Another fix that could help you fix this issue is changing the security permissions of the MachineKeys directory.
Step 1: Open File Explorer and go to the following location:
C: > ProgramData > Microsoft > Crypto > RSA
Step 2: Here, right-click on the MachineKeys folder and select the Properties option.

Step 3: Next, when the Properties window opens, go to the Security tab and click on the Edit option under the Group or user names section.

Step 4: In the next screen, select the Everyone option under the Group or user names section. After that, in the Permissions for Everyone section, select the Allow checkmark in front of the Full control option.

After making the selection, click on Apply then Ok. Restart your PC and check if the 1068 error was fixed.
Fix 8: Run Get-NetConnectionProfile Command in PowerShell
Here’s a command that you could run in Windows PowerShell to get rid of Peer Networking Error in Windows 10. Here’s how:
Step 1: Press Win + X keys on Keyboard and select the Windows PowerShell (Admin) option.

Step 2: Type the following command in PowerShell window and press the Enter key:
PowerShell Get-NetConnectionProfile
Once the command has run successfully, restart your PC and check for the error.
Fix 9: Update Windows 10
Here’s a sure shot way to fix the Peer Networking Error 1068 in Windows 10. Go ahead and update Windows on your PC to the latest version.
Step 1: Open the Settings app on your PC by pressing the Win + I keys. In the Settings app select the Update & Security option.

Step 2: In the Settings window, go to the left pane and select the Windows Update option. Now, go to the right pane and click on the Check for updates button.

Now, the update tool will search the internet for the latest version of Windows and will ask for your permission to install it. Follow the on-screen instructions to install the update. Once Windows 10 will be updated to the latest version, the issue will be fixed.
Fix 10: Change Properties of Peer Name Resolution Protocol Service
By changing the properties of one of the Windows Services named Peer Name Resolution Protocol you can get rid of the 1068 error. To make the changes, follow the steps below:
Step 1: Open the Services application by following the procedure in Step 1 of Fix 2. In the Services window, look for Peer Name Resolution Protocol.

Step 2: Double click on the Peer Name Resolution Protocol service. In the new window that opens, go to the Log On tab. Here, in the Log on as: section, select the Local System account option. Apply the settings by clicking on Ok.

See if this works. If not, you can try the following method.
Step 3: In the Log On tab, select This account option. Then, in the username section type: Local Service and empty the password fields. Save the settings and exit to the Services screen.

Now, Stop and restart the Peer Name Resolution Protocol service and see if the issue was solved.
Fix 11: Check if the Following Services are Running
Here are some more Windows services that you can check if they are running. If any of them are not running, start them.
Step 1: Open the Services window by following Step 1 of Fix 2.
Step 2: In the Services list, look for the following Services. When found, check their status. If the service is not running, click on the Start option.
- Application Layer Gateway Service
- Network Connections
- Network Location Awareness (NLA)
- Plug and Play
- Remote Access Auto Connection Manager
- Remote Access Connection Manager
- Remote Procedure Call (RPC)
- Telephony
Fix 12: Disable/Uninstall Antivirus
It has also been reported that third party Antivirus applications were the reason behind the Error 1068. If you have an Antivirus installed on your PC, you should try to disable it and see if that helped the case. If not, you should also try to uninstall the Antivirus.
Antivirus software usually leave back registry entries and residue files on the system. In order to make sure these are not causing the trouble, uninstall the Antivirus using an Antivirus remover software. After completely removing the Antivirus, restart your PC and check for the issue.
Did these solutions help you get rid of the 1068 error on your PC? Let us know in the comments below.