While the Windows 10 updates are essential for the overall health and performance of your PC, it can also get some headache along. Errors and exceptions are some of the troubles that you have to face with every new update. “Unexpected Store Exception” with the Error code: 0x00000154 is one such pesky error that can be scary as it comes with the much-dreaded BSOD (blue screen of death). Even rebooting the PC every time does not help remove the error.
What’s unfortunate is, there’s no one reason why you encounter the BSOD. However, most of the times, the message “Unexpected Store Exception Error: 0x00000154” in your Windows 10 PC occurs due to an anti-virus software. While removing the anti-virus can help get rid of the error sometimes, many times it wouldn’t.
Here’s how to fix the Unexpected Store Exception Error: 0x00000154 in Windows 10.
Method 1: Through Power Options
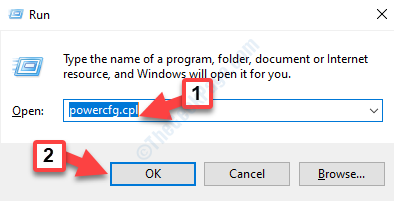
Step 1: Press the Win + R keys together on your keyboard to launch the Run command.
Step 2: Type powercfg.cpl in the Run command box. Hit Enter to open the Power Options window in Control Panel.

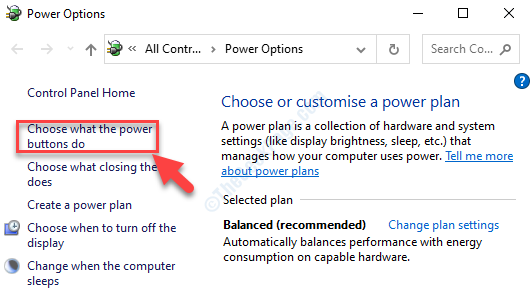
Step 3: In the Power Options window, go to the left side of the pane and click on Choose what the power buttons do.

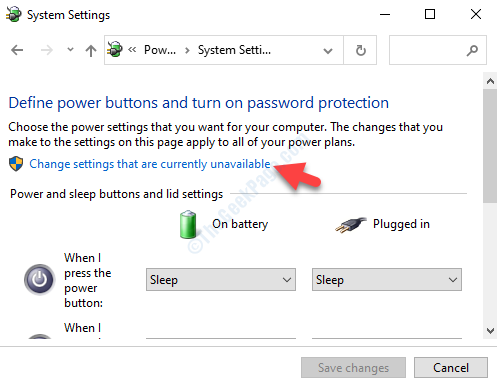
Step 4: Next, in the System Settings window, click to open the Change settings that are currently unavailable link.

Step 5: In the next window, scroll down and under Shut-down settings, uncheck the box next to, Turn on fast start-up (recommended).
Press the Save changes button below and save the changes and exit.

Now, reboot your PC and you should not see the error anymore. But, if this doesn’t resolve your problem, try the 2nd method.
Method 2: Using Powershell Command
Step 1: Right-click on the Start button and select Windows Powershell (Admin) from the context menu, to open Powershell with admin rights.

Step 2: In the Powershell (Admin mode) window, type the below command and hit Enter:
Get-AppxPackage -allUsers | Foreach {Add-AppxPackage -DisableDevelopmentMode -Register "$($_.installLocation)\appxbundlemanifest.xml"}

Once the process is complete, exit Powershell and restart your PC. You should not see the Error code: 0x00000154 anymore. However, if the problem persists, follow the 3rd method.
Method 3: By Running System File Checker Command
Step 1: Go to the Start button on your desktop and type Command Prompt in the search box.

Step 2: Right-click on the result and select Run as administrator from the menu, to open Command Prompt in admin mode.

Step 3: In the Command Prompt (Admin) window, run the below command and hit Enter:
sfc /scannow

Now, since the process takes a bit longer, wait for it to complete. It will automatically detect any corrupt files and repair them then and there.
Restart your PC and the error message should not show up anymore. But, if you are still facing the error, follow the 4th method.
Method 4: By Running the Check Disk Utility
Step 1: Go to the Start button on your desktop and type Command Prompt in the search box.

Step 2: Right-click on the result and select Run as administrator from the menu, to open Command Prompt in admin mode.

Step 3: In the Command Prompt (admin) window, execute the below command:
chkdsk c: /r

Close any programs that may be running and execute the command. It will take some time, so wait till it completes. Once completed, restart your PC and you should not see the error anymore.
Alternatively, you can try the 5th method.
Method 5: By Checking if There are any Updates
Sometimes, the error may also show up due to outdated drivers. In such cases, you may want to check if there are any latest driver updates.
Step 1: Press the Win + I keys together to open the Settings window. Click on Update & Security.

Step 2: In the Update & Security window, go to the right side of the pane and click on Check for updates.
If any updates available, click on Download and wait for it get installed automatically.

Once the update is complete, reboot your computer and the error should be gone.