So you are working on something urgent and have got all the windows open for the same. Your laptop is on battery power, and you have to grab your lunch, it’s already late. Turning your system off is a costly affair, thinking of closing the already open windows. Leaving the system open till your lunch is done would drain your battery too. Well, Sleep mode is your answer.
Sleep mode saves the state of your machine onto your system RAM and then shuts the machine. Though the machine might seem like it is completely turned off, it is still running, but on very low power mode. The moment you are back, your system comes back to life, opening all your previously opened windows and programs. Yes, of course, this is one of the best things windows has.
In this article, we give you 8 different ways using which you can put your computer to sleep. Go through them one by one, pick your favourite and do tell us in the comments section which one is your pick. Hope you enjoy!
Solution 1: Through the Start Menu Power Options
This is the most straightforward method using which you can put your Windows 11 computer to sleep.
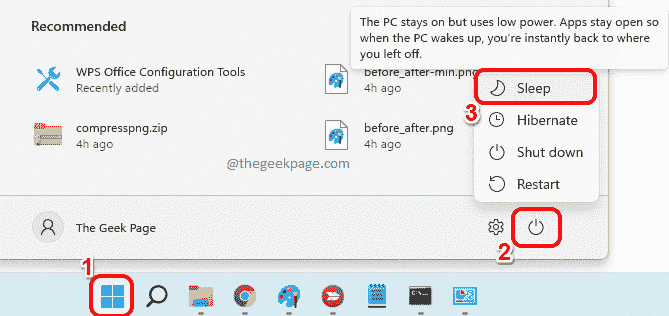
Click on the Windows Start menu icon, then click on the Power icon and then choose the Sleep option from the menu that expands out.
Solution 2: Through the Power User Menu
The power user menu is the menu that you see when you right click on the Windows Start menu icon.
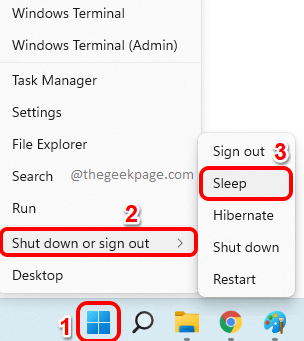
Right click on the Windows Start menu icon, click or hover over the option Shut down or sign out, and finally click on the Sleep option to put the computer to sleep.
Solution 3: Straight from Command Prompt
Step 1: Click on the search icon on the taskbar.
Step 2: Type in cmd and hit the Run as administrator option against Command Prompt to open it with admin privileges.
Step 3: Before we execute the command to put the computer to sleep, we need to make sure hibernate mode is turned off first. Else, the computer will hibernate instead of sleep. So, copy and paste the following command to turn off hibernate mode and then hit the Enter key.
powercfg -h off
Step 4: Finally, copy and paste the following command and hit the Enter key, which would instantly put your computer to sleep.
rundll32.exe powrprof.dll, SetSuspendState Sleep
Solution 4: From the CTRL + ALT + DEL Screen
You can put your computer to sleep from the CTRL + ALT + DEL screen as well.
Firstly, hit the keys CTRL + ALT + DEL to view your security options screen. Now, look at the bottom right corner of your screen to find the Power icon.
Click on the Power icon and then click on the Sleep option to put your machine directly to sleep.
Solution 5: By Using the Shortcut Keys ALT + F4
Step 1: Press the keys ALT + F4 simultaneously to open the Shut Down Windows mini wondow.
Here click on the dropdown arrow associated with the option What do you want the computer to do?
From the list of items, click on the option Sleep.
Step 2: Finally, hit the OK button to put your computer to sleep.
Solution 6: By Setting a Timer through Settings Application
Using this method, you can set a timer. When the timer goes off, your computer will be put to sleep automatically.
Step 1: Right click on the Windows Start menu icon and choose Settings application from the power user menu.
Step 2: On the left window pane, click on the System tile and on the right window pane, find and click on the tile named Power & battery.
Step 3: As next, under the header Power, click on the drop down arrow associated with the option Screen and sleep.
Step 4: Now you have the option to set a timer for different scenarios. The scenarios are as follows.
- On battery power, turn off my screen after
- When plugged in, turn off my screen after
- On battery power, put my device to sleep after
- When plugged in, put my device to sleep after
The first 2 options are to set timers to turn off your screen and the last 2 are sleep timers. By default, all the values are set to Never.
Step 5: Now, to put your computer to sleep after a particular period of time, click on the dropdown associated with the option you prefer, i.e., whether when on battery or when plugged in.
When the drop down menu expands out, giving you the possible timings, choose after how much time you want the computer to be put to sleep.
In the example below, I have chosen to put my computer to be put to sleep after 30 minutes when it is on battery.
Step 6: That’s it. Once the timer goes off, your system will automatically be put to sleep.
Solution 7: By Creating a Shortcut Key for Sleep Mode
Though this method requires some initial investment, once the shortcut is ready, this is one of the easiest methods using which you can put your computer to sleep.
Step 1: Right click on an empty space on the Desktop, click on New and then on Shortcut.
Step 2: In the Type the location of the item textbox, copy and paste the following location and hit the Next button.
C:\Windows\System32\rundll32.exe powrprof.dll,SetSuspendState
Step 3: In the next screen, give a name to your shortcut and hit the Finish button at the bottom.
Step 4: That’s it. You can now see that a Sleep shortcut is created on your Desktop, double clicking on which will put your machine to sleep.
Solution 8: By Creating a Hotkey Combination
In Solution 7, we learned how we can create a shortcut icon to put your computer to sleep. If we go 2 more steps, we can assign a hotkey combination for the sleep action, which will be even easier than clicking on the shortcut icon.
Step 1: Firstly, create a shortcut for your sleep action as detailed in Solution 7. Now, right click on the shortcut and then click on the Properties option.
Step 2: As next, click on the Shortcut tab at the top.
Now click on the text field associated with the option Shortcut key.
Step 3: Now, simply press any letter that you want to assign to the sleep action. CTRL + ALT will be added automatically by windows before your assigned key.
For example, if you want to set the key as S, simply press S. Windows will automatically add CTRL + ALT before it, making the hotkey combination as CTRL + ALT + S.
Once all done, hit the Apply button and then the OK button.
That’s it. Go ahead and try pressing CTRL + ALT + S keys together to put your computer to sleep straight away.
Please tell us in the comments section which one is your favourite. Though all the methods are equally effective and useful, our favourite is still Solution 1, going the conventional way.


