If you are using WiFi to connect, you can set Windows 10 and windows 11 to connect automatically with the WiFi as soon as you log in. However, many users complain of not getting connected to the WiFi automatically on Windows 10, despite the “Connect automatically” option being turned on.
There can be many reasons why this could happen. It could either be a Windows 10 Update that may be forcing the system to disable the WiFi, a change in the power saver options, disconnected LAN, or a simple malfunction. Whatever may be the reason, we have some solutions for this issue. Let’s see how to fix the WiFi not connecting automatically on Windows 10.
Method 1: set your WiFi Network to connect automatically
Case 1 – For Windows 11
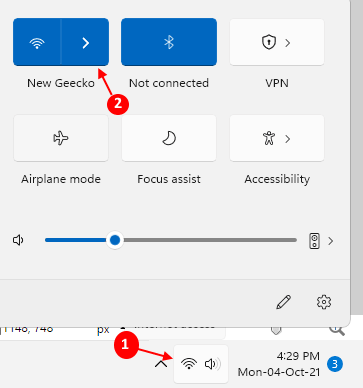
1 – Click on WiFi icon on Taskbar.
2 -Now, Click on > Sign located to the right of WiFi icon.
Click on Disconnect to disconnect the WiFi.

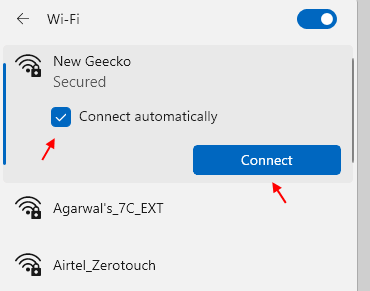
3 – Now, select the option connect Automatically
4 – Click on Connect.

Case 2 -For Windows 10
Step 1: Navigate to the network icon on your Taskbar (bottom-right), click on it and go to your WiFi Network.
![]()
Step 2: Right-click on your WiFi network and select Forget from the menu.

Step 3: Now, restart your PC and click on the network icon on your Taskbar to find your WiFi network.
Select your WiFi network and check the box next to Connect automatically. Press the Connect button.

Now, simply add your password and your PC should now connect to the WiFi network automatically each time you restart.
However, if the problem persists, follow the 2nd method.
Method 2: By Modifying the Power Saver Options
Step 1: Press the Win + X keys together on your keyboard and select Device Manager from the menu.

Step 2: In the Device Manager window, go to Network adapters and expand it.

Step 3: Now, select your WiFi adapter and right-click on it. Select Properties from the context menu.

Step 4: In the WiFi adapter’s Properties window, go the Power Management tab. Now, uncheck the box next to Allow the computer to turn off this device to save power.
Press OK to save the changes and exit.

N ow, whenever you start your computer, it should connect to the WiFi automatically. If it still doesn’t, follow the 3rd method.
Method 3: By Turning Off the Microsoft WiFi Direct Virtual Adapter
Step 1: Press the Win + X keys together on your keyboard and select Device Manager from the menu.

Step 2: In the Device Manager window, go to the View tab on the top and select Show hidden devices from the menu.

Step 3: Now, go to Network adapters and expand it.

Step 4: Under Network adapters, right-click on Microsoft Wi-Fi Direct Virtual Adapter and select Disable from the right-click menu.

Step 5 – Also Disable microsoft hosted network virtual adapter similarly.
Simply reboot your PC and you should not see the error anymore. In fact, now every time you start your PC, the WiFi should get connected automatically on your Window 10 system.
*Note – Disabling Microsoft Wi-Fi Direct Virtual Adapter may prevent you from using your Mobile hotspot automatically. Also, if this method doesn’t solve your issue, then make sure you Enable the feature again.
Method 4: Create or Make Changes to the Registry Editor via a command
Step 1: Search cmd in Windows search.
Step 2 -Now, right click on search result and click on run as administrator

Step 3 – Now, run the command given below.
reg add HKLM\Software\Policies\Microsoft\Windows\WcmSvc\GroupPolicy /v fMinimizeConnections /t REG_DWORD /d 0
Step 4 -Close the cmd window
Now, restart PC.
Now, simply restart your PC and the WiFi not connecting automatically on Windows 10 issue should be gone. But, if you still encounter the issue, follow the 4th method.
Method 5 – Edit Group Policy settings
1 – Search Edit Group Policy Editor in search box of Windows PC.
2 -Now, click on Edit Group Policy from the search result.

3 -Now, browse to the following location in GPEDIT.MSC
- Computer Configuration
- Administrative Templates
- System
- Internet Communication Management
- Internet Communicating Settings

4 – In the right side Find Turn off Windows Network Connectivity Status Indicator active tests. Double click on it and choose Not Configured. Finally click on Apply and OK.

Now, try again
Method 6: Empty Wlansvc Folder
1 – Search Services in Windows search box and then click on Services icon showing up in search.

2 – Now, find WLAN AutoConfig service and Right click on it and choose stop to stop the service

3 -Now, make sure hidden files are being shown on your PC. If Not, then Unhide all hidden files using steps shown in this article here
4 -Now, go to :-
- C:
- ProgramData
- Microsoft
- Wlansvc
5 – Select all files inside Wlansvc folder and delete them

6 -Now, again go to services, Locate WLAN AutoConfig service , right click on it and select start to start it again.

Now, check whether your problem gets resolved or not
Method 7: By Running the Network Troubleshooter
Step 1: Go to the network icon on the taskbar, right-click on it and select Troubleshoot problems from the right-click menu.

Step 2: Let the process complete and then follow the instructions to detect the issue. Once detected, it will fix the issue automatically.
Restart your PC and see if the issue is gone. If the problem is still there, follow the 5th method.