There is a hidden feature in all Windows versions (7 or later) that can hide files and folders from your File Explorer (by using the terminal). There is an easy way you can unhide these hidden files in the File Explorer in Windows 11. In this article, we will explain how to show the hidden files in File Explorer of Windows 11.
Warning –
Windows by default hide the system files and some additional necessary folders to protect those from external interference. So, we suggest NOT to unhide these system-protected files as it may lead to a fatal error that may irreversibly brick the system.
How to show hidden files and folders in Windows 11
Windows hide all the hidden files in File Explorer. But, there are additional settings you have to adjust in order to
Follow these steps to view the hidden files and folders.
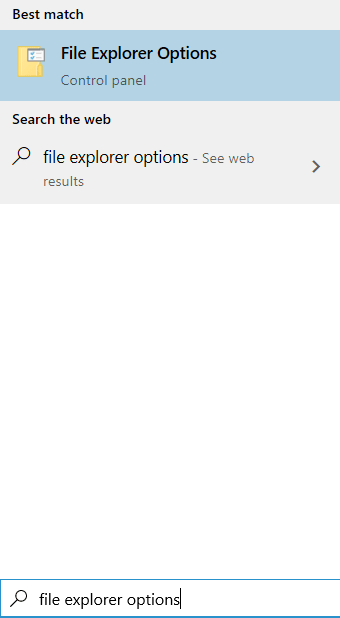
1. Search File explorer options in Windows search and then click on File explorer options from search result.

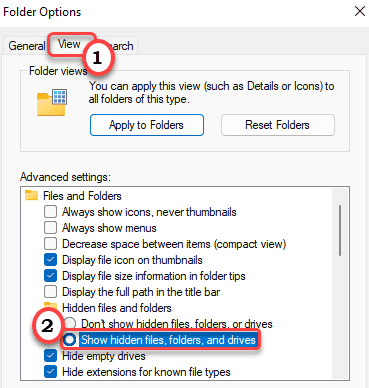
2. Then, click on the radio button beside the option “Show hidden files, folders, and drives“.

3. Finally, click on “Apply” and “OK” to save this change.

Now, just relaunch the File Explorer once. Now, check if you can see any hidden files and folder files.
How to Unhide the System Protected files
There is one additional step that you can use to unhide the system-protected files on your computer.
1. Open the File Explorer.
2. Agin tap on the three-bar option on the menu bar.
3. Then, tap on the “Options“.

4. Now, in the ‘Folder Options’ window, go to the “View” section.
5. Here, just uncheck the “Hide protected operating system files (Recommended)” option.

6. As soon as you click on the option to uncheck it, you will receive a warning message.
7. Just click on “Yes“.

8. After unchecking the option, don’t forget to click on “Apply” and “OK” to save it.

Just re-launch the File Explorer. Now, you will have full access to all the hidden files on your computer.
How to hide the system protected files in Windows 11
As we have mentioned before, you should not keep the system-protected files visible in File Explorer. So, you should just re-hide those again.
1. At first, open the File Explorer.
2. After that, click on the three-bar option at the end of the menu bar.
3. Then, click on the “Options“.

4. In the ‘Folder Options’ window, go to the “View” section.
5. Then, click on the radio button beside the option “Don’t show the hidden files, folders, and drives“.
6. Same way, check the “Hide protected operating system files (Recommended)” option.

6. Don’t forget to click on “Apply” and “OK” to save these changes.

This will hide the system-protected files.